- sales/support
Google Chat:---
- sales
+86-0755-88291180
- sales01
sales@spotpear.com
- sales02
dragon_manager@163.com
- support
tech-support@spotpear.com
- CEO-Complaints
zhoujie@spotpear.com
- Only Tech-Support
WhatsApp:13246739196
- Purchase/Shipping/Refund
WhatsApp:13424403025
- HOME
- >
- ARTICLES
- >
- Common Moudle
- >
- LCD
OLED Draw
Image Extraction
Use Image2Lcd for extracting the image.
Run Img2Lcd.exe, click Open, select "my car.bmp", output data type: C array (*.c), scan mode: horizontal scan, output grayscale: monochrome.
The maximum width and height are determined by the actual value of the input image, here is 101 and 46. click Save to generate the corresponding array.
The specific settings are as follows: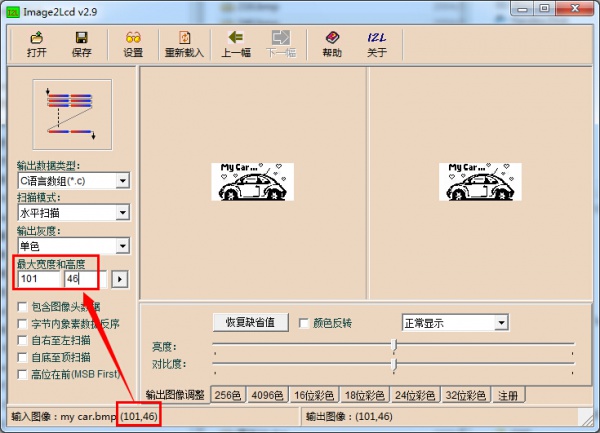
Here is an example of the default code.
Add the array generated above to Fonts. c.
const uint8_t c_my_car[598] = { /* 0X00,0X01,0X65,0X00,0X2E,0X00, */
0X00,0X00,0X00,0X00,0X00,0X00,0X00,0X14,0X00,0X00,0X00,0X00,0X00,0X00,0X06,0X30,
0X01,0XE0,0X00,0X00,0X2A,0X00,0X00,0XD8,0X00,0X00,0X00,0X0F,0X7B,0X63,0XE0,0X00,
0X00,0X22,0X00,0X01,0X24,0X00,0X00,0X00,0X0F,0XFB,0X63,0X07,0X34,0X00,0X14,0X00,
0X01,0X04,0X00,0X00,0X00,0X0D,0XDB,0X63,0X01,0XBC,0X00,0X08,0X00,0X00,0X88,0X00,
0X00,0X00,0X0C,0X1B,0X63,0X07,0XB0,0X00,0X00,0X00,0X00,0X50,0X00,0X00,0X00,0X0C,
0X1B,0X63,0XED,0XB0,0XDB,0X00,0X01,0X00,0X20,0X00,0X00,0X00,0X0C,0X19,0XE1,0XE7,
0XB0,0XDB,0X00,0X02,0X00,0X00,0X00,0X00,0X00,0X0C,0X19,0XE1,0XE7,0XB0,0XDB,0X00,
0X02,0X00,0X00,0X00,0X00,0X00,0X00,0X00,0X60,0X00,0X00,0X00,0X00,0X04,0X00,0X00,
0X00,0X00,0X00,0X00,0X03,0XC0,0X00,0X00,0X00,0X00,0X08,0X00,0X00,0X00,0X00,0X00,
0X00,0X00,0X00,0X00,0X00,0X00,0X00,0X08,0X05,0X00,0X00,0X00,0X00,0X00,0X00,0X00,
0X00,0X00,0X00,0X00,0X10,0X0A,0X80,0X00,0X00,0X00,0X00,0X00,0X0A,0X00,0X00,0XFF,
0XF8,0XE0,0X05,0X00,0X00,0X00,0X00,0X06,0XC0,0X15,0X00,0X1F,0XFF,0XFF,0XC0,0X02,
0X00,0X00,0X00,0X00,0X09,0X20,0X11,0X00,0XFB,0XFF,0XE1,0XF8,0X00,0X00,0X00,0X00,
0X00,0X08,0X20,0X0A,0X03,0X9F,0X00,0X9E,0X3E,0X00,0X00,0X00,0X00,0X00,0X04,0X40,
0X04,0X0E,0X70,0X00,0X81,0XC7,0X80,0X01,0X40,0X00,0X00,0X02,0X80,0X00,0X1D,0X80,
0X00,0XE0,0X61,0XE0,0X02,0XA0,0X00,0X00,0X01,0X00,0X00,0X77,0X9F,0XFC,0XF0,0X18,
0XF8,0X02,0X20,0X00,0X00,0X00,0X00,0X01,0XDF,0X00,0X00,0XF3,0X0C,0X3C,0X01,0X40,
0X00,0X00,0X00,0X00,0X03,0X9E,0X00,0X00,0XF8,0X06,0X1E,0X00,0X80,0X00,0X00,0X00,
0X00,0X07,0X0E,0X30,0X01,0XFC,0X7F,0X07,0X00,0X00,0X00,0X00,0X00,0X00,0X07,0X0E,
0X30,0X01,0XFC,0X7F,0X07,0X00,0X00,0X00,0X00,0X00,0X00,0X7E,0XFF,0XFF,0XFF,0XFF,
0XFF,0X83,0XC0,0X00,0X00,0X00,0X00,0X0F,0XFD,0XFF,0XFF,0XFF,0XFF,0XFC,0X01,0XF0,
0X00,0X00,0X00,0X00,0X3F,0X81,0XFF,0X00,0X00,0X00,0X00,0X1F,0XF0,0X00,0X00,0X00,
0X00,0XFE,0XF0,0X00,0X00,0X01,0X00,0X00,0XC0,0X1C,0X00,0X00,0X00,0X03,0XC0,0X07,
0X80,0X00,0X03,0XE0,0X07,0X00,0X1C,0X00,0X00,0X00,0X03,0X80,0X03,0X40,0X00,0X03,
0XE0,0X0C,0X00,0X0E,0X00,0X00,0X00,0X07,0X00,0X00,0XC0,0X00,0X00,0X20,0X18,0X00,
0X07,0X00,0X00,0X00,0X09,0X01,0X80,0X60,0X00,0X00,0X20,0X73,0X9F,0X03,0X80,0X00,
0X00,0X1E,0X0F,0XF2,0X20,0X00,0X00,0X20,0X67,0XFF,0XC1,0XC0,0X00,0X00,0X1E,0X1F,
0XF9,0X30,0X00,0X00,0X20,0XEF,0XFF,0XE0,0XE0,0X00,0X00,0X38,0X3F,0XFC,0X90,0X00,
0X00,0X20,0XCB,0XFF,0XF9,0XF0,0X00,0X00,0X7F,0X7F,0XFE,0X10,0X00,0X00,0X20,0XDB,
0XFF,0XFF,0XF0,0X00,0X00,0X6E,0XF9,0XBF,0X10,0X00,0X00,0X20,0XF7,0XED,0XFF,0XF0,
0X00,0X00,0X7C,0XFC,0X3F,0X10,0X00,0X00,0X20,0X67,0XE1,0XFD,0XE0,0X00,0X00,0X7C,
0XFC,0X3F,0X10,0X00,0X00,0X20,0X67,0XE1,0XFD,0XE0,0X00,0X00,0X38,0XFC,0X3F,0X18,
0X00,0X00,0X20,0X87,0XE0,0XFD,0XC0,0X00,0X00,0X38,0XF1,0X8F,0X18,0X00,0X1F,0XE7,
0X87,0X9C,0X7D,0XC0,0X00,0X00,0X1C,0XFE,0X1F,0X81,0XFF,0XFF,0XC0,0X0F,0XE0,0XFF,
0X80,0X00,0X00,0X0C,0XFC,0X3F,0X80,0X00,0X00,0X00,0X0F,0XE1,0XF8,0X00,0X00,0X00,
0X00,0XF9,0XBF,0XFF,0XFF,0XFF,0XFF,0XFF,0XEC,0XFE,0X00,0X00,0X00,0X03,0XF9,0XBF,
0XFF,0XFF,0XFF,0XFF,0XFF,0XFF,0XFF,0XC0,0X00,0X00,0X0F,0XFF,0XFF,0XFF,0XFF,0XFF,
0XFF,0XFF,0XFF,0XFF,0XC0,0X00,};
Add the following declaration to Fonts.h.
extern const uint8_t c_my_car[598];In main. c, just modify the code as follows.
#include "LIB_Config.h"


int main(void)
{
	system_init();

	ssd1306_clear_screen(0x00);//Clear the screen
	ssd1306_draw_bitmap(0, 0, &c_my_car[0], 101, 46);//display coordinates as (0, 0)
	ssd1306_refresh_gram();//Update GRAM

	while (1) {
	}
}
Specific code: 0.96inch-OLED-Code-Draw.zip
Expansion
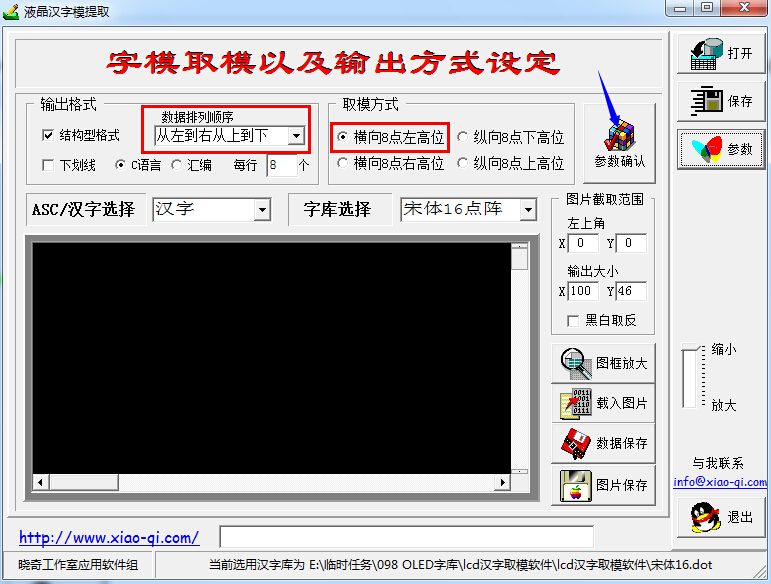
Similarly, the Chinese characters are taken in a similar way, here LcmZimo is used to take the mode, and the default settings are as shown below.
The red part is not modifiable, the others can be selected according to the actual needs, click to confirm the parameters, and then start to enter the corresponding Chinese string to take the mold. Use the display picture similar method to save to the project, call attention to the boundary of the array, such as the use of 16 dot matrix, then in the display picture size are set to 16.
Users can also modify the function ssd1306_draw_bitmap on the basis of the corresponding function to display Chinese characters.