


- sales/support
Google Chat:---
- sales
+86-0755-88291180
- sales01
sales@spotpear.com
- sales02
dragon_manager@163.com
- support
tech-support@spotpear.com
- CEO-Complaints
zhoujie@spotpear.com
- Only Tech-Support
WhatsApp:13246739196
- Purchase/Shipping/Refund
WhatsApp:13424403025
- HOME
- >
- ARTICLES
- >
- Jetson Series
- >
- Jetson Kits
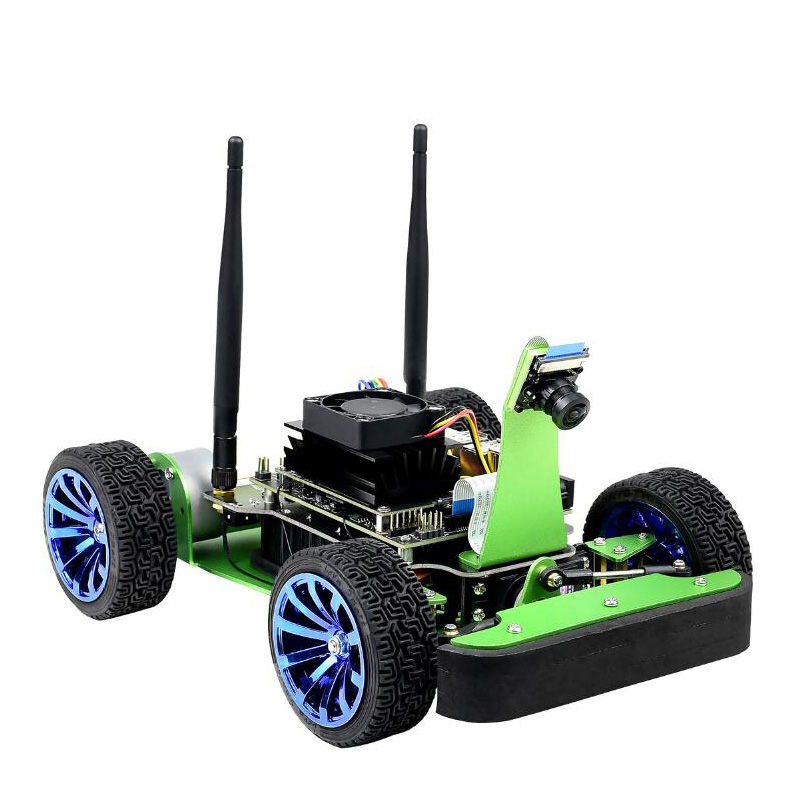
JetRacer AI Kit
Introduction
This is an AI Racing Robot kit based on Jetson Nano Developer Kit. Supports deep learning, auto line following, autonomous driving and so on.
User Guides
1. Hardware setup
2. Software setup
【Note】 The software part of this guide mostly based on NVIDIA JetRacer wiki , you can also refer to it
- Step 1. Write JetRacer image to SD card
- You need to prepare an SD card which should be at least 64G
- Download JetRacer image which is provided by NVIDIA and unzip it. Click here to download it
- Connect the SD card to PC via card reader
- User Etcher software to write image (unzip above) to SD card.Click here to download Etcher software
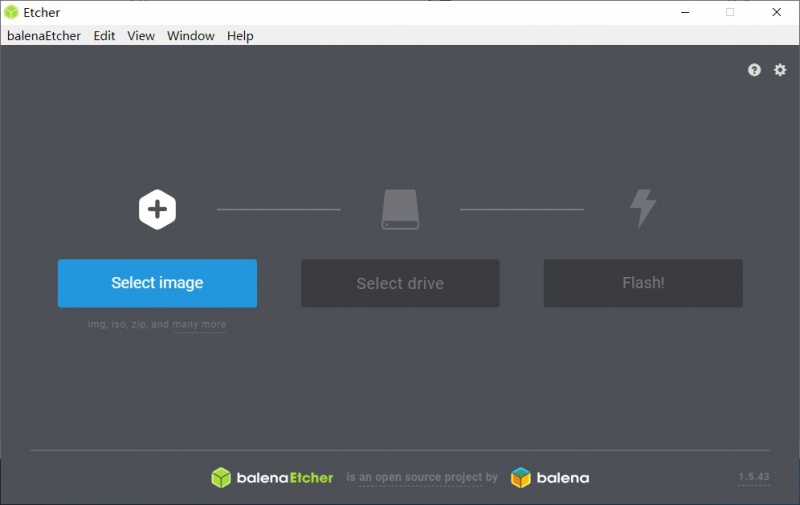
- After writing, eject the SD card
- Step 2. Startup Jetson Nano Developer Kit
- Insert SD card to SD card slot of Jetson nano (slot is under Jetson Nano board)
- Power on JetRacer AI Kit, and connect the micro USB interface of Jetson Nano Developer Kit to your PC
【Note】You had better test the Jetson Nano Developer Kit before you assemble JetRacer
- Step 3. Connect JeRacer to WIFI
All the examples use WIFI, we need to connect JetRacer to WIFI firstly.
- Open a browser (we recommend you to use Chrome) and navigate to 192.168.55.1:8888
- Sign in with default password jetson
- Open a terminal in Jupyter Lab by click File -> New -> Terminal
- In the terminal, type the following command to list available WiFi networks, and find the ssid_name of your network. You can also skip this step if you have known the available network.
sudo nmcli device wifi list
- Connect to the selected WIFI network. Please replace the <ssid_name> and <password> to the actual name and password.
sudo nmcli device wifi connect <ssid_name> password <password>
- After getting the successfully information, please check the ip_addtess of Wlan0 interface by the following command
ifconfig
- Step 4. Connect to JetRacer over WIFI
- Unplug the USB cable from Jetson Nano
- Close the previous Jupyter Lab Browser tab
- Open a new browser tab and navigate to http://<jetracer_ip_address>:8888
- Step 5. Install the python package
- Access JetRacer by going to http://<jetracer_ip_address>:8888
- Launch a new terminal. Default user name and password are both jetson
- Get and install the latest JetRacer repository from GitHub.The some of the python package provided here are modified by Waveshare for Waveshare JetRacer AI Kit.
- Update Jetcard Python
cd
sudo mkdir ws
cd ws
sudo git clone https://github.com/waveshare/jetcard
sudo cp jetcard/jetcard/ads1115.py ~/jetcard/jetcard/
sudo cp jetcard/jetcard/ina219.py ~/jetcard/jetcard/
sudo cp jetcard/jetcard/display_server.py ~/jetcard/jetcard/
sudo cp jetcard/jetcard/stats.py ~/jetcard/jetcard/
cd ~/jetcard
sudo pip3 uninstall jetcard -y
sudo reboot  #reboot and then install
cd ~/jetcard
sudo python3 setup.py install
- Install JetCam Python package
cd
sudo git clone https://github.com/NVIDIA-AI-IOT/jetcam
cd jetcam
sudo python3 setup.py install
- Install torch2trt Python package
cd
git clone https://github.com/NVIDIA-AI-IOT/torch2trt
cd torch2trt
sudo python3 setup.py install
- Install JetRacer package
cd
git clone https://github.com/waveshare/jetracer
cd jetracer
sudo python3 setup.py install
- Step 6. Configure power mode
To ensure that the Jetson Nano doesn't draw more current than the battery pack can supply, place the Jetson Nano in 5W mode by calling the following command
- You need to launch a new Terminal and enter following commands to select 5W power mode
sudo nvpmodel -m1
- Check if mode is correct
sudo nvpmodel -q
【Note】m1: 5W power mode, m2: 10W power model
3. Examples
- (1) Basic motion
- Access JetRacer by going to http://<jetracer_ip_address>:8888, navigate to ~/Notebooks/basic_motion/
- Browse to the folder ~/jetracer/notebooks in the Jupyter Lab file browser
- Open basic_motion.ipynb file and following the notebook
【Note】You can click icon ▶ to run codes, or select Run -> Run Select Cells. Make sure the JetRacer has enough space to run.
- Note
- If you get error when running the motion script, please open a new termial, resintall Adafruit-PureIO librares with following commands and try again.
sudo pip3 install --upgrade pip
sudo pip3 uninstall Adafruit-PureIO
sudo pip3 install Adafruit-PureIO
- (2) Teleoperations
- Access JetRacer by going to https://<jetracer_ip_address>:8888, navigate to ~/Notebooks/teleoperation/
- Open teleoperation.ipynb file and following notebook
- (3) Interactive-regression
- Navigate to https://<jetracer_ip_address>:8888
- Sign in with the default password jetson
- Browse to the folder ~/jetracer/notebooks in the Jupyter Lab file browser
- Open the notebook interactive_regression.ipynb and following it
- (4) Road-following
- Navigate to https://<jetracer_ip_address>:8888
- Sign in with the default password jetson
- Browse to the folder ~/jetracer/notebooks in the Jupyter Lab file browser
- Open the notebook road_following.ipynb and following it
