


- sales/support
Google Chat:---
- sales
+86-0755-88291180
- sales01
sales@spotpear.com
- sales02
dragon_manager@163.com
- support
tech-support@spotpear.com
- CEO-Complaints
zhoujie@spotpear.com
- Only Tech-Support
WhatsApp:13246739196
- Purchase/Shipping/Refund
WhatsApp:13424403025
- HOME
- >
- ARTICLES
- >
- Hot Articles
- >
- Banana Pi
Getting Started with CM4
Introduction
BananaPi BPI-CM4 new design with Amlogic A311D Quad core ARM Cortex-A73 and dual core ARM Cortex-A53 CPU ,ARM G52 MP4(6EE) GPU,NPU for AI at 5.0 TOPS, support Camera and MIPI-CSI interface ,HDMI output,2 Gigabit port . 4G RAM and 16 GB eMMC flash.
development
Prepare
- 1. Prepare a usb-serial cable, a 5V/3A adaptor type-c power supply. The serial cable is used for console debug and type-c cable is used for android image download and ADB debug.
- 2. Prepare a SDcard at least 8GB for linux development, android only support emmc boot.
- 3. The SOC rom first boot media is emmc, so board can't bootup from SDcard if the emmc is bootable with any image flashed, more info please refer to board
Android
Prepare
- 1. Download and install the AML Usb Burning Tool for android image download via type-c, only support windows.
- 2. Download the latest android image, and confirm that the md5 checksum is correct.
Install Image with Usb Burning Tool
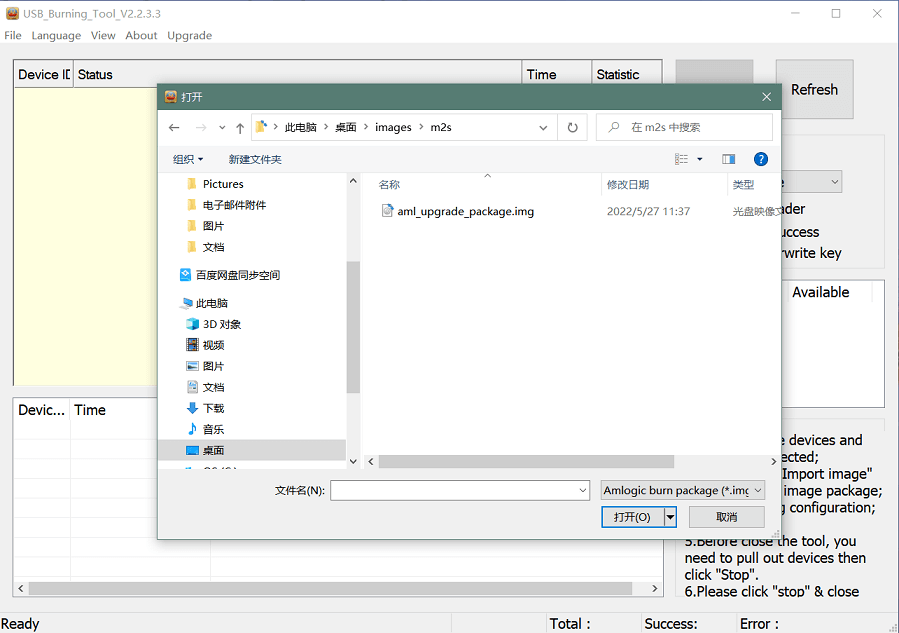
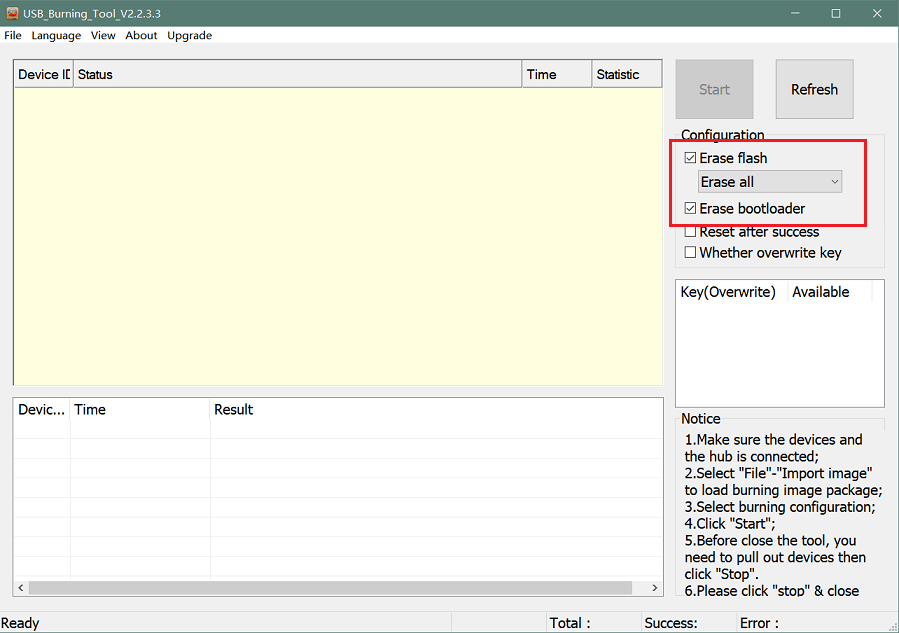
- 1. Open USB_Burning_Tool.exe, select menu File->Import image, choose the android image file aml_upgrade_package.img.
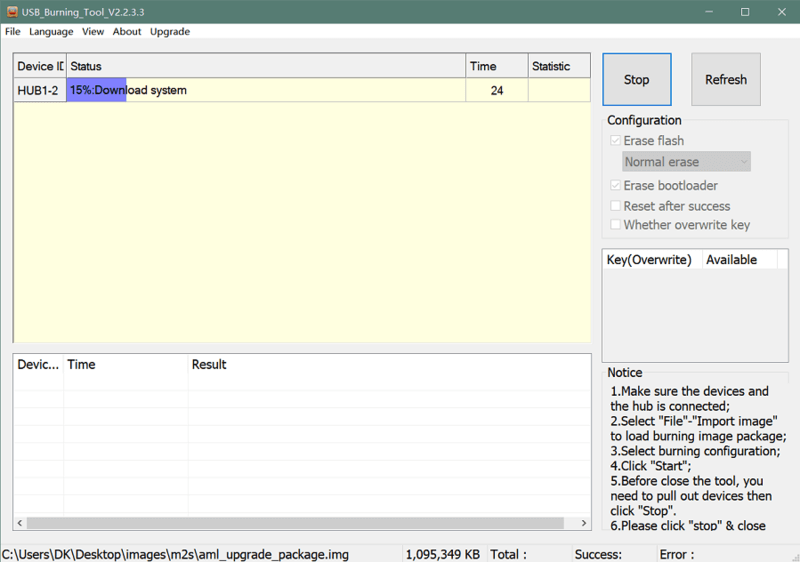
- 2. Short the usb boot test point on the main board, plugin type-c usb cable to PC or press the RST button if power adapter already connected, about two seconds later, the board will enter usb download mode and be identified correctly by PC. You can also enter usb download mode with adb command "adb reboot update" or console command "reboot update" if a bootable android already flashed, make sure typec usb connected to PC before doing this.

- 3. Click the Start button of the download tool and wait for upgrade complete.
- 4. After Burning successfull, Unplug the type-c usb and connect to power supply adaptor to startup.
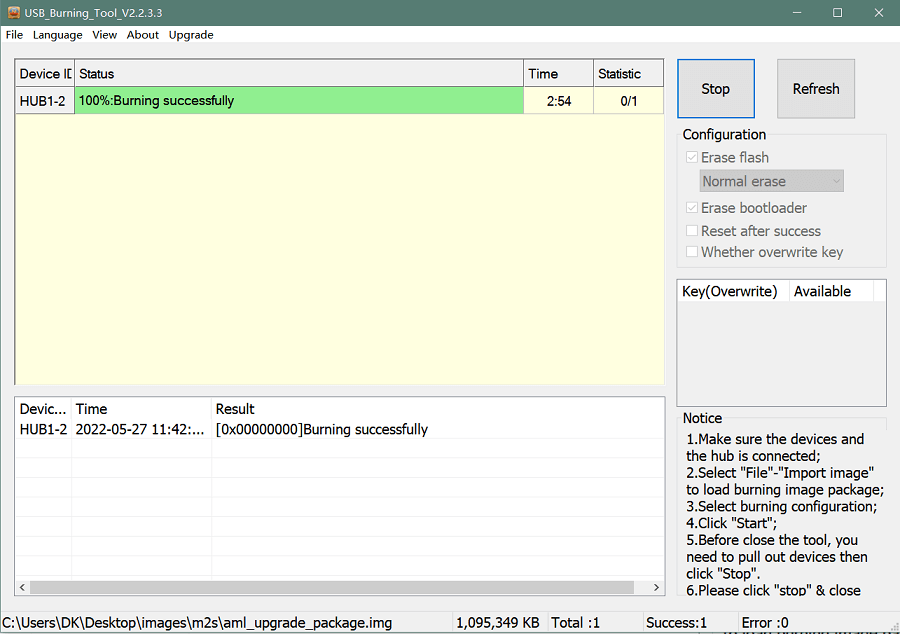
- 5. Click the Stop button to cancel the upgrade process and close the USB Buring Tool.
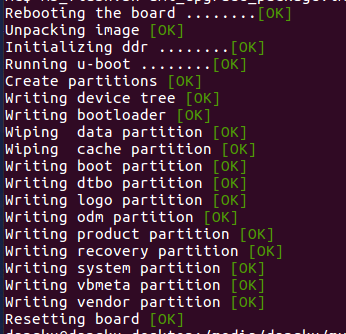
Install Image with Aml Flash Tool
aml-flash-tool is a linux platform opensource image flash util for Amlogic android.
$ ./flash-tool.sh --img=/path/to/aml_upgrade_package.img --parts=all --wipe --soc=g12a --reset=y
Build Android Source Code
- 1. Get Android 9.0 source code
$ https://github.com/BPI-SINOVOIP/BPI-A311D-Android9
- 2. Build the Android 9.0 Source code
- Please read the source code README
Android DTB overlay
- Bananapi CM4 DTBO idx value table, default idx value is 0 in release image.
Bananapi CM4 DTBO idx value table idx value device tree overlay description 0 android_p_overlay default dtbo, no use 1 wifi_bt_rtl8822cs enable bpi rtl8822cs wifi/bt module 2 i2c1 enable i2c 1 3 i2c2 enable i2c 2 4 sdio enable sdio 5 uart1 enable 2 pins uart 1 6 uart1_cts_rts enable 4 pins uart 1 7 uart2 enable 2 pins uart 2 8 hifi_pcm5122 enable i2s pcm5122 HiFi DAC
- How to apply a new dtbo
- 1. ADB command via sysfs
 root@dangku-desktop:/tmp# adb root
 restarting adbd as root
 root@dangku-desktop:/tmp# adb remount
 remount succeeded
 root@dangku-desktop:/tmp# adb shell
 bananapi_m2s:/ # echo dtbo > /sys/class/unifykeys/name
 bananapi_m2s:/ # echo "1" > /sys/class/unifykeys/write
 bananapi_m2s:/ # reboot
- 2. Uart console command via sysfs
 console:/ $
 console:/ $ su
 console:/ # echo dtbo > /sys/class/unifykeys/name
 [  115.702781@0] unifykey: name_store() 1302, name dtbo, 4
 [  115.702856@0] unifykey: name_store() 1311
 console:/ #
 console:/ # echo "1" > /sys/class/unifykeys/write
 [  129.262659@0] unifykey: write_store()  is a string
 [  129.262733@0] unifykey: dtbo, 1, 1
 [  129.265312@0] unifykey: amlkey_write 393
 [  129.292347@1] emmc_key_write:149, write ok
 console:/ #
 console:/ # reboot
- 3. Settings App(To-Do)
- Check the bootup uart debug message and confirm which dtbo is loaded actually, here "1" means set idx=1 to apply wifi_bt_rtl8822cs dtbo.
 load dtb from 0x1000000 ......
       Amlogic multi-dtb tool
       Single dtb detected
 find 2 dtbos
 dtbos to be applied: 1
 Apply dtbo 1
- Unifykeys is stored in a specific emmc part, "Normal erase" selected in USB_Burning_Tool will not erase this data for next update, you must select "Erase all" if you want the default dtbo idx to be applied after image download.
- Build Android image with a specific DTBO default.
- 1. Default build-in overlays are defined in device/bananapi/bananapi_m2s/Kernel.mk, you can add a new overlay dtbo here.
DTBO_DEVICETREE := android_p_overlay wifi_bt_rtl8822cs i2c1 i2c2 sdio uart1 uart1_cts_rts uart2 hifi_pcm5122
- 2. Default apply DTBO idx is defined in device/bananapi/bananapi_m2s/BoardConfig.mk, you can change the idx value to set which overlay dtbo will be applied default.
BOARD_KERNEL_CMDLINE += androidboot.dtbo_idx=0
- 3. DTS files are in common/arch/arm64/boot/dts/amlogic/overlay/bananapi_m2s/
- More info about android device tree overlays, please refer to google android offical site
Install OpenGapps
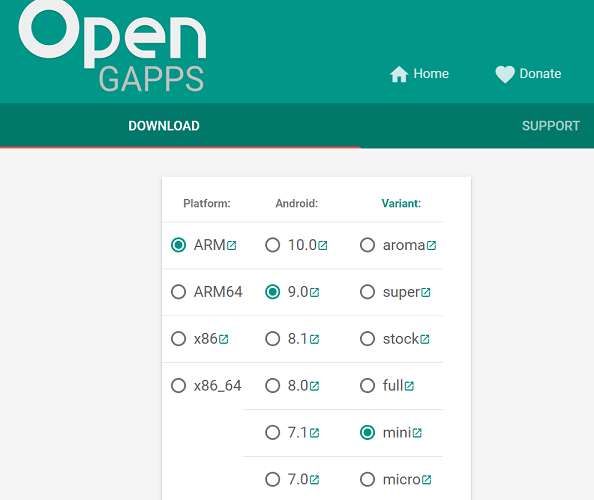
- 1. Download install package from Opengapps.org, Android release image is arm/android 9.0 variant.
- 2. Download device_id.apk
- 3. Copy the OpenGapp package to a udisk or sdcard root directory.
- 4. Create a txt file named factory_update_param.aml in udisk or sdcard root directory with the following android recovery parameter content, and replace the file name with the actual downloaded package.
- udisk:
 --wipe_cache
 --update_package=/udisk/open_gapps-arm-9.0-pico-20210327.zip
- sdcard:
 --wipe_cache
 --update_package=/sdcard/open_gapps-arm-9.0-pico-20210327.zip
- 5. Plugin the udisk or sdcard to the board and poweron.
- 6.OpenGapps install and certify.
Switch Mipi Panel
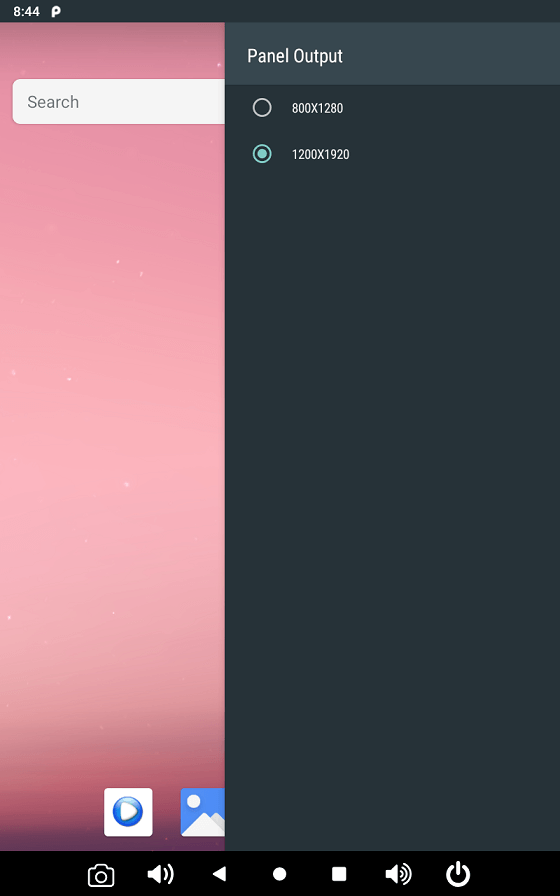
- The default android release image only support one mipi panel because hw has no detect logic for different panel at boot, so [800x1280 bpi panel] enabled as default, but you can change to [1200x1920 bpi panel] as defualt in Settings->Panel Output
Panel Rotation
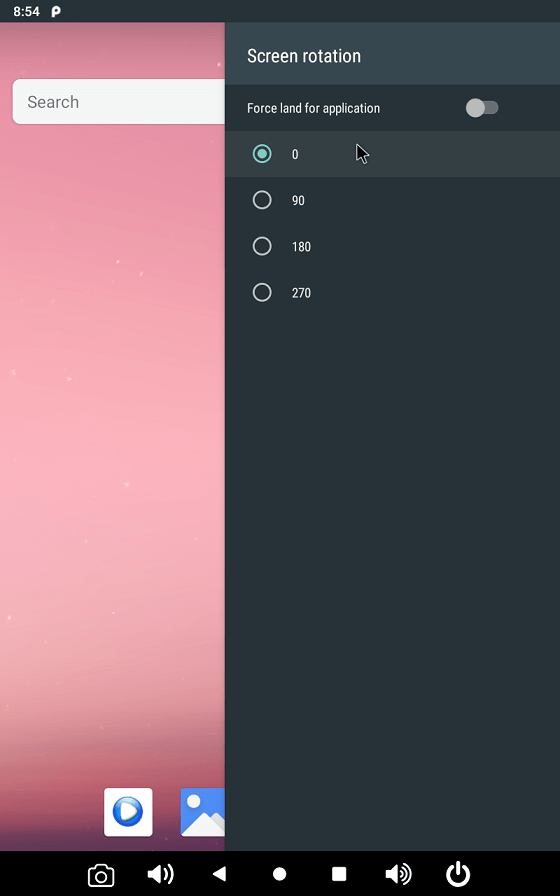
The two 10" mipi panels are all portrait hw display, so the default android release image is portrait mode, but you can rotate it to 90/180/270 in two ways.
- 1. UI Rotation in Settings->Display->Screen rotation
- 2. SurfaceFlinger rotation, need modify android source code and build
- Change the default sf rotation property
   diff --git a/device/bananapi/bananapi_m2s/bananapi_m2s.mk b/device/bananapi/bananapi_m2s/bananapi_m2s.mk
   index 1f51703..d592a44 100644
   --- a/device/bananapi/bananapi_m2s/bananapi_m2s.mk
   +++ b/device/bananapi/bananapi_m2s/bananapi_m2s.mk
   @@ -579,6 +579,6 @@ PRODUCT_PROPERTY_OVERRIDES += \
    else
    PRODUCT_PROPERTY_OVERRIDES += \
        ro.sf.lcd_density=213 \
    -    ro.sf.primary_display_orientation=0
   +    ro.sf.primary_display_orientation=90
    endif
- Change the touch panel rotation in dts
   diff --git a/common/arch/arm64/boot/dts/amlogic/bananapi_m2s.dts b/common/arch/arm64/boot/dts/amlogic/bananapi_m2s.dts
   index 4a698b0..3d41b63 100755
   --- a/common/arch/arm64/boot/dts/amlogic/bananapi_m2s.dts
   +++ b/common/arch/arm64/boot/dts/amlogic/bananapi_m2s.dts
   @@ -876,8 +876,8 @@
                   reg = <0x5d>;
                   reset-gpio = <&gpio GPIOA_6 GPIO_ACTIVE_HIGH>;
                   irq-gpio = <&gpio GPIOA_5 GPIO_ACTIVE_HIGH>;
   -               rotation = <4>; /* sf_rotation 0 */
   -               //rotation = <0>; /* sf_rotation 90*/
  +               //rotation = <4>; /* sf_rotation 0 */
  +               rotation = <0>; /* sf_rotation 90*/
                   //rotation = <5>; /* sf_rotation 180 */
                   //rotation = <3>; /* sf_rotation 270 */
Custom Android Boot Logo
- Android bootloader limit boot logo fb display size is 1080p60hz/1920x1080 default, and android kernel dtb partition table limit boot logo partition size to 16MB default .
- 1. Prepare a 16bit bmp file and named boot-logo.bmp
- 2. Compress the bmp file to boot-logo.bmp.gz
$ gzip boot-logo.bmp
- 3. Download m2s_android_bootlogo_tool.zip
- 4. Extract this tool
 $ unzip m2s_android_bootlogo_tool.zip
 $ cd m2s_android_bootlogo_tool/
 $ ls -l logo/
 -rwxr--r-- 1 dangku dangku 525054 Sep 25 16:54 bootup.bmp
 -rwxr--r-- 1 dangku dangku 525054 Sep 25 16:54 bootup_secondary.bmp
 -rwxr--r-- 1 dangku dangku    184 May 19  2020 upgrade_bar.bmp
 -rwxr--r-- 1 dangku dangku 180072 May 19  2020 upgrade_error.bmp
 -rwxr--r-- 1 dangku dangku 180072 May 19  2020 upgrade_fail.bmp
 -rwxr--r-- 1 dangku dangku 180072 May 19  2020 upgrade_logo.bmp
 -rwxr--r-- 1 dangku dangku 180072 May 19  2020 upgrade_success.bmp
 -rwxr--r-- 1 dangku dangku    184 May 19  2020 upgrade_unfocus.bmp
 -rwxr--r-- 1 dangku dangku 180072 May 19  2020 upgrade_upgrading.bmp
- 5. Copy the boot-logo.bmp.gz
 $ cp boot-logo.bmp.gz logo/bootup.bmp
 $ cp boot-logo.bmp.gz logo/bootup_secondary.bmp
- 6. Create target logo.img with img pack tool, the binary and related libs of m2s_android_bootlogo_tool are copy from <android-source-dir>/out/host/linux-x86
$ ./logo_img_packer -r logo logo.img
- 7. Flash boot logo with fastboot
 $ adb root
 $ adb remount
 $ adb reboot fastboot
- Wait few seconds and check whether fastboot connected
 $ fastboot device
 1234567890      fastboot
 $ fastboot flashing unlock_critical
 $ fastboot flashing unlock
 $ fastboot flash logo logo.img
 $ fastboot reboot
Linux
Prepare
- 1. Linux image support SDcard or EMMC bootup, but you should read the boot sequence at first.
- 2. Make sure bootable EMMC is formatted if you want bootup from SDcard, more info refer to Erase EMMC for SDcard Bootup
- 3. Make sure SDcard is formatted without Linux image flashed if you want bootup from EMMC and use Sdcard as storage.
- 4. Install bpi-tools on your Linux PC(if flash image with other tools, ignore this step). If you can't access this URL or any other install problem, please go to bpi-tools source repo, download and install this tools manually.
 $ apt-get install pv
 $ curl -sL  https://raw.githubusercontent.com/BPI-SINOVOIP/bpi-tools/master/bpi-tools | sudo -E bash
- 5. Download Linux latest Linux Image, and confirm that the md5 checksum is correct.
- 6. Default login: pi/bananapi or root/bananapi
Install Image to SDcard
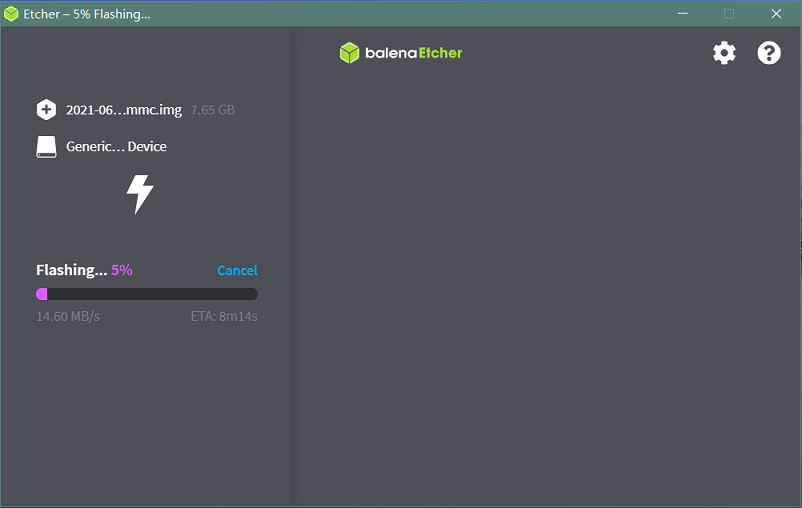
- 1. Install Image with Etcher on Windows, Linux and MacOS.
- 2. Install Image with dd command on Linux, umount SDcard device /dev/sdX partition if mounted automatically. Actually bpi-copy is the same as this dd command.
 $ sudo apt-get install pv unzip
 $ sudo unzip -p xxx-bpi-cm4-xxx.img.zip | pv | dd of=/dev/sdX bs=10M status=noxfer
- 3. Install the linux image in udisk with bpi-tools on Linux, plug SDcard to Linux PC and run
 $ sudo apt-get install pv unzip
 $ sudo bpi-copy xxx-bpi-cm4-xxx.img.zip /dev/sdX
Install Image to EMMC
- 1. Prepare a SDcard with Linux image flashed and bootup board with this SDcard.
- 2. Copy Linux image to udisk, plug the udisk to board and mount it.
- 3. Install with dd command, umount mmcblk0p1 and mmcblk0p2 partition if mounted automatically. Actually bpi-copy is the same as this dd command.
 $ sudo apt-get install pv unzip
 $ sudo unzip -p xxx-bpi-cm4-xxx.img.zip | pv | dd of=/dev/mmcblk0 bs=10M status=noxfer
- 4. Install with bpi-tools command
 $ sudo apt-get install pv unzip
 $ sudo bpi-copy xxx-bpi-cm4-xxx.img.zip /dev/mmcblk0
- 5. After download complete, power off safely and eject the SDcard.
Build Linux Source Code
- 1. Get the Linux bsp source code
$ git clone https://github.com/BPI-SINOVOIP/BPI-M2S-bsp
- 2. Build the bsp source code
- Please read the source code README.md
- 3. If you want build uboot and kernel separately, please download the u-boot the kernel only, get the toolchains, boot script and other configuration files from /bpi-m2s
DTB overlay
- 1. DTB overlay is used for 40pin gpios multi-function configuration and install in vfat boot partition, you can check the mount point with mount command.
 root@bananapi:~# ls /boot/overlays/
 hifi_pcm5122.dtbo  pdmmic.dtbo        sdio.dtbo                 waveshare_tft24_lcd.dtbo
 i2c1.dtbo          pwm_c-beeper.dtbo    spi0.dtbo                 waveshare_tft35c_lcd.dtbo
 i2c2.dtbo          pwm_cd-c.dtbo           spi0_flash.dtbo        wifi_bt_rtl8822cs.dtbo
 i2s.dtbo            pwm_cd.dtbo              uart1_cts_rts.dtbo    i2smic.dtbo    pwm_ef.dtbo
 uart1.dtbo        os08a10.dtbo              pwm_ef-f.dtbo          uart2.dtbo
- 2. Update the overlays env in vfat /boot/env.txt to enable what you want.
 # Device Tree Overlays
 #   uart1           -- Enable UART1 (uart_A, GPIO Header PIN8 & PIN10)
 #   pwm_c           -- Enable PWM_C (GPIO Header PIN7)
 #   i2c2            -- Enable i2c2 (GPIO Header PIN3 & PIN5)
 #   spi0            -- Enable SPI0 (GPIO Header PIN19 & PIN21 & PIN23 & PIN24)
 overlays="i2c2 spi0 uart1"
- 3. Must be restart the board for overlay dtb loaded.
Enable Camera
- The linux release image is camera disabled default, according to the following configuration, it can be enabled by yourself.
- 1. Update the dtb overlays env in /boot/env.txt to enable camera dtbo.
overlays="os08a10"
- 2. Add camera modules to /etc/modules
 iv009_isp_iq
 iv009_isp_lens
 iv009_isp_sensor
 iv009_isp
- 3. Create and add camera modules options to /etc/modprobe.d/os08a10.conf
 #choose camera calibration parameters
 options iv009_isp_iq cali_name=0
 #choose isp register sequence
 options iv009_isp_sensor isp_seq_num=0
- 4. Enable camera isp systemd service
$ sudo systemctl enable camera_isp_3a_server.service
- Camera device is /dev/video0 after reboot.
Switch Mipi Panel
- The default linux release image only support one mipi panel because hw has no detect logic for different panel at boot, so 800x1280 bpi panel enabled as default, but you can change to [1200x1920 bpi panel] as defualt in /boot/lcd_env.txt
 # Mipi panel type
 #    Symbol    | Resolution
 # ----------------------+-------------
 #    "lcd_0"   | 10" 800x1280 panel
 #    "lcd_1"   | 10" 1200x1920 panel
 panel_type=lcd_0
- Note: Dual display is not work on linux, so disconnect hdmi cable when mipi used.
Panel Rotation
- The two 10" mipi panels are all portrait hw display, so the default release image is portrait mode, but you can rotate it to 90/180/270.
- For Desktop image, create a xorg configuration file /usr/share/X11/xorg.conf.d/10-fbdev-rotate.conf with contents:
 Section "Device"
     Identifier "Configured Video Device"
     # Rotate off
 #   Option "Rotate" "off"
     # Rotate Right / clockwise, 90 degrees
     Option "Rotate" "CW"
     # Rotate upside down, 180 degrees
 #   Option "Rotate" "UD"
     # Rotate counter clockwise, 270 degrees
 #   Option "Rotate" "CCW"

 EndSection

 Section "InputClass"
     Identifier "Coordinate Transformation Matrix"
     MatchIsTouchscreen "on"
     MatchProduct "goodix-ts"
     MatchDevicePath "/dev/input/event0"
     MatchDriver "libinput"
     # Rotate Right / clockwise, 90 degrees
     Option "CalibrationMatrix" "0 1 0 -1 0 1 0 0 1"
     # Rotate upside down, 180 degrees
 #   Option "CalibrationMatrix" "-1 0 1 0 -1 1 0 0 1"
     # otate counter clockwise, 270 degrees
 #   Option "CalibrationMatrix" "0 -1 1 1 0 0 0 0 1"

 EndSection
- For Server image, you can change the framebuffer rotation in two ways:
- 1. Sysfs dynamically change.
 echo 0 > /sys/class/graphics/fbcon/rotate    //origin 0 degree
 echo 1 > /sys/class/graphics/fbcon/rotate    //90 degree
 echo 2 > /sys/class/graphics/fbcon/rotate    //180 degree
 echo 3 > /sys/class/graphics/fbcon/rotate    //270 degree
- 2. Boot Configuration change.
- change the fb_rotate env in /boot/env.txt
 # Framebuffer Rotate
 # 0 - origin 0 degree
 # 1 - 90 degree
 # 2 - 180 degree
 # 3 - 270 degree
 fb_rotate=0
WiringPi
- Note: This WiringPi only support set 26pins gpio to output, input, pwm or software pwm, for io functions as i2c, spi, ..., you must enable dtb overlay in boot.ini
- 1. Build and install wiringPi, for debian, you must install sudo before build
 $ sudo apt-get update
 $ sudo apt-get install build-essential git
 $ git clone https://github.com/Dangku/amlogic-wiringPi
 $ cd amlogic-wiringPi
 $ chmod a+x build
 $ sudo ./build
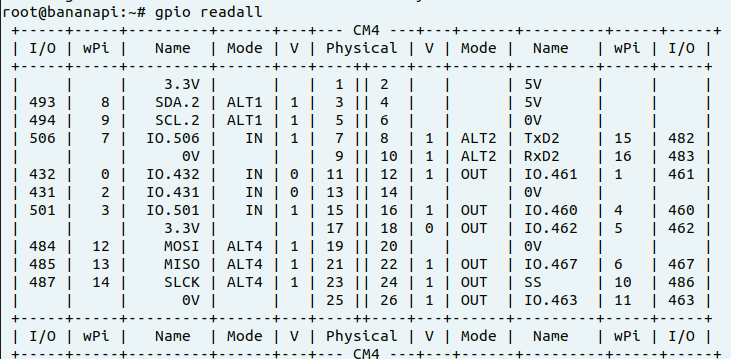
- 2. Run gpio readall to show all 26pins status.
- 3. BPI GPIO Extend board and examples in amlogic-wiringPi/examples
RPi.GPIO
- Build and install, for debian, you must install sudo before build
 $ sudo apt-get update
 $ sudo apt-get install build-essential python python-dev python-setuptools git
 $ git clone https://github.com/Dangku/RPi.GPIO-Amlogic.git
 $ cd RPi.GPIO-Amlogic
 $ sudo python setup.py clean --all
 $ sudo python setup.py build install
WiringPi2-Python
- Build and install, for debian, you must install sudo before build
 $ sudo apt-get update
 $ sudo apt-get install build-essential python python-dev python-setuptools swig git
 $ git clone --recursive   https://github.com/Dangku/WiringPi2-Python-Amlogic.git
 $ cd WiringPi2-Python-Amlogic
 $ sudo python setup.py install
Custom Linux Boot Logo
- Linux uboot limit boot logo fb size to 1080p60hz/1920x1080 default, so oversize resolution will not be supported by default image, but you can modify uboot source code to support it.
- 1. Prepare a 24bit bmp file and named boot-logo.bmp
- 2. copy the target file to /boot/firmware/ or /boot/ directory.
EC20 LTE 4G Module
- 1. AT test
- After the module is connected and Linux OS bootup. several ttyUSB* device files are created in the directory /dev. For EC20, /dev/ttyUSB2 is the AT port.
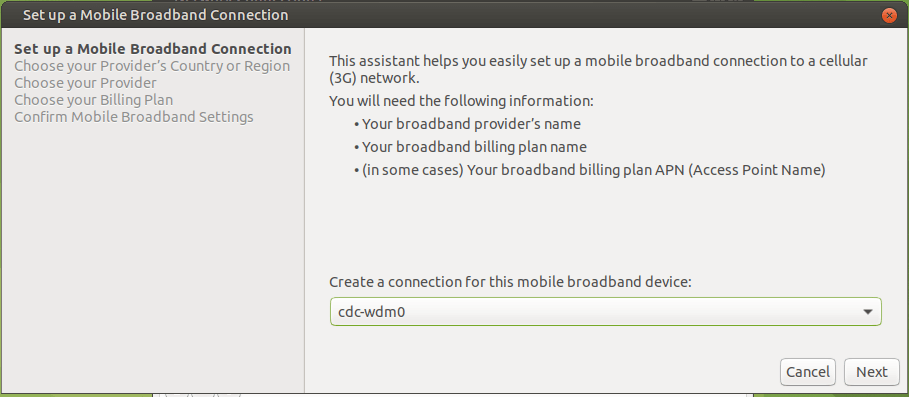
- 2. Connect Network via qmi_wwan on Ubuntu Desktop
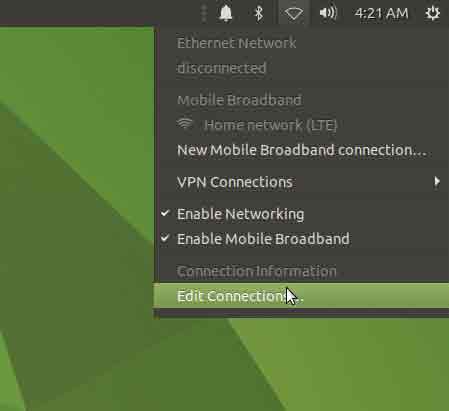
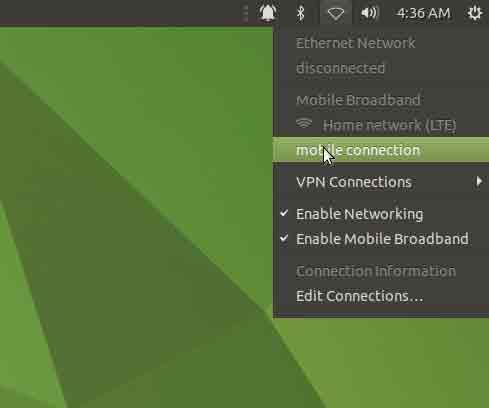
- Click edit connections in network manager menu
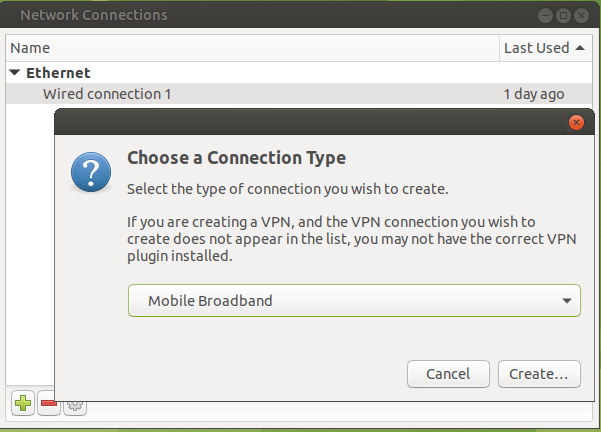
- Add a new mobile broadband connection
- Choose qmi channel device
- When the qmi_wwan_q driver has been installed in the module, a network device and a QMI channel are created. The network device is named as wwanX and the QMI channel is /dev/cdc-wdmX. The network device is used for data transmission, and QMI channel is used for QMI message interaction
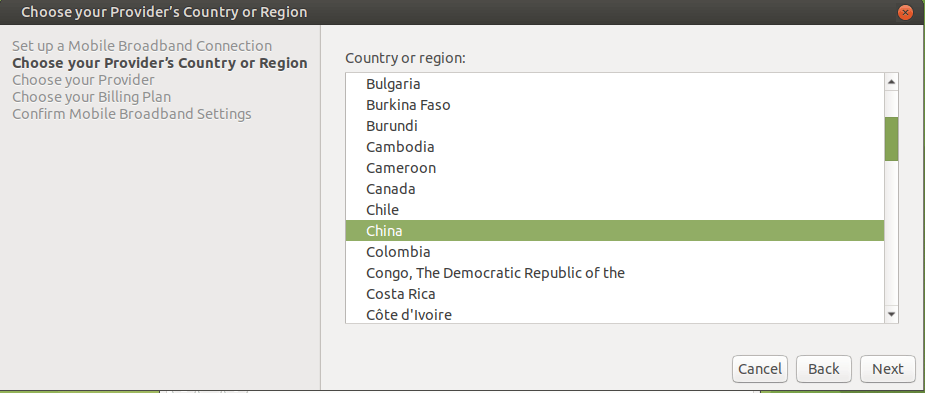
- Choose carrier provider's country region
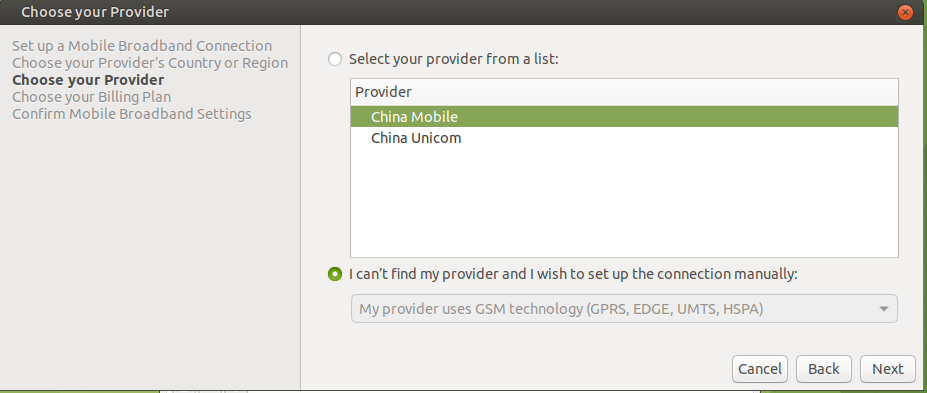
- Choose carrier provider.
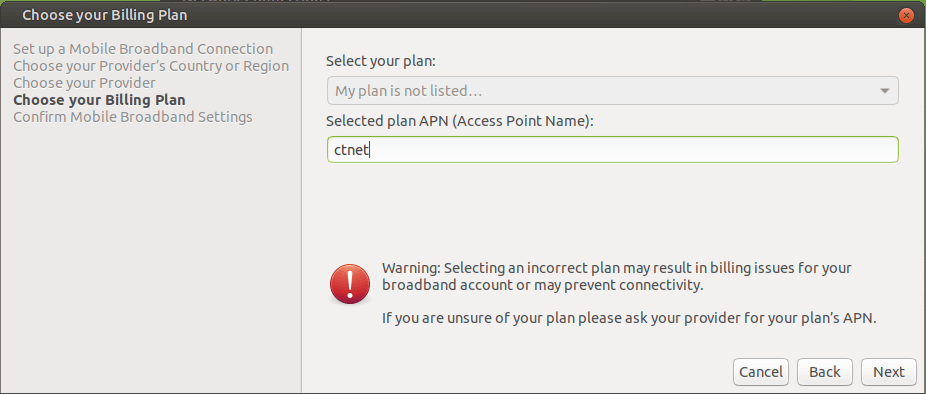
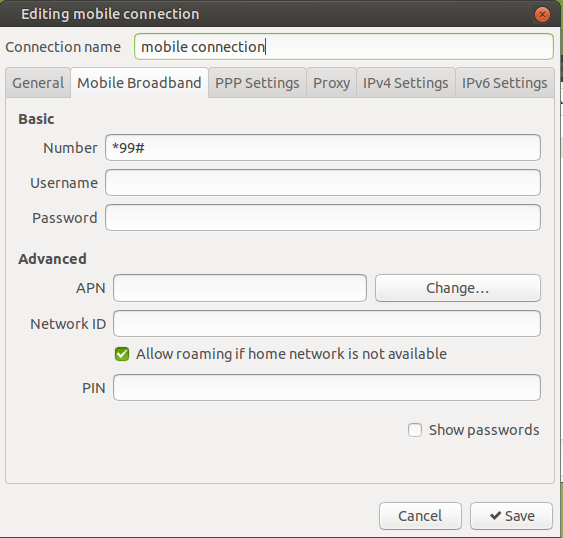
- Set connection name, carrier connection username/password and APN if needed.
- Setup finished, now you can connect it.
- 3. Connect Network via pppd on Ubuntu&Debian Server
- Install pppd
$ sudo apt install ipppd
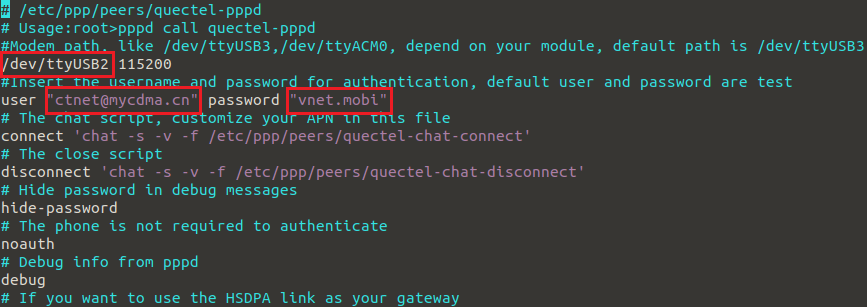
- Change AT device, username and password to your local carrier in /etc/ppp/peers/quectel-ppp
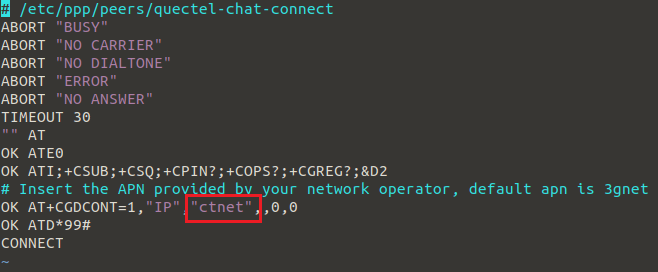
- Change APN to your local carrier in /etc/ppp/peers/quectel-chat-connect
- Two ways command to start pppd, you can check the process of PPP calling setup log HERE
# pppd call quectel-ppp &
- or
# quectel-pppd.sh /dev/ttyUSB2 <apn> <username> <password>
- Terminate pppd process:
# quectel-ppp-kill
- 4. Connect Network via qmi_wwan on Ubuntu&Debian Server
- [quectel-CM] is a connection manager program for you to set up data connection manually. You can check the process of qmi_wwan calling setup log here
# quectel-CM &
- Terminate quectel-CM process:
# killall quectel-CM
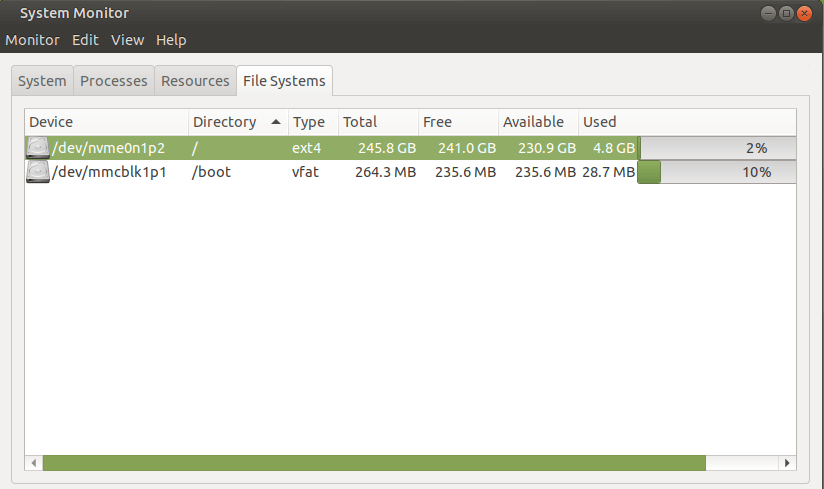
Boot Linux from SSD
- A311d soc rom and BPI-M2S-bsp uboot are both not support nvme boot, so the only way for booting linux from SSD is create a bootable sdcard or emmc with bootloader and boot partition flashed, then load rootfs from SSD. After bootup, everything will run from SSD. You need a minipcie to nvme adapter board because bananapi cm4io has a minipcie slot onboard.
- 1. The simple way is flash the CM4 Linux image to sdcard or emmc for bootable and also flash it to the nvme ssd for loading rootfs.
- 2. Bootup the CM4 board with sdcard or emmc, modify /boot/boot.ini to load rootfs from nvme partition for kernel.
 diff a/boot/boot.ini b/boot/boot.ini
 index 2222e79..c485067 100755
 --- a/boot/boot.ini
 +++ b/boot/boot.ini
 @@ -20,6 +20,8 @@ fi;

  if test "${devtype}" = "usb"; then setenv rootfsdev "/dev/sda2"; fi

 +# force set root=/dev/nvme0n1p2
 +setenv rootfsdev "/dev/nvme0n1p2"
 +
  # Load env.txt
  fatload ${devtype} ${devno}:1 ${env_loadaddr} env.txt
  env import -t ${env_loadaddr} ${filesize};
- 3. Reboot the system, kernel will load rootfs from nvme ssd.
- 4. Test performance
- You can verify the performance of your SSD on Pi Benchmarks using the following command:
sudo curl https://raw.githubusercontent.com/TheRemote/PiBenchmarks/master/Storage.sh | sudo bash
- Test results for sd, emmc and nvme ssd (Samsung 970EVOPlus)
Category Test Sdcard Test Result Emmc Test Result Nvme SSD Test Result HDParm Disk Read 60.67 MB/s 148.80 MB/s 351.29 MB/s HDParm Cached Disk Read 56.71 MB/s 141.02 MB/s 347.03 MB/s DD Disk Write 14 MB/s 51.0 MB/s 244 MB/s FIO 4k random read 2176 IOPS (8704 KB/s) 8438 IOPS (33753 KB/s) 101386 IOPS (405544 KB/s) FIO 4k random write 932 IOPS (3729 KB/s) 10876 IOPS (43505 KB/s) 43206 IOPS (172827 KB/s) IOZone 4k read 8586 KB/s 20311 KB/s 119475 KB/s IOZone 4k write 2385 KB/s 19016 KB/s 90619 KB/s IOZone 4k random read 6734 KB/s 20807 KB/s 51517 KB/s IOZone 4k random write 3737 KB/s 22731 KB/s 95139 KB/s Score: 1076 Score: 5446 Score: 24550
Disable SDcard UHS mode
- Add disableuhs option to kernel bootargs in /boot/env.txt to disable sdcard uhs capability
 # User kernel args
 # Add customer kernel args here
 user_kernel_args=pci=pcie_bus_safe disableuhs
Enable Wifi and BT
- CM4 has onboard wifi/bt RTL8822CS, and is not enabled in default image, you can enable it with the following procedure.
- 1. Add the wifi module name to /etc/modules for loaded automatically next boot.
 # This file contains the names of kernel modules that should be loaded
 # at boot time, one per line. Lines beginning with "#" are ignored.
 88x2cs
- 2. Install bluetooth packages for server images
 $ sudo apt update
 $ sudo apt install bluez rfkill
- 3. Reboot system
Linux Server Image Network Configuration
https://netplan.io/
- Linux Wifi STA mode
- A sample wifi sta mode netplan configuration file, 01-wlan0-sta.yaml
network:
  version: 2
  renderer: networkd
  wifis:
    wlan0:
      dhcp4: true
      access-points:
        "bananapi":
           password: "123456789"
- Linux Wifi AP mode
- 1. Prepare the setup the wifi adater correctly.
- 2. Get the wifi adapter Band, Frequencies, Channel, HT Capability, VHT Capability or other properties
$ iw list
- 3. Manage wifi access point mode with Netplan and Network-Manager.
- Install NetworkManager because ap is only supported with NetworkManager renderer
$ sudo apt install network-manager
- A sample 2.4G wifi ap mode netplan configuration file, 01-wlan0-ap-2.4g.yaml
network:
version: 2
renderer: NetworkManager
wifis:
  wlan0:
    dhcp4: no
    access-points:
      "bananapi":
         mode: ap
         band: 2.4GHz
         channel: 6
         auth:
           key-management: psk
           password: "123456789"
- A sample 5G wifi ap mode netplan configuration file, 01-wlan0-ap-5g.yaml
network:
version: 2
renderer: NetworkManager
wifis:
  wlan0:
    dhcp4: no
    access-points:
      "bananapi":
         mode: ap
         band: 5GHz
         channel: 36
         auth:
           key-management: psk
           password: "123456789"
- 4. Manage wifi access point mode with Netplan and Hostapd.
- 1). Create a netplan configuration file, 01-wlan0-ap-hostapd.yaml
network:
version: 2
renderer: networkd
ethernets:
  wlan0:
    dhcp4: no
    addresses:
      - 192.168.11.1/24
- 2). Install hostapd
$ sudo apt install hostapd
- Create hostapd configuration file /etc/hostapd/hostapd.conf, for example
interface=wlan0
ssid=bananapi

driver=nl80211

auth_algs=1
wpa=2
wpa_passphrase=123456789
wpa_key_mgmt=WPA-PSK
rsn_pairwise=CCMP

#bridge=br0
beacon_int=500
#SSID not hidden
ignore_broadcast_ssid=0

hw_mode=a
channel=36
max_num_sta=8

### IEEE 802.11n
ieee80211n=1
#require_vht=0
ht_capab=[HT20][HT40+][SHORT-GI-20][SHORT-GI-40][SHORT-GI-80][DSSS_CCK-40]

### IEEE 802.11ac
ieee80211ac=1
#require_vht=0
#vht_capab=[MAX-MPDU-3895][SHORT-GI-80][SU-BEAMFORMEE]
#vht_oper_chwidth=1
#vht_oper_centr_freq_seg0_idx=42

### WMM
wmm_enabled=1
- 3). To support 80MHz channel width you need load driver with rtw_vht_enable=2 option, Or you can create /etc/modprobe.d/8822cs.conf with content
options 88x2cs rtw_vht_enable=2
- 4). Install and configure dhcp server service, use isc-dhcp-server for example
$ sudo apt install isc-dhcp-server
- Configure dhcp server interface in /etc/default/isc-dhcp-server
# On what interfaces should the DHCP server (dhcpd) serve DHCP requests?
#       Separate multiple interfaces with spaces, e.g. "eth0 eth1".
INTERFACESv4="wlan0"
- Configure dhcp subnet and dns in /etc/dhcp/dhcpd.conf
...
option domain-name "example.org";
option domain-name-servers 8.8.8.8, 114.114.114.114;
...
# No service will be given on this subnet, but declaring it helps the
# DHCP server to understand the network topology.
subnet 192.168.11.0 netmask 255.255.255.0 {
  range dynamic-bootp 192.168.11.1 192.168.11.100;
  option broadcast-address 192.168.11.255;
  option routers 192.168.11.1;
}
- 5). Start Service
$ sudo hostapd /etc/hostapd/hostapd.conf -B
$ sudo systemctl restart isc-dhcp-server
- 6). Routing configuration.
sysctl net.ipv4.ip_forward=1
iptables -t nat -A POSTROUTING -s 192.168.11.0/24 -o eth0 -j MASQUERADE
Other Development
Boot Sequence
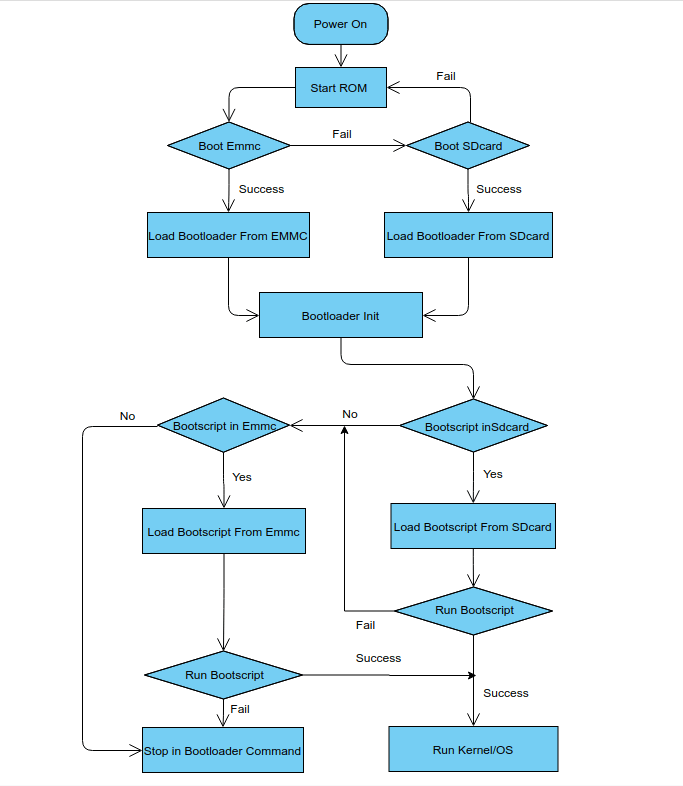
- Check bootloader loaded from SDcard or EMMC at the beginning of the console debug messages
- 1. Rom load bootloader from SDcard (Linux log example)
 ...

 BL2 Built : 15:21:42, Mar 26 2020. g12a g486bc38 - gongwei.chen@droid11-sz

 Board ID = 1
 Set cpu clk to 24M
 Set clk81 to 24M
 Use GP1_pll as DSU clk.
 DSU clk: 1200 Mhz
 CPU clk: 1200 MHz
 Set clk81 to 166.6M
 board id: 1
 Load FIP HDR DDR from SD, src: 0x00010200, des: 0xfffd0000, size: 0x00004000, part: 0
 fw parse done
 PIEI prepare done
 fastboot data verify
 result: 255
 Cfg max: 12, cur: 1. Board id: 255. Force loop cfg
 DDR4 probe

 ...
- 2. Rom load bootloader from EMMC(Android Log example)
 ...

 Board ID = 1
 Set cpu clk to 24M
 Set clk81 to 24M
 Use GP1_pll as DSU clk.
 DSU clk: 1200 Mhz
 CPU clk: 1200 MHz
 Set clk81 to 166.6M
 eMMC boot @ 0
 sw8 s
 board id: 1
 Load FIP HDR DDR from eMMC, src: 0x00010200, des: 0xfffd0000, size: 0x00004000, part: 0
 fw parse done
 PIEI prepare done
 00000000
 emmc switch 1 ok
 ddr saved addr:00016000
 Load ddr parameter from eMMC, src: 0x02c00000, des: 0xfffd0000, size: 0x00001000, part: 0
 00000000

 ...
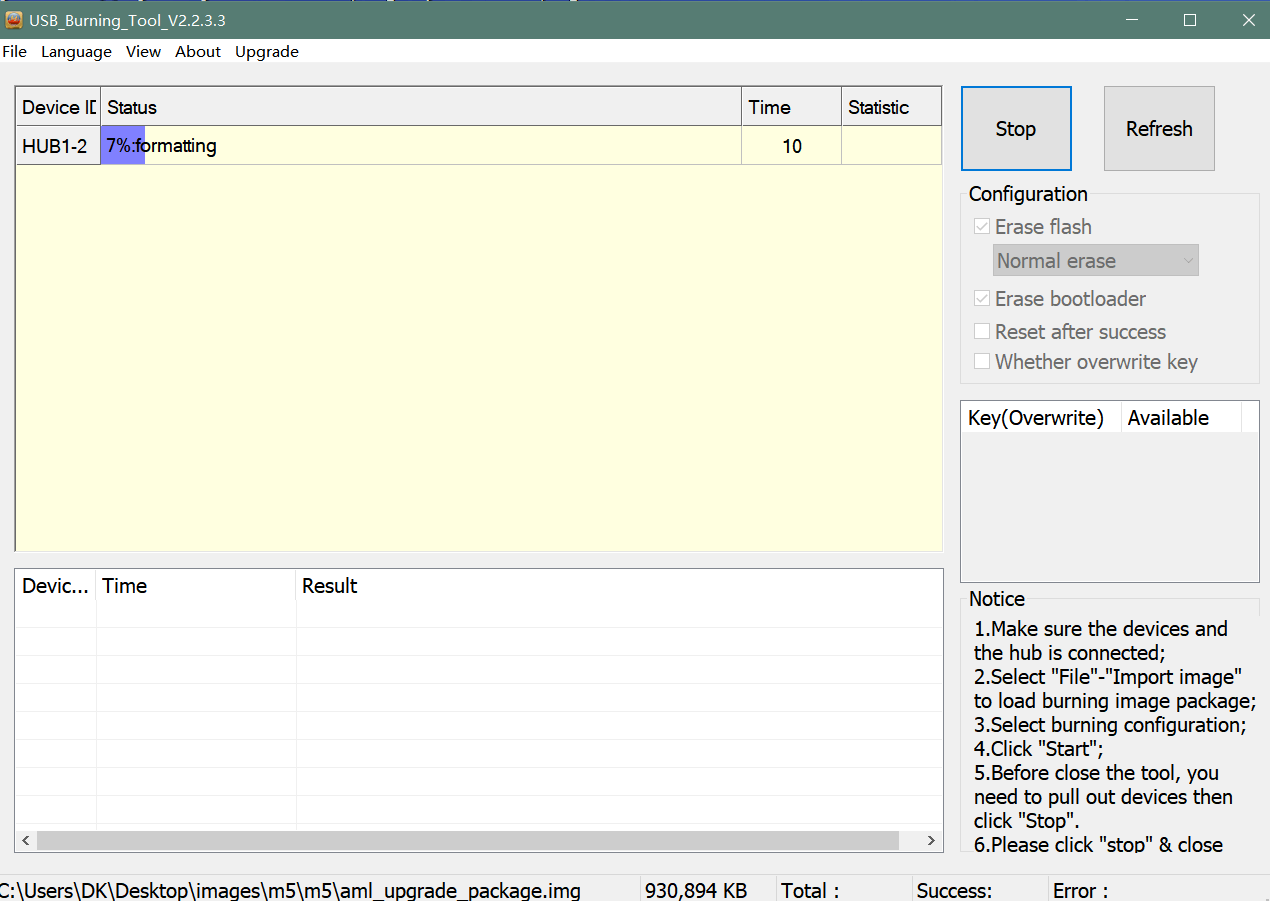
Erase EMMC for SDcard Bootup
- There are four possible scenarios should be pay attention to, EMMC already flashed Android image, EMMC already flashed Linux image, boot process hangup in BL2 and EMMC empty.
- 1. Bootable EMMC with Android image flashed
- a). Using usb burning tool, unplug the type-c usb cable while the download process at 7% formatting
- b). Using Android Fastboot tool, make sure the adb/fastboot tools is work on your PC before doing this.
   root@dangku-desktop:/tmp# adb root
   adbd is already running as root
   root@dangku-desktop:/tmp# adb remount
   remount succeeded
   root@dangku-desktop:/tmp# adb shell
   bananapi_m2s:/ # reboot fastboot
- Wait a few seconds for board reboot to fastboot mode
   root@dangku-desktop:/tmp# fastboot devices
   1234567890	fastboot
   root@dangku-desktop:/tmp# fastboot flashing unlock_critical
   ...
   OKAY [  0.044s]
   finished. total time: 0.044s
   root@dangku-desktop:/tmp# fastboot flashing unlock
   ...
   OKAY [  0.047s]
   finished. total time: 0.047s
   root@dangku-desktop:/tmp# fastboot erase bootloader
   erasing 'bootloader'...
   OKAY [  0.059s]
   finished. total time: 0.059s
   root@dangku-desktop:/tmp# fastboot erase bootloader-boot0
   erasing 'bootloader-boot0'...
   OKAY [  0.036s]
   finished. total time: 0.036s
   root@dangku-desktop:/tmp# fastboot erase bootloader-boot1
   erasing 'bootloader-boot1'...
   OKAY [  0.035s]
   finished. total time: 0.035s
- c). Using uboot command, connect a debug console cable and press ESC while power on to enter uboot command line
   bananapi_m2s_v1#amlmmc erase 1
   emmckey_is_protected(): protect
   start = 0,end = 57343
   start = 221184,end = 30535679
   Erasing blocks 0 to 8192 @ boot0
   start = 0,end = 8191
   Erasing blocks 0 to 8192 @ boot1
   start = 0,end = 8191
   bananapi_m2s_v1#reset
   resetting ...
   SM1:BL:511f6b:81ca2f;FEAT:A0F83180:20282000;POC:F;RCY:0;EMMC:0;READ:0;CHK:1F;READ:0;CHK:1F;READ:0;CHK;
- These two ways actually erase the bootloader part of EMMC android, After bootup from SDcard Linux, You'd better format the whole EMMC by dd command.
- d). The simplest way is insert the SDcard with Linux image flashed before power on, the Android bootloader will check boot.ini file whether exist in SDcard vfat partition, so that the SDcard Linux will bootup. After bootup, you can format the whole EMMC by dd command and then flash the Linux image to EMMC.
   ...
   BPI: try boot from sdcard
   reading boot.ini
   2453 bytes read in 3 ms (797.9 KiB/s)
   ## Executing script at 03080000
   Starting boot.ini...
   reading env.txt
   3483 bytes read in 7 ms (485.4 KiB/s)
   HDMI: Autodetect: 1080p60hz
   reading Image.gz
   10924573 bytes read in 611 ms (17.1 MiB/s)
   reading bananapi_m2s.dtb
   88054 bytes read in 12 ms (7 MiB/s)
   reading uInitrd
   11704481 bytes read in 655 ms (17 MiB/s)
   reading overlays/wifi_bt_rtl8822cs.dtbo
   729 bytes read in 6 ms (118.2 KiB/s)
- 2. Bootable EMMC with Linux image flashed
- a). Using uboot command, connect a debug console cable and press ESC while power on to enter uboot command line
bananapi_m2s# mmc erase 0 1000
- b). Linux u-boot also check boot.ini file whether exist in SDcard vfat partition so that the SDcard Linux will bootup. After bootup, you can format the whole EMMC by dd command or flash the Linux image directly to EMMC.
- 3. A extreme situation is bootloader or uboot corrupted, Rom load it from EMMC but hangup in u-boot or BL2, for example the boot process will hangup in BL2 of EMMC if dram init failed, The only way is format the EMMC with usb burning tool, or download the Android image completely and then try other ways to erase EMMC or flash Linux image to EMMC.
- 4. Rom will try to load bootloader from SDcard directly if EMMC is empty.
Erase Emmc Android by dd command
- If the board is flashed android before, the whole emmc must be erased by these commands if you want bootup it with SDcard Linux image.
 $ sudo dd if=/dev/zero of=/dev/mmcblk0boot0 bs=1M status=noxfer
 $ sudo dd if=/dev/zero of=/dev/mmcblk0boot1 bs=1M status=noxfer
 $ sudo dd if=/dev/zero of=/dev/mmcblk0 bs=1M status=noxfer
 $ sync
Cloud-init&Snap
- Cloud-init and Snap service are enabled default, you can disable or remove them.
- 1. disable or remove cloud-init
$ sudo touch /etc/cloud/cloud-init.disabled
- or
$ sudo apt purge cloud-init
- 2. disable or remove snap
$ sudo apt purge snapd
Enable rc-local
- The systemd service rc-local.service already exists in release image, but there is no [Install] part in the unit file. As a result, Systemd is unable to enable it. First, we must update the file.
$ sudo nano /lib/systemd/system/rc-local.service
 [Unit]
 Description=/etc/rc.local Compatibility
 Documentation=man:systemd-rc-local-generator(8)
 ConditionFileIsExecutable=/etc/rc.local
 After=network.target

 [Service]
 Type=forking
 ExecStart=/etc/rc.local start
 TimeoutSec=0
 RemainAfterExit=yes
 GuessMainPID=no

 [Install]
 WantedBy=multi-user.target
 Alias=rc-local.service
- Create /etc/rc.local file.
sudo nano /etc/rc.local
 #!/bin/sh
 #
 # rc.local
 #
 # This script is executed at the end of each multiuser runlevel.
 # Make sure that the script will "exit 0" on success or any other
 # value on error.
 #
 # In order to enable or disable this script just change the execution
 # bits.
 #
 # By default this script does nothing.

 exit 0
- Add executable permission to /etc/rc.local
$ sudo chmod +x /etc/rc.local
- Enable rc-local.service and reboot
 $ sudo systemctl enable rc-local.service
 $ sudo reboot
Enable sudo for Debian
- The release Debian image do not install sudo default, with "su -" command, user can change to root. If you like sudo, you can install it.
 $ su root
 Password:(enter bananapi)
 # apt-get update
 # apt-get install sudo
 # adduser pi sudo
- Then please do logout and login again
Install Docker Engine
- Install Docker Engine on Ubuntu 20.04 Server
- 1. Set up the repository
- Update the apt package index and install packages to allow apt to use a repository over HTTPS:
 $ sudo apt-get update
 $ sudo apt-get install apt-transport-https ca-certificates curl gnupg lsb-release
- Add Docker’s official GPG key:
$ curl -fsSL https://download.docker.com/linux/ubuntu/gpg | sudo gpg --dearmor -o /usr/share/keyrings/docker-archive-keyring.gpg
- Set up the stable repository
 $  echo \
    "deb [arch=arm64 signed-by=/usr/share/keyrings/docker-archive-keyring.gpg] https://download.docker.com/linux/ubuntu/ \
    $(lsb_release -cs) stable" | sudo tee /etc/apt/sources.list.d/docker.list > /dev/null
- 2. Install Docker Engine
 $ sudo apt-get update
 $ sudo apt-get install docker-ce docker-ce-cli containerd.io
- 3. Verify the Docker Engine is installed correctly by running the hello-world image.
$ sudo docker run hello-world

Install docker with a simple command
$ curl -sSL get.docker.com | sudo sh
docs.docker.com on other Linux distributions
TAG:
Milk V
Product Tutorial Catalog How to use host device
Jetson-nano-to-boot-the-system User Guide
SpotPear
ESP32 S3 AI 1.54inch Development Board 1.54 inch TouchScreen Display DeepSeek
Raspberry Pi PICO Long-Range Communication
USB to SPI
Arduino Board Managers Tutorial User Guide
Arducam 64MP Camera
Jetson Orin Nano UGV Beast PT ROS2 AI OpenCV Robot Car MediaPipe
Raspberry Pi Pico rp2040 Display image 1.3inch LCD ST7789 change bmp to hex
Raspberry Pi 5
Sipeed NanoCluster Mini Cluster Board mini data center For Raspberry Pi CM45 / Computer /LM3H /M4N
Spotpear
Raspberry Pi 7inch DSI
Pi5-Pcie-Fish-Boar
LuckFox
Arduino Thermal imaging
User Guide
Raspberry Pi Compute Module 4 CM4 IO Board Dual Gigabit Ethernet Mini Router Board
TAG:
ESP32 S3
Raspberry Pi 0.96inch LCD
Horizon Sunrise 5 D-Robotics RDK X5
Arduino 0.96inch RGB OLED
Raspberry Pi 5 Gen3
1.5inch LCD
Slotted Optocoupler Module
TTL UART To CAN
SpotPear
Raspberry Pi DS3231
UGV Beast PT ROS2 AI 4G 5G OpenCV Robot Car MediaPipe Raspberry Pi4B Pi5
Raspberry Pi 5 CSI Cable
Raspberry Pi Touchscreen
spotpear
Pi4B
Bus Servo DC-BUCK-Adapter 7.2V Voltage mini module For SC15 SC09 Servo
USB TO RS485
Wireless RTL8822CE NIC 2.4G 5GHz Dual Band WiFi High Speed Wireless Card RTL8822CE-CG core
8.8inch LCD 1920x480 Computer PC Monitor Display Secondary Screen TypeC USB CPU RAM
Raspberry Pi 5