- sales/support
Google Chat:---
- sales
+86-0755-88291180
- sales01
sales@spotpear.com
- sales02
dragon_manager@163.com
- support
tech-support@spotpear.com
- CEO-Complaints
zhoujie@spotpear.com
- Only Tech-Support
WhatsApp:13246739196
- Purchase/Shipping/Refund
WhatsApp:13424403025
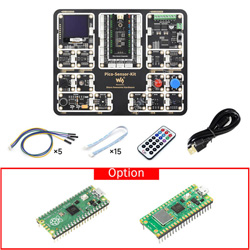
Raspberry Pi Pico-Sensor-Kit-B User Guide
Overview
Pico-Sensor-Kit is a PICO entry-level sensor kit, including common sensors such as LED, buttons, and buzzers, which is easy for beginners to get started.
All-in-one design, all the modules are connected with PCB castellated holes, which is not needed to be soldered or wired anymore. Hence, you do not need to worry about the wiring. and it can provide you with an excellent programming experience.
Of course, you can separate these modules, and then connect them with the wires we provided, and these modules are easy to be integrated into your projects.
- PS: Please pay attention to the sharp cuts and fragments when disassembling the modules.
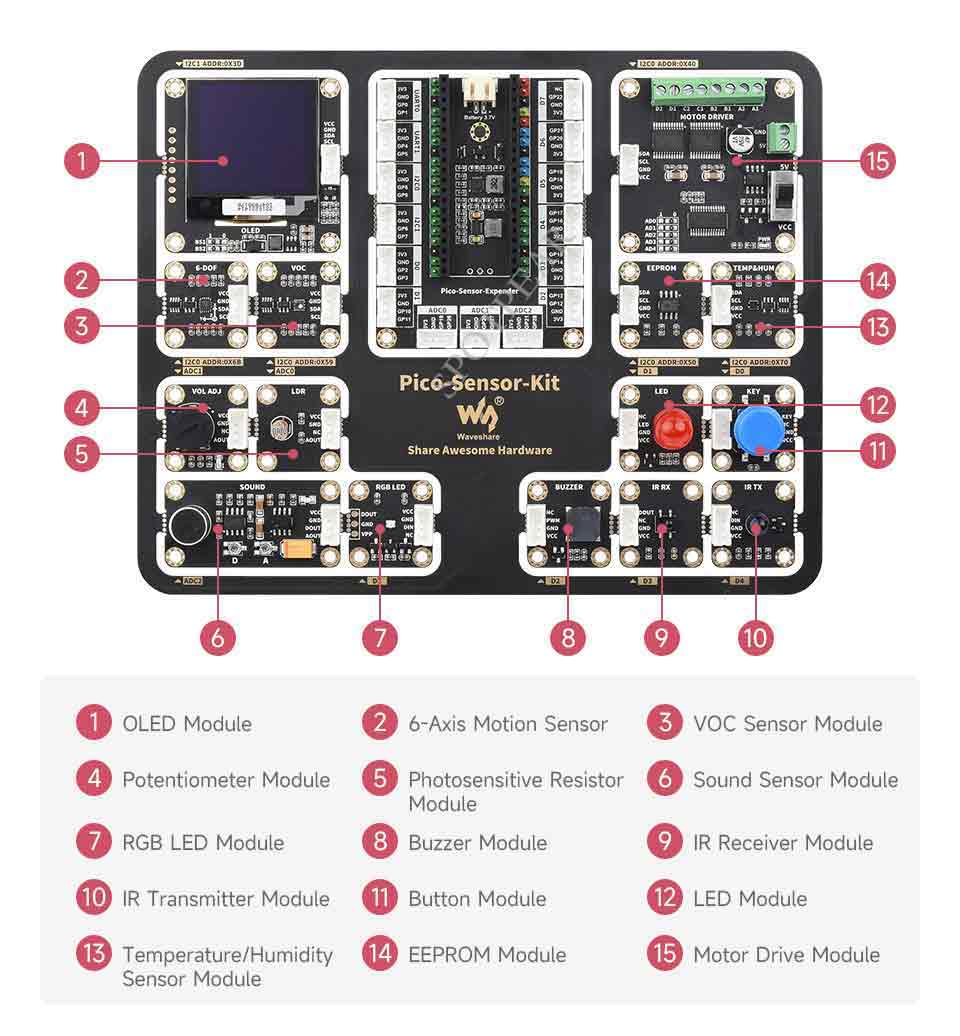
Parameters
Pico-sensor-kit includes 15 modules in total. For more details, please refer to the following table.
| Module | Module Connection Port | Description |
| Button Module | D0 | Detect whether the button is pressed, for human-computer interaction |
| LED Module | D1 | Emit light by inputting electrical signal |
| Buzzer Module | D2 | Sound by the frequency of the input electrical signal |
| IR Receiver Module | D3 | Accept infrared remote control signal and output electrical signal |
| IR Transmitter Module | D4 | Emit infrared light at the frequency of the input electrical signal |
| RGB LED Module | D7 | Full-color lights controlled by a single bus |
| 6-axis Sensor Module | I2C0 (ADDR:0 X 6B) | 6-axis attitude sensor |
| VOC Sensor Module | I2C0 (ADDR:0 X 59) | VOC (Volatile Organic Compound) sensor |
| EEPROM Module | I2C0 (ADDR:0 X 50) | Electrically erasable programmable read-only memory, which can be used to store offline data |
| Temperature/Humidity Sensor Module | I2C0 (ADDR:0 X 70) | Low power consumption temperature and humidity sensor |
| Motor Driver Module | I2C0 (ADDR:0 X 40) | Can be used to drive four 5V motors |
| OLED Module | I2C1 (ADDR:0 X 3D) | 1.5-inch OLED module, 128 × 128 resolution, 16 grayscale display |
| Photoresistor Module | ADC0 | For detecting the brightness |
| Potentiometer Module | ADC1 | Can be used to simulate voltage changes |
| Voice Sensor Module | ADC2 | Can be used to detect ambient sound |
Interface Description
C/C++ SDK Demo User Guide
- Before using the demos and tutorials, you need to set up a development environment and learn the basic methods.
1. GPIO
D0:Key
- Project file address: /c/1.GPIO/D0-KEY
Demo Effect
- When the button is pressed, the LED turns on synchronously.
- When the button is released, the LED turns off and the pressed time is output in the serial port.
D1:LED
- Project file address: /c/1.GPIO/D1-LED
Demo Effect
- LED cycle flashes at 1Hz frequency.
2. PWM
D1:LED
- Project file address: /c/2.PWM/D1-LED
Demo Effect
- The LED cycle flashes at a frequency of 2.5KHz, every 10ms as an interval, increasing or decreasing the duty cycle by 1%, to achieve the breathing light effect.
D2:BUZZER
- Project file address: /c/2.PWM/D2-BUZZER
Demo Effect
- The passive buzzer has a duty cycle of 30% and a frequency between 600Hz-1.4KHz to achieve a siren-like sound effect.
3. I2C
I2C1: LED
- Project file effect: /c/3.I2C/I2C1-OLED
Demo Effect
- 1.5-inch OLED displays graphic test interface and keeps 1s.
- 1.5-inch OLED displays titles and stripes of different grayscale and keeps them.
I2C0:6-DOF
- Project file effect: /c/3.I2C/I2C0-6-DOF
Demo Effect
- 1.5-inch OLED displays title, accelerometer, and gyroscope readings.
- Move or turn the board at this time, you can clearly see the value change.
I2C0:VOC
- Project file address: /c/3.I2C/I2C0-VOC
Demo Effect
- 1.5-inch OLED display title and VOC reading.
- Wait for about 3 seconds, the VOC reading will increase slowly and finally stabilize at a stable value, with an average of about 100 and a maximum of 500. The larger the value, the worse the air quality.
- At this time, blow a breath to the VOC sensor, and the value will gradually increase, and then gradually decrease.
I2C0:EEPROM
- Project file address: /c/3.I2C/I2C0-EEPROM
Demo Effect
- 1.5-inch OLED display title and reset times.
- The number of resets is read from EEPROM and verified by CRC8. Each reset or restart will increase the displayed value by one.
I2C0:SHTC3
- Project file address: /c/3.I2C/I2C0-SHTC3
Demo Effect
- 1.5-inch OLED display title, chip ID, and temperature and humidity readings.
I2C0:MOTOR DRIVER
- Project file address: /c/3.I2C/I2C0-MOTOR-DRIVER
Demo Effect
- Drive the motors on the four ports A, B, C, and D to rotate forward for one second in turn, and the duty cycles are 25%, 50%, 75%, and 100% respectively.
4. ADC
ADC0:LDR
- Project file address: /c/4.ADC/ADC0-ADC0-LDR
Demo Effect
- Output the current voltage on the photoresistor via the serial port every second.
ADC1:VOL ADJ
- Project file address: /c/4.ADC/ADC1-ADC1-VOL-ADJ
Demo Effect
- Output the voltage on the current potentiometer by the serial port every second.
ADC2:SOUND
- Project file address: /c/4.ADC/ADC2-SOUND
Demo Effect
- Output the current sound sensor output voltage and DC output value through the serial port every 0.1 seconds.
- PS: Because sound is a sound wave generated by vibration, the voltage value obtained by the sound sensor is not a stable value, so the output voltage cannot be directly linked to the volume.
5. PIO
D3:IR RX
- Project file address: /c/5.PIO/D3-IR-RX
Demo Effect
- Waiting for the signal from the infrared remote control.
- After receiving the infrared remote control signal, decode and output the data via the serial port.
D4:IR TX
- Project file address: /c/5.PIO/D4-IR-TX
Demo Effect
- Transmit a signal with the address 0 x 00 and the command 0 x 00 conforming to the NEC protocol by the infrared transmitter module every 1 second.
D7:RGB LED
- Project file address: /c/5.PIO/D7-RGB-LED
Demo Effect
- RGB cycle gradient color.
MircoPython
1. GPIO
D0:Key
- Project file address: /python/GPIO/D0-KEY
Demo Effect
- When the key is pressed, the command line output key is pressed.
- When the key is released, the command line outputs the pressing time.
D1:LED
- Project file address: /python/GPIO/D1-LED
Demo Effect
- LED cycle flashes at 1Hz frequency.
D2:IR RX
- Project file address: /python/GPIO/D2-BUZZER
Demo Effect
- The passive buzzer has a duty cycle of 30% and a frequency between 600Hz-1.4KHz to achieve a siren-like sound effect.
D3:IR RX
- Project file address: /python/GPIO/D3-IR-RX.
- Before running the demo, you need to upload ir_rx in the project folder to pico.
Demo Effect
- Waiting for the signal from the infrared remote control.
- After receiving the signal from the infrared remote control, decode and output the data through the command line.
D4:IR TX
- Project file address: /python/GPIO/D4-IR-TX
- Before running the demo, you need to upload the ir_tx in the project folder to pico.
Demo Effect
- Each time the button module is pressed, the infrared transmitter module will emit a signal conforming to the NEC protocol with the address 0 x 01 and the command 0 x 07.
D7:RGB LED
- Project file address: /python/GPIO/D7-RGB-LED
Demo Effect
- RGB cycle gradient color.
2. ADC
ADC0:LDR
- Project file address: /python/ADC/ADC0-LDR
Demo Effect
- Output the current voltage on the photoresistor by the command line every second.
ADC1:VOL ADJ
- Project file address: /python/ADC/ADC1-VOL-ADJ
Demo Effect
- Output the voltage on the current potentiometer every second through the command line.
ADC2:SOUND
- Project file address: /python/ADC/ADC2-SOUND
Demo Effect
- Output the current sound sensor output voltage and DC output value by the command line every 0.3 seconds.
- PS: Because sound is a sound wave generated by vibration, the voltage value obtained by the sound sensor is not a stable value, so the output voltage cannot be directly linked to the volume.
3. I2C
I2C1:OLED
- Project file address: /python/I2C/I2C1-OLED
Demo Effect
- 1.5-inch OLED displays titles and stripes of different grayscale and keeps them.
I2C0:6-DOF
- Project file address: /python/I2C/I2C0-6-DOF
Demo Effect
- Output acceleration and gyroscope readings by the command line every 0.5S.
- Move or turn the board at this time, you can clearly see the value changes.
I2C0:VOC
- Project file address: /python/I2C/I2C0-VOC
- Before running the demo, you need to upload VOC_Algorithm.py in the project folder to pico.
Demo Effect
- Output VOC readings with the command line every 0.5s.
- Wait for about 3 seconds, the VOC reading will increase slowly and finally stabilize at a stable value, with an average of about 100 and a maximum of 500. The larger the value, the worse the air quality.
- At this time, blow a breath to the VOC sensor, and the value will gradually increase, and then gradually decrease.
I2C0:EEPROM
- Project file address: /python/I2C/I2C0-EEPROM
Demo Effect
- Write "hello world!" to EEPROM.
- Then read the string from EEPROM and output it with the command line.
I2C0:SHTC3
- Project file address: /python/I2C/I2C0-SHTC3
Demo Effect
- Output the current temperature and humidity readings with the command line every 0.5S.
I2C0:MOTOR DRIVER
- Project file address: /python/I2C/I2C0-MOTOR-DRIVER
Demo Effect
- Drive the motors on the four ports A, B, C, and D to rotate forward for one second in turn, and the duty cycles are 25%, 50%, 75%, and 100% respectively.
Demo
Datasheet
- AT24C04B-08B
- SGP40
- QMI8658C
- IRM-H638T-TR2
- TSAL6400
- SSD1327
- 1.5inch OLED Specification
- PCA96 datasheet
- TB6612FNG datasheet
Development Software
Pico Quick Start
Download Firmware
- MicroPython Firmware Download

- C_Blink Firmware Download

Demo
Datasheet
- AT24C04B-08B
- SGP40
- QMI8658C
- IRM-H638T-TR2
- TSAL6400
- SSD1327
- 1.5inch OLED Specification
- PCA96 datasheet
- TB6612FNG datasheet