




- sales/support
Google Chat:---
- sales
+86-0755-88291180
- sales01
sales@spotpear.com
- sales02
dragon_manager@163.com
- support
tech-support@spotpear.com
- CEO-Complaints
zhoujie@spotpear.com
- Only Tech-Support
WhatsApp:13246739196
- Purchase/Shipping/Refund
WhatsApp:13424403025
Write Image for Compute Module Boards Lite version
If your CM4 board is the Lite version without eMMC and you need to use a Micro SD card, we recommend you write images with an SD card reader.
- Download the newest Raspberry Pi image from Raspberry Pi Website.
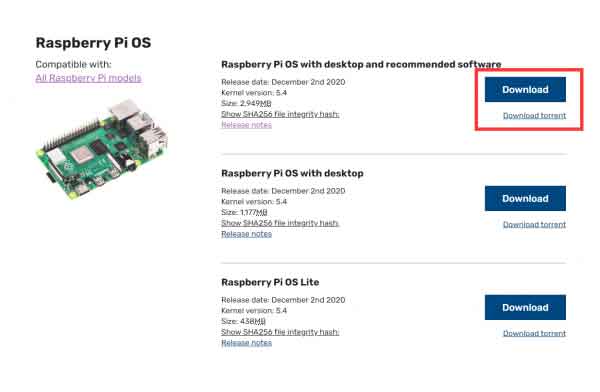
- Connect your Micro SD card to the host PC with the card reader.
- Format the Micro SD card (the portable disk) by SDFormatter.exe software.
- Write the Raspberry Pi image to the Sd card by Win32DiskImager.exe software, choose the image file, and click "Write" to start. It may prompt you to format the CM4 again after writing, just ignore it.
- After writing, a disk named BOOT is recognized, go into the disk and modify the config.txt file. Add the line to the file: dtoverlay=dwc2,dr_mode=host.
- To finish, eject the BOOT disk from the host PC. Disconnect the USB cable and power adapter, disconnect the BOOT, and set the switch to OFF. restart the board and go ahead with the examples.
- If you do not have a card reader, you can insert the SD card into the carrier board and write it just like the eMMC version.
TAG:
RP2040-Keyboard-3
Raspberry Pi RP2040 Camera
7inch Round LCD HDMI Capacitive 7 inch Touchscreen Display 1080x1080 For Raspberry Pi/Jetson Nano/mini PC
ESP32 C3 1.44inch LCD
ESP32-S3 1.28inch Round LCD Display Screen Module Development Board GC9A01A QMI8658A With Case
Raspberry Pi LCD display screen 1.3inch ST7789 with Game Button A
Raspberry Pi 5 USB Audio
Python HTTP Request Communication
Raspberry Pi Pico 2 RP2350 1.47 inch LCD Display Development board RP2350A 1.47inch Screen RGB color $8.5
Core3566004000
Raspberry Pi 1.54inch OLED
BPI
Raspberry Pi 5 PCIe FFC Connector to Standard PCIe x1 Slot (C) Expansion Board
Magnetic Encoder Servo Motor 120KG.CM 24V 360° RS485 High Precision And Large Torque
Raspberry Pi 12.3 inch DSI MIPI Display TouchScreen LCD 720x1920 Luckfox Lyra Omni3576 RK3576
Luckfox Pico Max
Raspberry Pi Pico 2 RP2350 industrial 6-ch Relay RS485 isolation protection
Pi5
ESP32-S3 AI 1.54-inch (G) e-Paper Ink Screen 1.54inch Display AIoT Development Board Deepseek
Raspberry Pi 5
TAG:
PoE IO Expansion Board Raspberry Pi Compute Module CM4S/CM3
Raspberry Pi Pico 2 XIAO RP2350 Arm Cortex-M33 Hazard3 RISC-V RAM Seeed Studio
Raspberry Pi RP2040
ESP32-S3 Development Board 3.16 inch LCD display 3.16inch Screen SD slot 320x820 RGB LED ST7701
SeeedStudio SenseCAP Watcher Clear Enclosure Camera AI ESP32-S3 Himax WiseEye2 HX6538 AI Agent
Raspberry Pi 5 PCIE to MiniPCIe For wireless network WIFI Card USB Bluetooth
Milk-V
SpotPear
LCD
AS7341 Spectral Color Sensor Visible Spectrum Sensor
Raspberry Pi RTC WatchDog HAT (B)
ESP32 C3 MINI TV LVGL Astronaut Clock Watch Buzzer 1.69inch LCD TouchScreen Display ST7789 240x280
Power Manager Module
SpotPear
E-Ink
Pi5
BBC Microbit programmable gamepad for Micro:bit
Raspberry Pi 5
Raspberry Pi 1.3inch
6mm Wide Angle CS Lens Raspberry Pi High Quality Camera CS Global Shutter Camera