


- sales/support
Google Chat: zj734465502@gmail.com
- sales
+86-0755-88291180
- sales01
sales01@spotpear.com
- sales02
dragon_manager@163.com
- support
services01@spotpear.com
- CEO-Complaints
manager01@spotpear.com
- sales/support
WhatsApp:13246739196
- HOME
- >
- ARTICLES
- >
- Common Moudle
- >
- LCD
5/7inch-USB-Monitor Guide
Resource
- Software for Windows: SpotPear PC Monitor
Hardware Connection
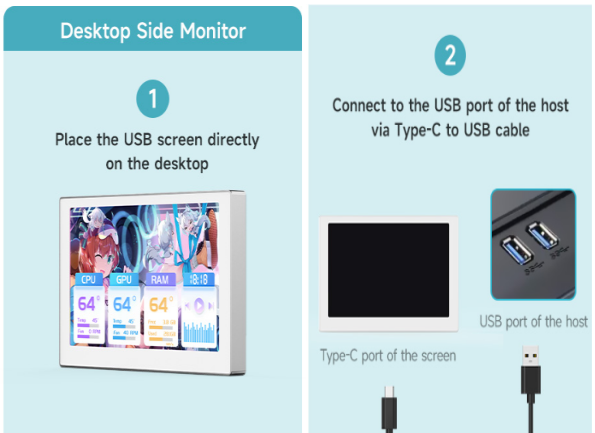
Desktop Secondary Screen: USB Type-C Connection
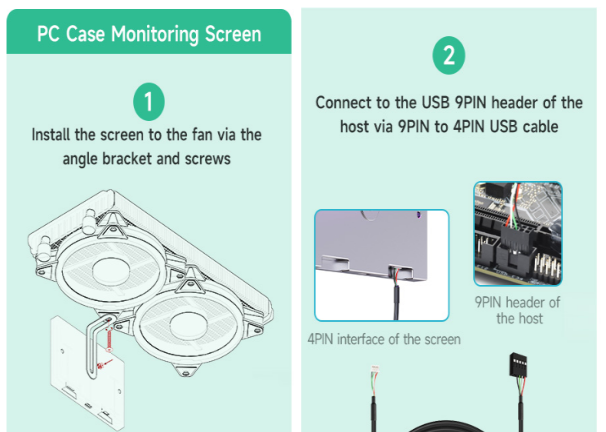
PC Case Secondary Screen: 9PIN Interface Connection
Software Setting
- Download Waveshare PC Monitor.
- Install the player driver "K-Lite_Codec_Pack.exe" in the PCMonitor directory:
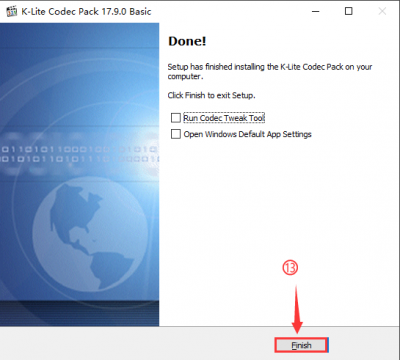
① Select "Fresh install"
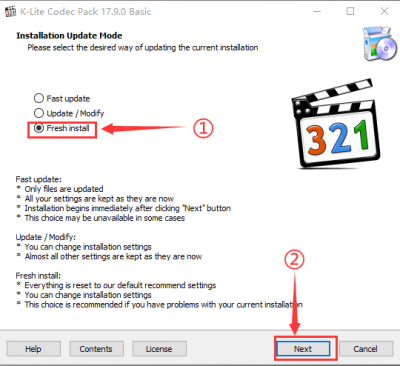
② All select "Next"
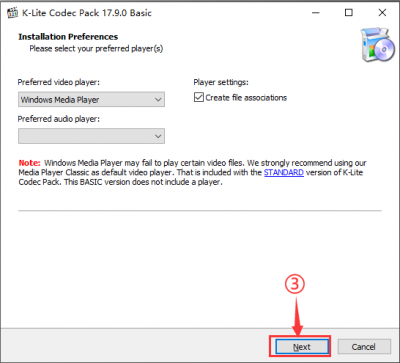
③ Click on "Finish" to end the driver installation
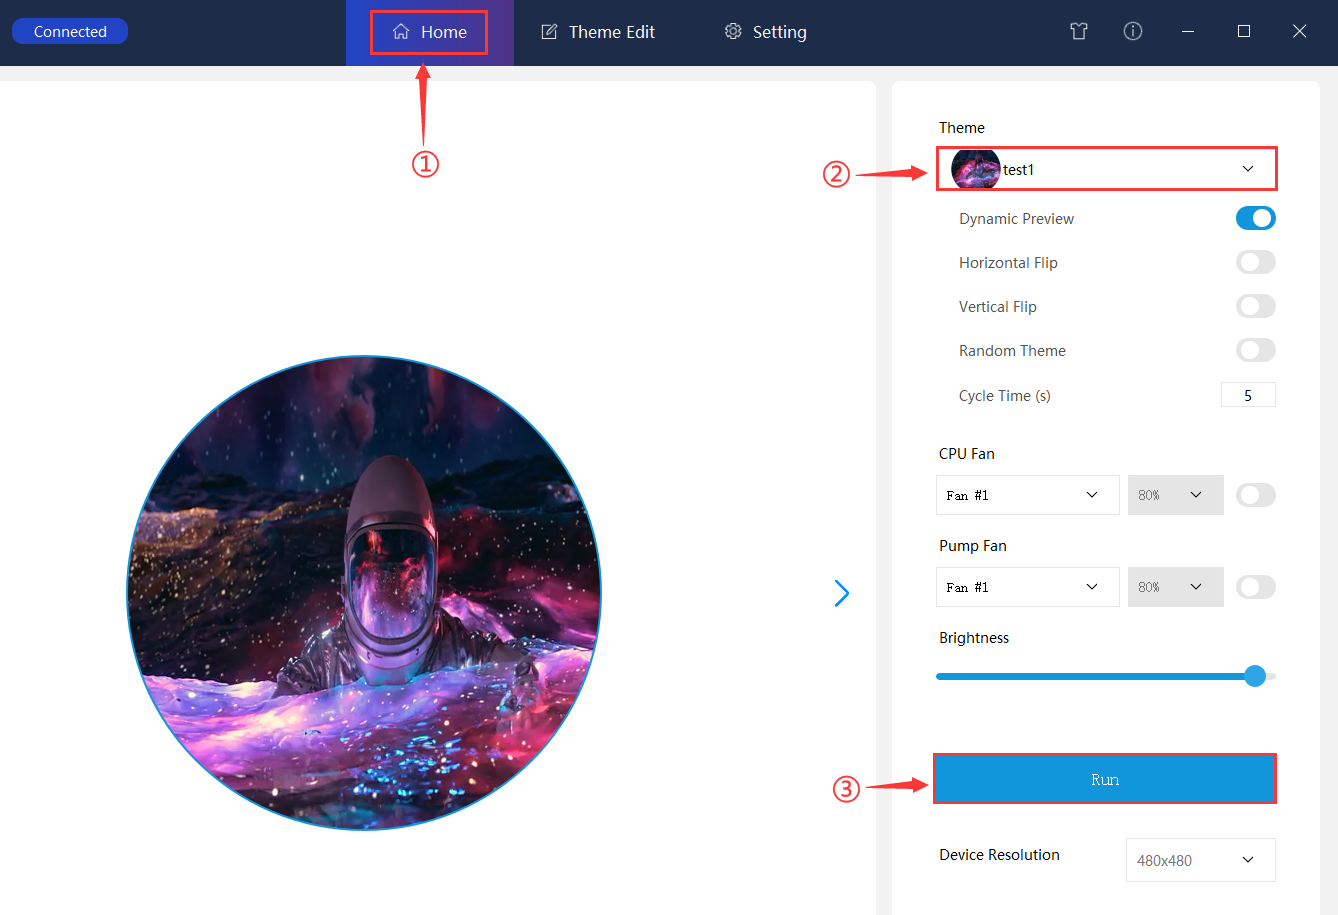
- 3. Double-click to open PCMonitor software, "Connected" on the top left corner, choose your favorite theme on the right side, and click "Run" to display it.

Theme Customization
1. Enter "Theme Edit" Interface

2. Video Setting
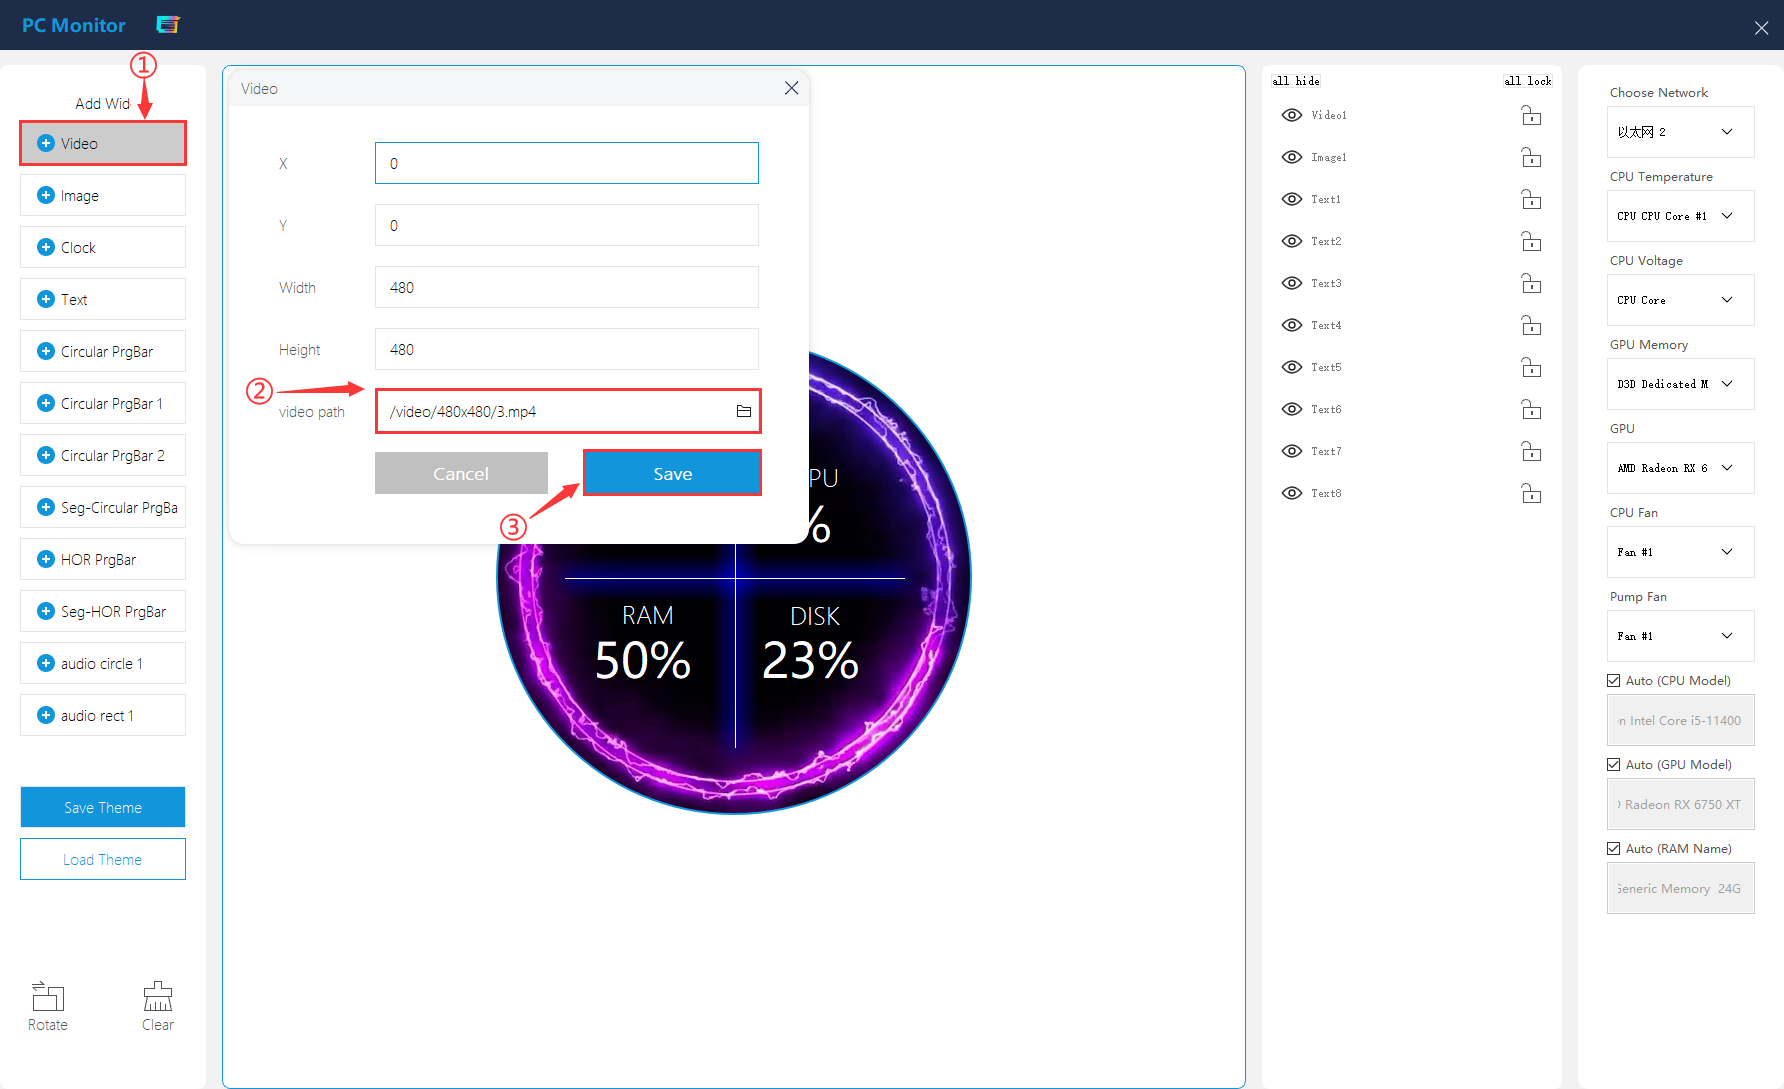
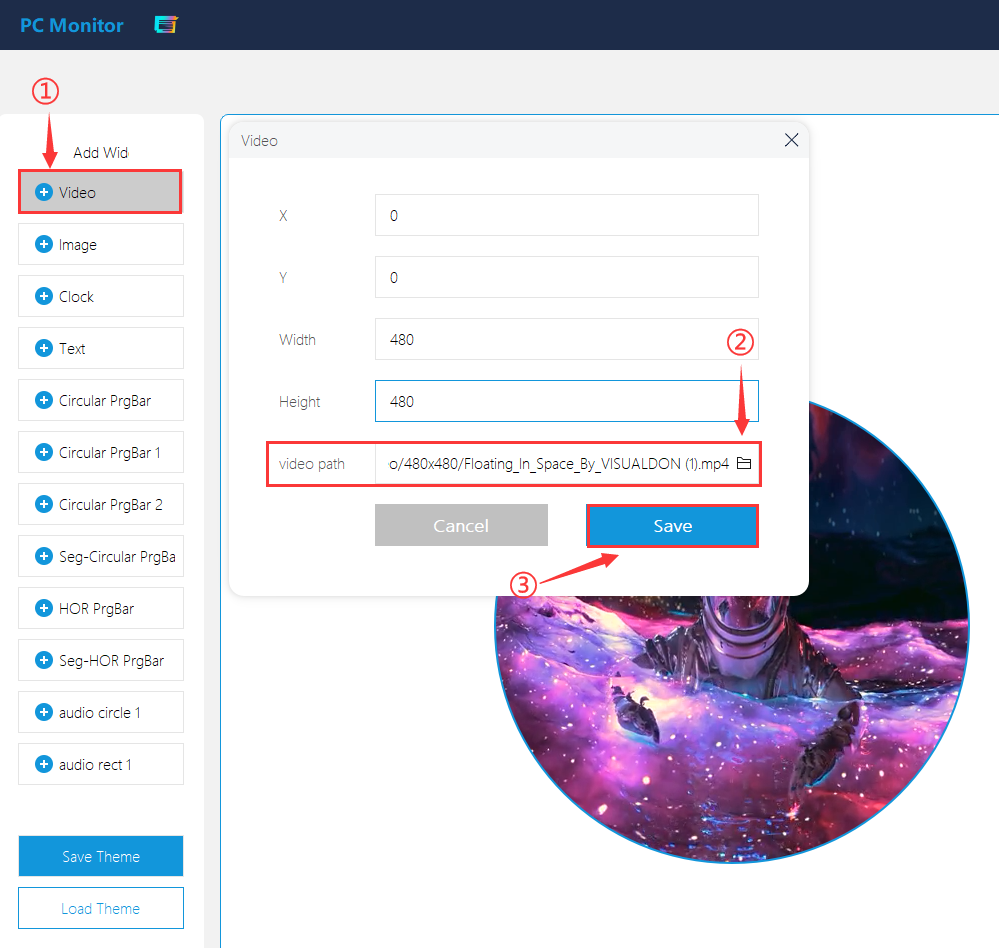
① Click "+ Video", and set up the original (X, Y) and video size.
② Set the correct video path, save the created video file into the "/video/480x480" file directory, and select it. (PS: H264 encoding format file is required).
③ Click "Save", and the corresponding video is previewed. (you can edit it by right-clicking on the layer). For example, if the original coordinates are set as (0,0), and the video size is 480x480, then the theme will present a full-screen effect.
3. Images Setting
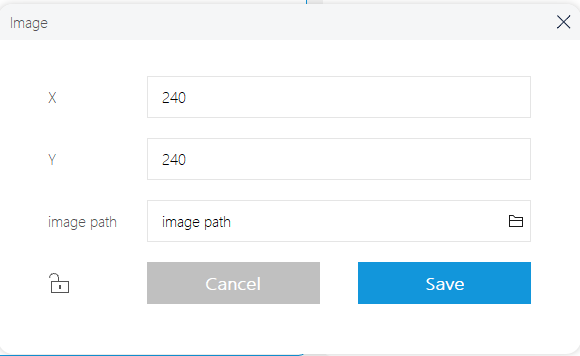
① Click "+ Image", and set up the centered coordinates as (X, Y) and the centered position is (240, 240) by default.
② Set the correct image path, save the created image file into the "/image/480x480" file directory, and select it.
③ Click "Save", and the corresponding image is previewed. (You can edit it by right-clicking on the layer).
4. Clock Setting
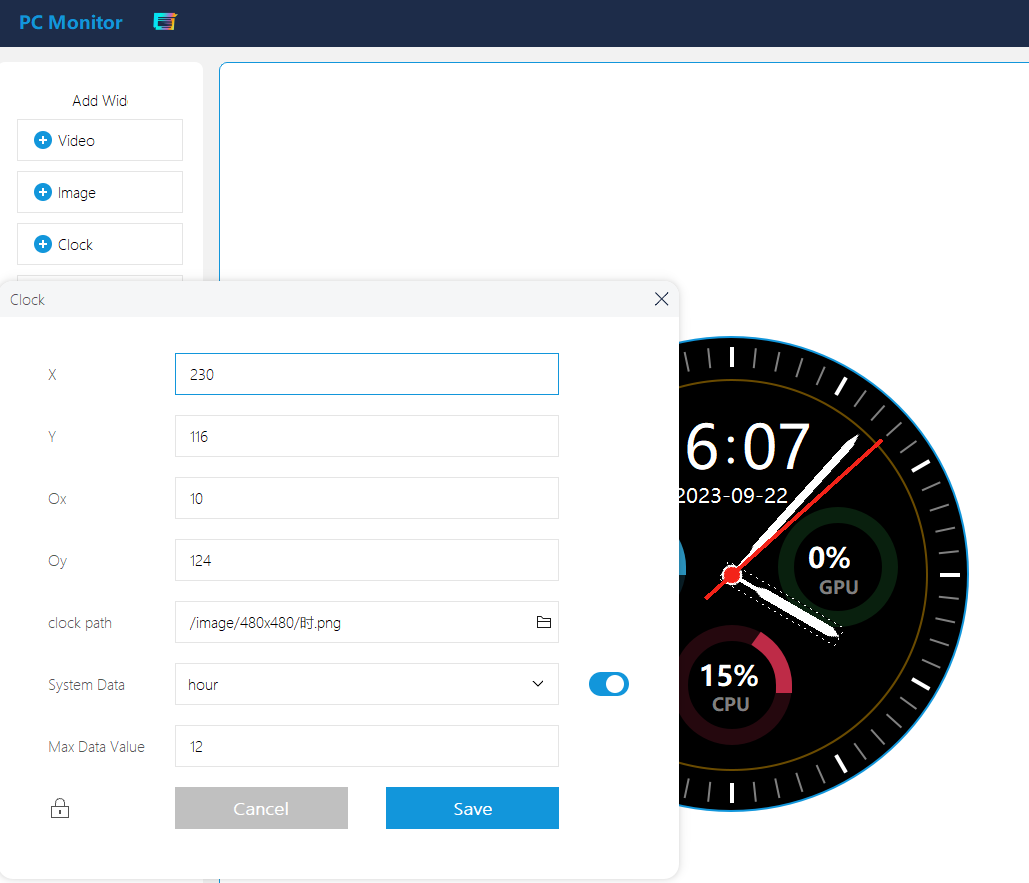
① Click "+ Clock", and place the images corresponding to 'hour,' 'minute,' and 'second' in the "/image/480x480" directory and select them.
② Set the relative positions of three-pointer images and rotate them around the central origin.
③ Open system data and set them separately as 'hour,' 'minute,' and 'second'.
④ Set the maximum values for system data, with 'hour' set to 60, and 'minute' and 'second' set to 60.
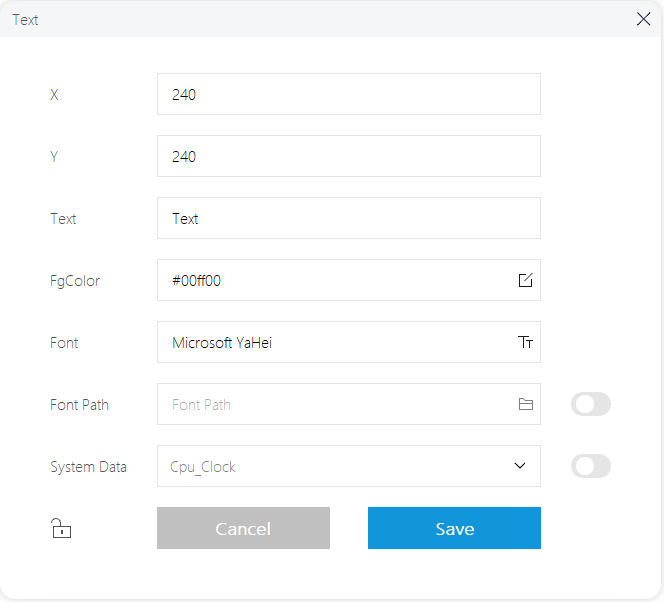
5. Text Setting
① Click on '+ Text' to set the text's coordinates ((240,240) is centered by default, and draggable using the mouse).
② Set the text content, FgColor, and font, then click "Save" to apply.
③ After checking "System Data", the corresponding dynamic values of the system data will be displayed.
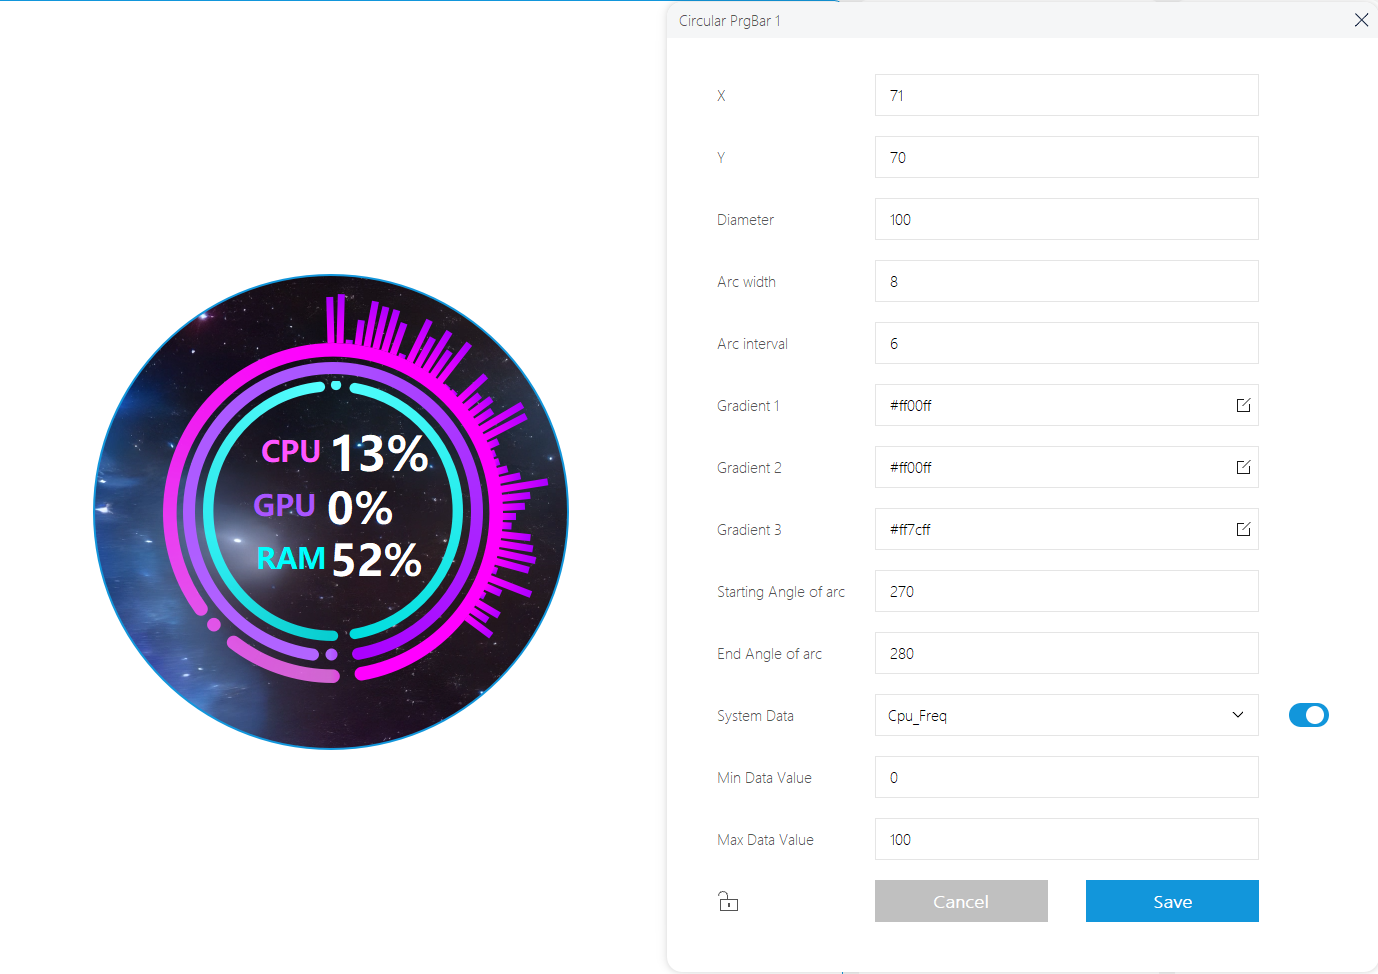
6. Circular PrgBar Setting
① Click "+ Circular PrgBar " to set up the basic parameters of the circle such as the coordinates, diameter, arc width, and arc spacing.
② Set the color, and it supports three gradient colors (or display one color).
③ Set the starting and ending angles of the arc to control the display direction and arc length.
④ After checking the system data and setting the upper and lower data limits, the corresponding system data will be converted into the dynamic effect of the Circular PrgBar.
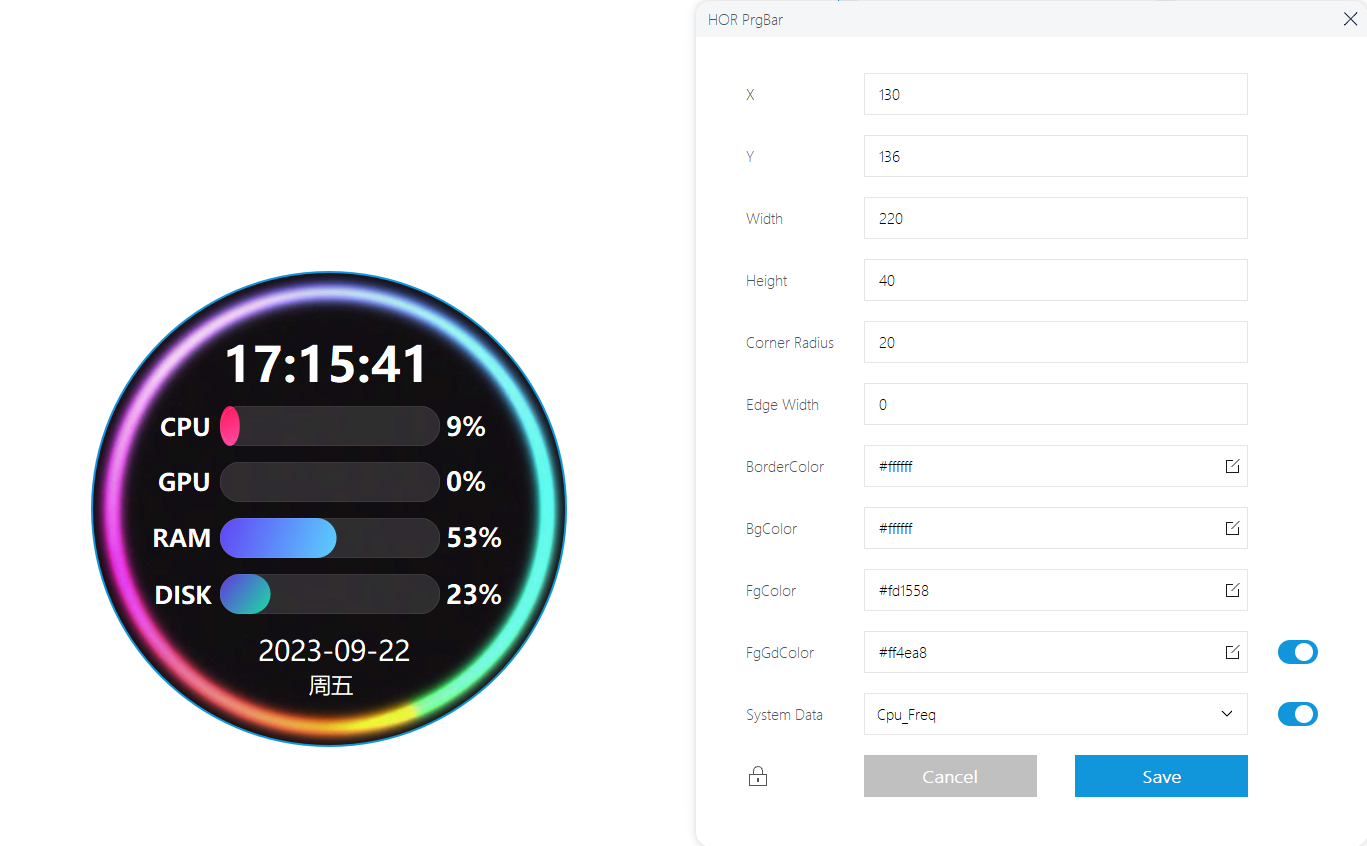
7. HOR PrgBar Setting
① Click on "+ HOR PrgBar" to set the basic parameters of the horizontal progress bar, such as its coordinates, width, height, corner radius, and border width.
② Set the border color, the BgColor of the HOR PrgBar, and the FgColor of the content, supporting gradient foreground display. (If not selected, it will display the same color.)
③ After checking 'System Data,' the corresponding system data will be converted into dynamic effects for the HOR PrgBar.
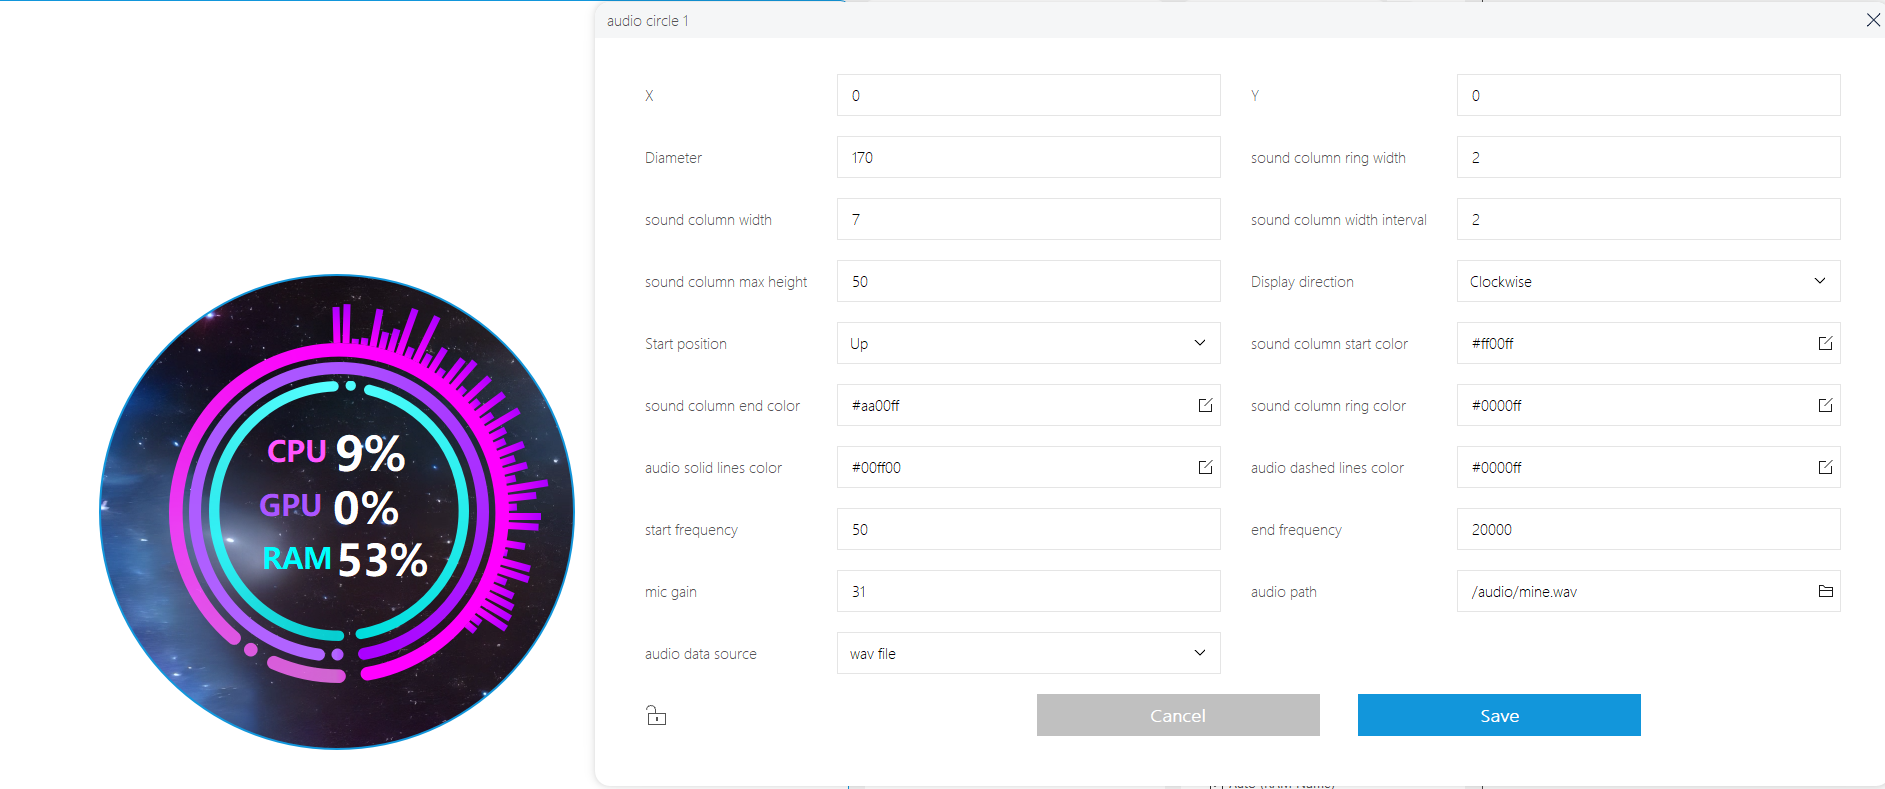
8. Audio Arc Setting
① Click "+ Audio arc" to set the basic parameters such as the circle coordinates and the diameter.
② Sound Column Ring Width: The carrier for all sound columns will be displayed in the outer ring of the audio circle.
③ Sound Column Width: Indicates the width value of each individual sound column, value = 7 is recommended.
④ Sound Column Width Interval: Indicates the width interval value of each individual sound column, value = 2 is recommended.
⑤ Sound Column Max Height: Indicates the max height value of each individual sound column, value = 50 is recommended.
⑥ Display Direction: Set the rotation direction of the sound column ring, clockwise or anticlockwise.
⑦ Start Position: Set the starting position of the sound column ring, up/down/left/right.
⑧ Sound Column Start Color: All column colors are generated by gradient colors, and the starting color represents the gradient starting color of the first independent sound column.
⑨ Sound Column End Color: All column colors are generated by gradient colors, and the ending color represents the gradient ending color of the first independent sound column.
⑩ Sound Column Ring Color: Indicates the color of the outer sound column ring.
⑪ Audio Solid Lines Color: Indicates the middle solid line of the sound column ring.
⑫ Audio Dashed Lines Color: Indicates the solid line of the internal sound column ring.
⑬ Start Frequency: Set the starting frequency of the microphone or .wav file spectrum; (spectrum range: 1-20000).
⑭ End Frequency: Set the ending frequency of the microphone or .wav file spectrum; (spectrum range: 1-20000).
⑮ Mic Gain: Sets the degree of amplification for the microphone to acquire the ambient sound input signal and controls the sensitivity to the sound signal; (gain value range: 0-31).
⑯ Audio Path: Set the path of .wav audio file, and only take effect when the audio data source is "wav file".
⑰ Audio Data Source: Set the data source of the audio signal for the audio circle.
- "randomNumbers": use the random data frequency.
- "audio mic": use the mic to get the ambient sound frequency.
- "wav file": use the frequency band of the .wav audio file.
Wallpaper Dynamic Background Setting (Expanded Application, No-necessary Setting)
- 1. Download Steam software, install the Wallpaper Engine application (this application is not free), open Wallpaper Engine, and download your favorite dynamic wallpaper from Workshop. Right-click to select "Open in Explorer", and you can see the downloaded MP4 file in the corresponding file folder.

- 2. Open the following website to convert the format: https://video.online-convert.com/convert-to-mp4
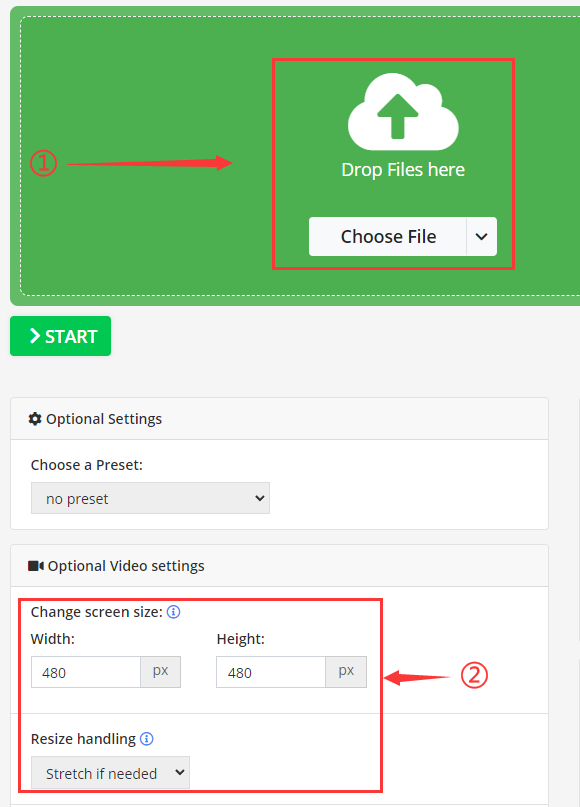
① Import the downloaded MP4 wallpaper;
② Set the exported video size to 480x480 pixels and set the "Resize handling" as stretchable;
③ Click "Start" to export the video.

- 3. Place the processed video with the resolution of 480x480 to "PCMonitor\video\480x480".
- 4. Open the PCMonitor.exe application (reboot to take effect if it is enabled).
- 5. Click "Edit Theme" -> Add "Video" -> Input "Video Path" -> Click on "Save", and name it ".theme".
- 6. Return to the "main page" -> Click on "Select Theme" -> Check the corresponding .theme file in the drop-down box -> Click on "Run".