- sales/support
Google Chat: zj734465502@gmail.com
- sales
+86-0755-88291180
- sales01
sales01@spotpear.com
- sales02
dragon_manager@163.com
- support
services01@spotpear.com
- CEO-Complaints
manager01@spotpear.com
- sales/support
WhatsApp:13246739196
- HOME
- >
- ARTICLES
- >
- Common Moudle
- >
- LCD
1.54inch OLED Module User Guide
Document
Demo
Software
Datasheet
Introduction
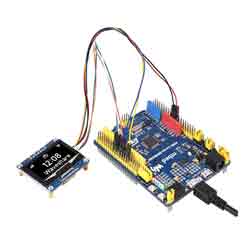
- This product is a 1.54-inch OLED module, a built-in SSD1309 driver chip, using the SPI/I2C interface communication, provides Raspberry Pi, Arduino, STM32, ESP32, Jetson Nano, and other demo information.
Parameters
- OPERATING VOLTAGE: 3.3V / 5V
- COMMUNICATION INTERFACE: SPI / I2C
- DRIVER: SSD1309
- RESOLUTION: 128 × 64 pixels
- PIXEL SIZE: 0.254 × 0.254(mm)
- DISPLAY SIZE: 35.05 × 17.52mm
- MODULE SIZE: 43 × 37.5(mm)
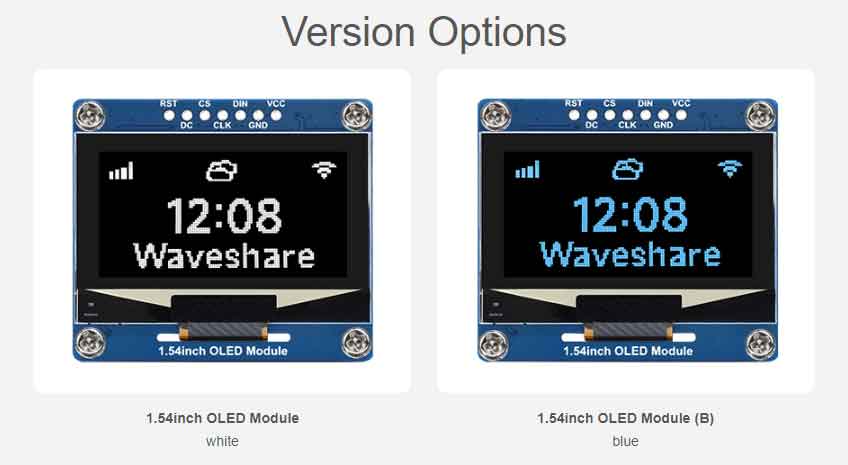
- DISPLAY COLOR:
- 1.54inch OLED Module: White
- 1.54inch OLED Module (B): Blue
Pinout
| PIN | Description |
| VCC | 5V/3.3V Power Input |
| GND | Power Ground |
| DIN | Data Input |
| CLK | Clock Signal Input |
| CS | Chip selection, low active |
| DC | Data/command, low for command, high for data |
| RST | Reset, low active |
Hardware Configuration
OLED module provides two kinds of driver interfaces: 4-wire SPI and I2C interfaces respectively. There are two optional soldering resistors on the back of the module at the lower left corner, through the choice of resistors to select the corresponding communication mode, as shown in the figure: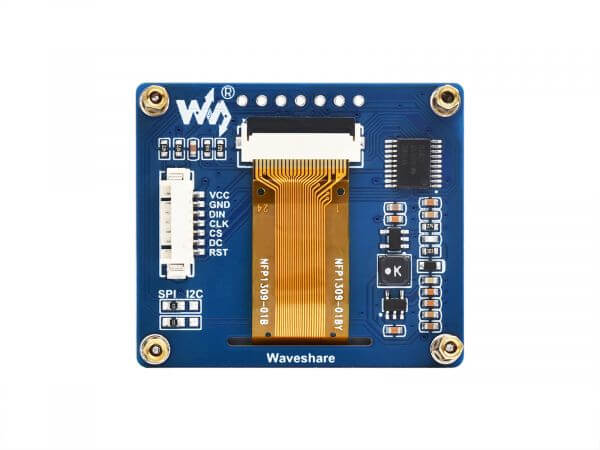
The module adopts a 4-wire SPI communication mode by default, that is, the resistor is connected to the SPI by default. The specific hardware configuration is as follows:
- 4-wire SPI:
That is the factory demo setting: two 0R resistors are connected to the SPI position;
- I2C:
Two 0R resistors are connected to the I2C position;
PS: The demo is set as SPI mode by default, if you need to switch the mode, please modify the DEV_Config.h. See demo description - underlying hardware interface - interface selection for more details.
Communication Protocol
SPI Protocol
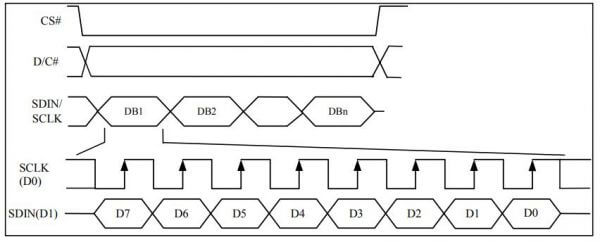
- The 4-wire serial interface consists of Serial Clock (SCLK), Serial Data (SDIN), D/C#, and CS#. In the 4-wire SPI mode, D0 serves as SCLK, and D1 serves as SDIN. For the unused data pins, D2 should be kept open. The pins from D3 to D7, "E" and "R/W# (WR#)" can be connected to external ground.
- SDIN is shifted in on each rising edge of SCLK, in the order of D7, D6, ..., into an 8-bit shift register. D/C# is sampled every 8 clocks, and the data byte in the shift register is written into the Graphic Display Data RAM (GDDRAM) or command register in the same clock cycle.
RPI User Guide
Provide BCM2835, WiringPi, and RPI (Python) library demo.
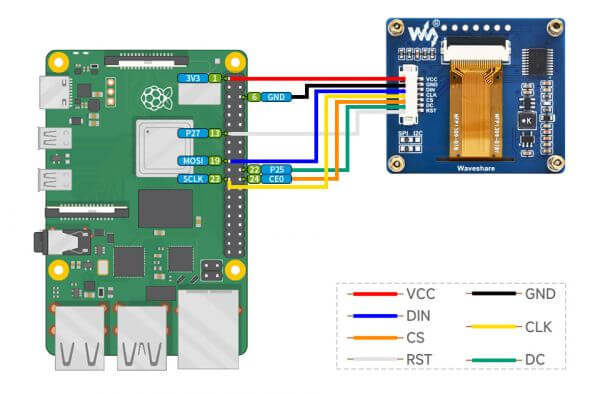
Hardware Connection
When connecting to the Raspberry Pi, you can use a 7PIN cable to connect according to the following table:
| OLED | Raspberry Pi | |
| BCM2835 | Board | |
| VCC | 3.3V | 3.3V |
| GND | GND | GND |
| DIN | MOSI / SDA | 19 / 3 |
| CLK | SCLK / SCL | 23 / 5 |
| CS | CE0 | 24 |
| DC | 25 | 22 |
| RST | 27 | 13 |
- Four-wire SPI wiring diagram:
Enable SPI and I2C Interface
- Open the Raspberry Pi and enter the following command to access the configuration interface:
sudo raspi-config
Select Interfacing Options -> SPI -> Yes to enable the SPI interface

And then reboot the Raspberry Pi:
sudo reboot
Same for I2C, enter the configuration interface and select Interfaces Options -> I2C -> Yes to turn on the IIC interface, then reboot.
Install Library
BCM2835
#Open the Raspberry Pi terminal and run the following command:
wget http://www.airspayce.com/mikem/bcm2835/bcm2835-1.71.tar.gz
tar zxvf bcm2835-1.71.tar.gz
cd bcm2835-1.71/
sudo ./configure && sudo make && sudo make check && sudo make install
#For more, you can refer to the official website: http://www.airspayce.com/mikem/bcm2835/
WiringPi
#Open the Raspberry Pi terminal and run the following command:
cd
sudo apt-get install wiringpi
#For Raspberry Pi systems after May 2019 (earlier than that do not need to execute), an upgrade may be required:
wget https://project-downloads.drogon.net/wiringpi-latest.deb
sudo dpkg -i wiringpi-latest.deb
gpio -v
#Run gpio -v and version 2.52 will appear, if it does not appear, it means there is an installation error.

#The Bullseye branch system uses the following command:
git clone https://github.com/WiringPi/WiringPi
cd WiringPi
./build
gpio -v
#Run gpio -v and version 2.70 will appear, if it does not appear, it means there is an installation error.
- Install Python function library:
#python2
sudo apt-get update
sudo apt-get install python-pip
sudo apt-get install python-pil
sudo apt-get install python-numpy
sudo pip install RPi.GPIO
sudo pip install spidev
sudo apt-get install python-smbus
#python3
sudo apt-get update
sudo apt-get install python3-pip
sudo apt-get install python3-pil
sudo apt-get install python3-numpy
sudo pip3 install RPi.GPIO
sudo pip3 install spidev
sudo apt-get install python3-smbus
Download the Test Demo
Open the Raspberry Pi and run:
sudo apt-get install p7zip-full
sudo wget https://files.waveshare.com/upload/2/2c/OLED_Module_Code.7z
7z x OLED_Module_Code.7z
cd OLED_Module_Code/RaspberryPi
Run the Test Demo
The following commands should be executed in the RaspberryPi directory, otherwise, the directory will not be indexed:
C
cd c
sudo make clean
sudo make -j 8
Test demos for all screens can be called directly by entering the corresponding size:
sudo ./main #Screen size
Depending on the OLED, one of the following commands should be entered.
#0.91inch OLED Module
sudo ./main 0.91
------------------------------
#0.95inch RGB OLED (A)/(B)
sudo ./main 0.95rgb
------------------------------
#0.96inch OLED (A)/(B)
sudo ./main 0.96
------------------------------
#0.96inch OLED Module (C)/(D)/(E)
sudo ./main 0.96
------------------------------
#0.96inch RGB OLED Module
sudo ./main 0.96rgb
------------------------------
#1.27inch RGB OLED Module
sudo ./main 1.27rgb
------------------------------
#1.3inch OLED (A)/(B)
sudo ./main 1.3
------------------------------
#1.3inch OLED Module (C)
sudo ./main 1.3c
------------------------------
#1.32inch OLED Module
sudo ./main 1.32
------------------------------
#1.5inch OLED Module
sudo ./main 1.5
------------------------------
#1.5inch OLED Module (B)
sudo ./main 1.5b
------------------------------
#1.5inch RGB OLED Module
sudo ./main 1.5rgb
------------------------------
#1.51inch OLED Module
sudo ./main 1.51
------------------------------
#1.54inch OLED Module
sudo ./main 1.54
------------------------------
#2.42inch OLED Module
sudo ./main 2.42
Python
- Enter the Python demo directory:
cd python/example
- Run the demo corresponding to the OLED model, the demo supports python2/3:
If you have purchased a 1.3inch OLED Module (C), please enter:
# python2
sudo python OLED_1in3_c_test.py
# python3
sudo python3 OLED_1in3_c_test.py
If you have purchased a 1.5inch RGB OLED Module, please enter:
# python2
sudo python OLED_1in5_rgb_test.py
# python3
sudo python3 OLED_1in5_rgb_test.py
- Model instruction correspondence table:
#0.91inch OLED Module
sudo python OLED_0in91_test.py
------------------------------------
#0.95inch RGB OLED (A)/(B)
sudo python OLED_0in95_rgb_test.py
------------------------------------
#0.96inch OLED (A)/(B)
sudo python OLED_0in96_test.py
------------------------------------
#0.96inch OLED Module (C)/(D)/(E)
sudo python OLED_0in96_test.py
------------------------------------
#0.96inch RGB OLED Module
sudo python OLED_0in96_rgb_test.py
------------------------------------
#1.27inch RGB OLED Module
sudo python OLED_1in27_rgb_test.py
------------------------------------
#1.3inch OLED (A)/(B)
sudo python OLED_1in3_test.py
------------------------------------
#1.3inch OLED Module (C)
sudo python OLED_1in3_c_test.py
------------------------------------
#1.32inch OLED Module
sudo python OLED_1in32_test.py
------------------------------------
#1.5inch OLED Module
sudo python OLED_1in5_test.py
------------------------------------
#1.5inch OLED Module (B)
sudo python OLED_1in5_b_test.py
------------------------------------
#1.5inch RGB OLED Module
sudo python OLED_1in5_rgb_test.py
------------------------------------
#1.51inch OLED Module
sudo python OLED_1in51_test.py
------------------------------------
#1.54inch OLED Module
sudo python OLED_1in54_test.py
------------------------------------
#2.42inch OLED Module
sudo python OLED_2in42_test.py
- Please make sure that the SPI is not occupied by other devices, you can check in the middle of /boot/config.txt.
Description of C codes (API)
Hardware Interface
1. There are three ways for C to drive: BCM2835 library, WiringPi library, and Dev library respectively
2. We use Dev libraries by default. If you need to change to BCM2835 or WiringPi libraries, please open RaspberryPi\c\Makefile and modify lines 13-15 as follows: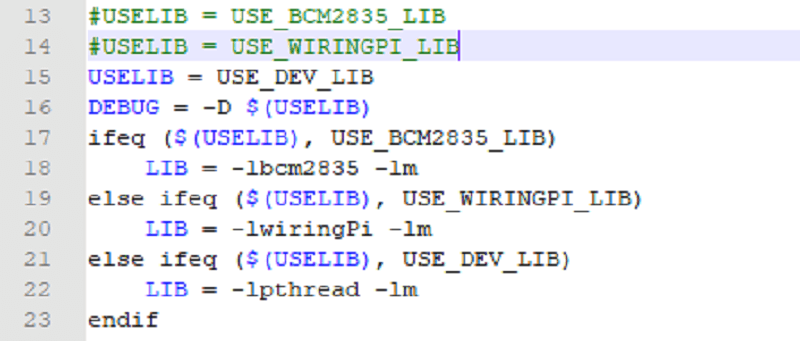
We have carried out the underlying encapsulation. Because the hardware platform is different, the internal implementation is different. If you need to know the internal implementation, you can go to the corresponding directory to view
You can see many definitions in DEV_Config.c(.h), in the directory: RaspberryPi\c\lib\Config
- Interface selection:
#define USE_SPI_4W  1
#define USE_IIC     0
Note: Modified here directly to switch SPI/I2C
- Data type:
#define UBYTE      uint8_t
#define UWORD      uint16_t
#define UDOUBLE    uint32_t
- Module initialization and exit processing.
void DEV_Module_Init(void);
void DEV_Module_Exit(void);
Note:
  Here is some GPIO processing before and after using the LCD screen.
- Write GPIO:
void DEV_Digital_Write(UWORD Pin, UBYTE Value)
Parameter:
     UWORD Pin: GPIO Pin number
     UBYTE Value: level to be output, 0 or 1
- Read GPIO:
UBYTE DEV_Digital_Read(UWORD Pin)
Parameter:
     UWORD Pin: GPIO Pin number
     Return value: level of GPIO, 0 or 1
- GPIO mode setting:
void DEV_GPIO_Mode(UWORD Pin, UWORD Mode)
Parameters:
     UWORD Pin: GPIO Pin number
     UWORD Mode: Mode, 0: input, 1: output
GUI Functions
If you need to draw pictures, display Chinese and English characters, display pictures, etc., we provide some basic functions here about some graphics processing in the directory RaspberryPi\c\lib\GUI\GUI_Paint.c(.h).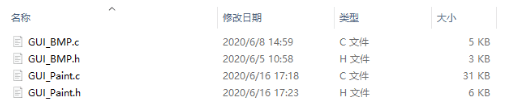
The fonts can be found in RaspberryPi\c\lib\Fonts directory.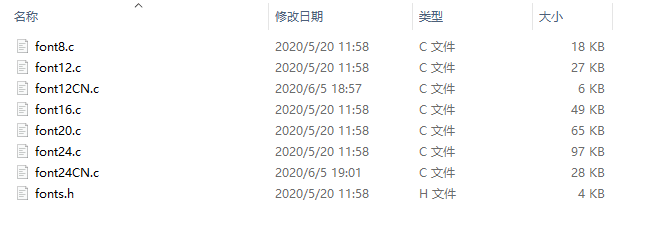
- New image properties: Create a new image buffer, this property includes the image buffer name, width, height, flip angle, and color.
void Paint_NewImage(UBYTE *image, UWORD Width, UWORD Height, UWORD Rotate, UWORD Color)
Parameters:
      Image: the name of the image buffer, which is actually a pointer to the first address of the image buffer;
      Width: image buffer Width;
      Height: the Height of the image buffer;
      Rotate: Indicates the rotation Angle of an image
      Color: the initial Color of the image;
- Select image buffer: The purpose of the selection is that you can create multiple image attributes, there can be multiple image buffers, and you can select each image you create.
void Paint_SelectImage(UBYTE *image)
Parameters:
       Image: the name of the image buffer, which is actually a pointer to the first address of the image buffer;
- Image rotation: Set the rotation Angle of the selected image, preferably after Paint_SelectImage(), you can choose to rotate 0, 90, 180, 270.
void Paint_SetRotate(UWORD Rotate)
Parameters:
        Rotate: ROTATE_0, ROTATE_90, ROTATE_180, and ROTATE_270 correspond to 0, 90, 180, and 270 degrees.
- Sets the size of the pixels:
void Paint_SetScale(UBYTE scale)
Parameters:
	scale: the size of pixels, 2: each pixel occupies one bit; 4: Each pixel occupies two bits.
- Image mirror flip: Set the mirror flip of the selected image. You can choose no mirror, horizontal mirror, vertical mirror, or image center mirror.
void Paint_SetMirroring(UBYTE mirror)
Parameters:
        Mirror: indicates the image mirroring mode. MIRROR_NONE, MIRROR_HORIZONTAL, MIRROR_VERTICAL, MIRROR_ORIGIN correspond to no mirror, horizontal mirror, vertical mirror, and image center mirror respectively.
- Set points of the display position and color in the buffer: here is the core GUI function, processing points display position and color in the buffer.
void Paint_SetPixel(UWORD Xpoint, UWORD Ypoint, UWORD Color)
Parameters:
        Xpoint: the X position of a point in the image buffer
        Ypoint: Y position of a point in the image buffer
        Color: indicates the Color of the dot
- Image buffer fill color: Fills the image buffer with a color, usually used to flash the screen into blank.
void Paint_Clear(UWORD Color)
Parameters:
        Color: fill Color
- The fill color of a certain window in the image buffer: the image buffer part of the window filled with a certain color, usually used to fresh the screen into blank, often used for time display, fresh the last second of the screen.
void Paint_ClearWindows(UWORD Xstart, UWORD Ystart, UWORD Xend, UWORD Yend, UWORD Color)
Parameters:
        Xstart: the x-starting coordinate of the window
        Ystart: the y-starting coordinate of the window
        Xend: the x-end coordinate of the window
        Yend: the y-end coordinate of the window
        Color: fill Color
- Draw point: In the image buffer, draw points on (Xpoint, Ypoint), you can choose the color, the size of the point, the style of the point.
void Paint_DrawPoint(UWORD Xpoint, UWORD Ypoint, UWORD Color, DOT_PIXEL Dot_Pixel, DOT_STYLE Dot_Style)
Parameters:
        Xpoint: indicates the X coordinate of a point.
        Ypoint: indicates the Y coordinate of a point.
        Color: fill Color
        Dot_Pixel: The size of the dot, the demo provides 8 size pointss by default.
              typedef enum {
                 DOT_PIXEL_1X1  = 1,	// 1 x 1
                 DOT_PIXEL_2X2  , 		// 2 X 2
                 DOT_PIXEL_3X3  , 	 	// 3 X 3
                 DOT_PIXEL_4X4  , 	 	// 4 X 4
                 DOT_PIXEL_5X5  , 		// 5 X 5
                 DOT_PIXEL_6X6  , 		// 6 X 6
                 DOT_PIXEL_7X7  , 		// 7 X 7
                 DOT_PIXEL_8X8  , 		// 8 X 8
               } DOT_PIXEL;
        Dot_Style: the size of a point that expands from the center of the point or from the bottom left corner of the point to the right and up.
                 typedef enum {
                     DOT_FILL_AROUND  = 1,
                     DOT_FILL_RIGHTUP,
                  } DOT_STYLE;
- Draw the line: In the image buffer, draw a line from (Xstart, Ystart) to (Xend, Yend), you can choose the color, the width and the style of the line.
void Paint_DrawLine(UWORD Xstart, UWORD Ystart, UWORD Xend, UWORD Yend, UWORD Color, LINE_STYLE Line_Style ,  LINE_STYLE Line_Style)
Parameters:
        Xstart: the x-starting coordinate of the line
        Ystart: the y-starting coordinate of the line
        Xend: the x-end coordinate of a line
        Yend: the y-end coordinate of a line
        Color: fill Color
        Line_width: The width of the line, the demo provides 8 sizes of width by default.
              typedef enum {
                 DOT_PIXEL_1X1  = 1,	// 1 x 1
                 DOT_PIXEL_2X2  , 		// 2 X 2
                 DOT_PIXEL_3X3  ,		// 3 X 3
                 DOT_PIXEL_4X4  ,		// 4 X 4
                 DOT_PIXEL_5X5  , 		// 5 X 5
                 DOT_PIXEL_6X6  , 		// 6 X 6
                 DOT_PIXEL_7X7  , 		// 7 X 7
                 DOT_PIXEL_8X8  , 		// 8 X 8
              } DOT_PIXEL;
        Line_Style: line style. Select whether the lines are joined in a straight or dashed way.
              typedef enum {
                 LINE_STYLE_SOLID = 0,
                 LINE_STYLE_DOTTED,
              } LINE_STYLE;
- Draw a rectangle: In the image buffer, draw a rectangle from (Xstart, Ystart) to (Xend, Yend), you can choose the color, the width of the line, and whether to fill the inside of the rectangle.
void Paint_DrawRectangle(UWORD Xstart, UWORD Ystart, UWORD Xend, UWORD Yend, UWORD Color, DOT_PIXEL Line_width,  DRAW_FILL Draw_Fill)
Parameters:
	Xstart: the starting X coordinate of the rectangle
	Ystart: the starting Y coordinate of the rectangle
	Xend: the x-end coordinate of the rectangle
        Yend: the y-end coordinate of the rectangle
	Color: fill Color
	Line_width: The width of the four sides of a rectangle. And the demo provides 8 sizes of width by default.
		typedef enum {
			DOT_PIXEL_1X1  = 1,	// 1 x 1
			DOT_PIXEL_2X2  , 		// 2 X 2
			DOT_PIXEL_3X3  ,		// 3 X 3
			DOT_PIXEL_4X4  ,	        // 4 X 4
			DOT_PIXEL_5X5  , 		// 5 X 5
 			DOT_PIXEL_6X6  , 		// 6 X 6
                        DOT_PIXEL_7X7  , 		// 7 X 7
                        DOT_PIXEL_8X8  , 		// 8 X 8
                 } DOT_PIXEL;
         Draw_Fill: Fill, whether to fill the inside of the rectangle
              typedef enum {
                 	DRAW_FILL_EMPTY = 0,
                 	DRAW_FILL_FULL,
              } DRAW_FILL;
- Draw circle: In the image buffer, draw a circle of Radius with (X_Center Y_Center) as the center. You can choose the color, the width of the line, and whether to fill the inside of the circle.
void Paint_DrawCircle(UWORD X_Center, UWORD Y_Center, UWORD Radius, UWORD Color, DOT_PIXEL Line_width,  DRAW_FILL Draw_Fill)
Parameters:
	X_Center: the x-coordinate of the center of the circle
	Y_Center: the y-coordinate of the center of the circle
	Radius: indicates the Radius of a circle
	Color: fill Color
	Line_width: The width of the arc, with a default of 8 widths
		typedef enum {
        		DOT_PIXEL_1X1  = 1,	// 1 x 1
        		DOT_PIXEL_2X2  , 		// 2 X 2
        		DOT_PIXEL_3X3  ,		// 3 X 3
        		DOT_PIXEL_4X4  ,		// 4 X 4
        		DOT_PIXEL_5X5  , 		// 5 X 5
        		DOT_PIXEL_6X6  , 		// 6 X 6
        		DOT_PIXEL_7X7  , 		// 7 X 7
        		DOT_PIXEL_8X8  , 		// 8 X 8
		} DOT_PIXEL;
	Draw_Fill: fill, whether to fill the inside of the circle
              typedef enum {
              		DRAW_FILL_EMPTY = 0,
                 	DRAW_FILL_FULL,
              } DRAW_FILL;
- Write Ascii character: In the image buffer, use (Xstart Ystart) as the left vertex, and write an Ascii character, you can select Ascii visual character library, font foreground color, and font background color.
void Paint_DrawChar(UWORD Xstart, UWORD Ystart, const char Ascii_Char, sFONT* Font, UWORD Color_Foreground, UWORD Color_Background)
Parameters:
Xstart: the x-coordinate of the left vertex of a character
Ystart: the Y-coordinate of the left vertex of a character
Ascii_Char: indicates the Ascii character
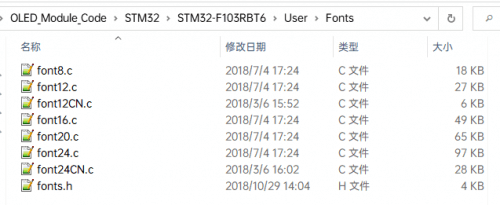
Font: Ascii visual character library, in the Fonts folder the demo provides the following Fonts:
Font8: 5*8 font
Font12: 7*12 font
Font16: 11*16 font
Font20: 14*20 font
Font24: 17*24 font
Color_Foreground: Font color
Color_Background: indicates the background color
- Write English string: In the image buffer, use (Xstart Ystart) as the left vertex, and write a string of English characters, you can choose Ascii visual character library, font foreground color, and font background color.
void Paint_DrawString_EN(UWORD Xstart, UWORD Ystart, const char * pString, sFONT* Font, UWORD Color_Foreground,  UWORD Color_Background)
Parameters:
	Xstart: the x-coordinate of the left vertex of a character
	Ystart: the Y coordinate of the font's left vertex
	PString: string, string is a pointer
	Font: Ascii visual character library, in the Fonts folder the demo provides the following Fonts:
     		Font8: 5*8 font
     		Font12: 7*12 font
     		Font16: 11*16 font
     		Font20: 14*20 font
     		Font24: 17*24 font
	Color_Foreground: Font color
  	Color_Background: indicates the background color
- Write Chinese string: in the image buffer, use (Xstart Ystart) as the left vertex, and write a string of Chinese characters, you can choose character font, font foreground color, and font background color of the GB2312 encoding.
void Paint_DrawString_CN(UWORD Xstart, UWORD Ystart, const char * pString, cFONT* font, UWORD Color_Foreground,  UWORD Color_Background)
Parameters:
	Xstart: the x-coordinate of the left vertex of a character
	Ystart: the Y coordinate of the font's left vertex
	PString: string, string is a pointer
  	Font: GB2312 encoding character Font library, in the Fonts folder the demo provides the following Fonts:
     		Font12CN: ASCII font 11*21, Chinese font 16*21
     		Font24CN: ASCII font24 *41, Chinese font 32*41
	Color_Foreground: Font color
	Color_Background: indicates the background color
- Write numbers: In the image buffer, use (Xstart Ystart) as the left vertex, and write a string of numbers, you can choose Ascii visual character library, font foreground color, and font background color.
void Paint_DrawNum(UWORD Xpoint, UWORD Ypoint, double Nummber, sFONT* Font, UWORD Digit, UWORD Color_Foreground,   UWORD Color_Background)
Parameters:
	Xpoint: the x-coordinate of the left vertex of a character
	Ypoint: the Y coordinate of the left vertex of the font
	Nummber: indicates the number displayed, which can be a decimal
	Digit: It's a decimal number
 	Font: Ascii visual character library, in the Fonts folder the demo provides the following Fonts:
   		Font8: 5*8 font
   		Font12: 7*12 font
   		Font16: 11*16 font
		Font20: 14*20 font
   		Font24: 17*24 font
	Color_Foreground: Font color
	Color_Background: indicates the background color
- Display time: in the image buffer, use (Xstart Ystart) as the left vertex, display time, you can choose Ascii visual character font, font foreground color, and font background color.
void Paint_DrawTime(UWORD Xstart, UWORD Ystart, PAINT_TIME *pTime, sFONT* Font, UWORD Color_Background,  UWORD Color_Foreground)
Parameters:
	Xstart: the x-coordinate of the left vertex of a character
 	Ystart: the Y coordinate of the font's left vertex
	PTime: display time, A time structure is defined here, as long as the hours, minutes, and seconds are passed to the parameters;
	Font: Ascii visual character library, in the Fonts folder the demo provides the following Fonts:
     		Font8: 5*8 font
     		Font12: 7*12 font
     		Font16: 11*16 font
     		Font20: 14*20 font
     		Font24: 17*24 font
  	Color_Foreground: Font color
  	Color_Background: indicates the background color
Python (for Raspberry Pi)
It is compatible with python and python3.
The calls of python are less complex compared to the C demo.
Config.py
- Select interface.
Device_SPI = 1
Device_I2C = 0
Note: Switch SPI/I2C modified here.
- Module initialization and exit processing.
def module_init()
def module_exit()
Note:
1. Here is some GPIO processing before and after using the LCD screen.
2. The module_init() function is automatically called in the INIT () initializer on the LCD, but the module_exit() function needs to be called by itself
- SPI writes data.
def spi_writebyte(data)
- IIC writes data.
i2c_writebyte(reg, value):
Main.py
The main function, if your Python version is Python2, is re-executed in Linux command mode as follows.
sudo python main.py
If your Python version is Python3, run the following command in Linux.
sudo python3 main.py
GUI Functions
Python has an image library PIL official library link, it does not need to write code from the logical layer like C and can directly call the image library for image processing. The following will take a 1.54-inch LCD as an example, we provide a brief description of the demo.
- It needs to use the image library and install the library.
sudo apt-get install python3-pil
And then import the library
from PIL import Image,ImageDraw,ImageFont.
Among them, Image is the basic library, ImageDraw is the drawing function, and ImageFont is the text function.
- Define an image buffer:
image1 = Image.new("1", (disp.width, disp.height), "WHITE")
The first parameter defines the color depth of the image, which is defined as "1" to indicate the bitmap of one-bit depth. The second parameter is a tuple that defines the width and height of the image. The third parameter defines the default color of the buffer, which is defined as "WHITE".
- Create a drawing object based on Image1 on which all drawing operations will be performed on here.
draw = ImageDraw.Draw(image1)
- Draw a line:
draw.line([(0,0),(127,0)], fill = 0)
The first parameter is a four-element tuple starting at (0, 0) and ending at (127,0). Draw a line. Fill ="0" means the color of the line is white.
- Draw a rectangle:
draw.rectangle([(20,10),(70,60)],fill = "WHITE",outline="BLACK")
The first argument is a tuple of four elements. (20,10) is the coordinate value in the upper left corner of the rectangle, and (70,60) is the coordinate value in the lower right corner of the rectangle. Fill =" WHITE" means BLACK inside, and outline="BLACK" means the color of the outline is black.
- Draw a circle:
draw.arc((150,15,190,55),0, 360, fill =(0,255,0)
Draw an inscribed circle in the square, the first parameter is a tuple of 4 elements, with (150, 15) as the upper left corner vertex of the square, (190, 55) as the lower right corner vertex of the square, specifying the level median line of the rectangular frame is the angle of 0 degrees, the second parameter indicates the starting angle, the third parameter indicates the ending angle, and fill = 0 indicates that the color of the line is white. If the figure is not square according to the coordination, you will get an ellipse.
Besides the arc function, you can also use the chord function for drawing a solid circle.
draw.ellipse((150,65,190,105), fill = 0)
The first parameter is the coordination of the enclosing rectangle. The second and third parameters are the beginning and end degrees of the circle. The fourth parameter is the fill color of the circle.
- Write a character:
The ImageFont module needs to be imported and instantiated:
Font1 = ImageFont.truetype("../Font/Font01.ttf",25)
Font2 = ImageFont.truetype("../Font/Font01.ttf",35)
Font3 = ImageFont.truetype("../Font/Font02.ttf",32)
You can use the fonts of Windows or other fonts which is in ttc format..
Note: Each character library contains different characters; If some characters cannot be displayed, it is recommended that you can refer to the encoding set ro used. To draw English characters, you can directly use the fonts; for Chinese characters, you need to add a symbol u:
draw.text((5, 68), 'Hello world', fill = 0, font=Font1)
text= u"微雪电子"
draw.text((5, 200), text, fill = 0, font=Font3)
The first parameter is a two-element tuple with (5,68) as the left vertex, and use font1, fill is font color, fill = 0 means that the font color is white, and the second sentence shows '微雪电子', and the font color is white.
- Read local pictures:
image = Image.open('../pic/pic.bmp')
The parameter is the image path.
- Other functions:
Python's image library is very powerful, if you need to achieve other features, you can go to the official website to learn http://effbot.org/imagingbook pil.
STM32 User Guide
Provide the demo based on STM32F103RBT6.
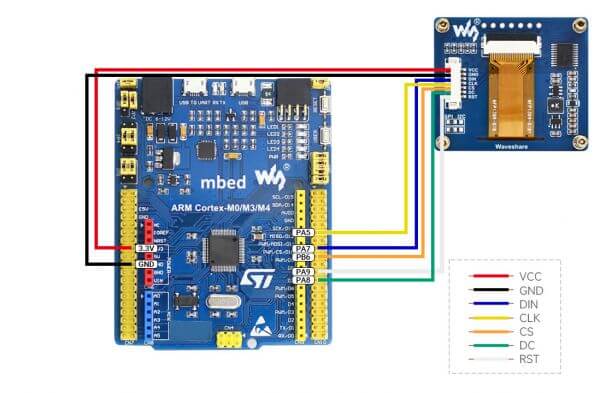
Hardware Connection
The example demo we provide is based on the STM32F103RBT6, and the provided connections correspond to the pins of the STM32F103RBT6. If you need to port the demo, please make sure to connect it according to the actual pin configuration.
| OLED | STM32 |
| VCC | 3.3V |
| GND | GND |
| DIN | SPI:PA7 / I2C:PB9 / I2C_SOFT:PC8 |
| CLK | SPI:PA5 / I2C:PB8 / I2C_SOFT:PC6 |
| CS | PB6 |
| DC | PA8 |
| RST | PA9 |
- Four-wire SPI connection diagram:
Run the demo
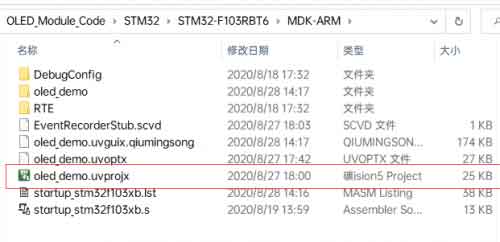
- Download the demo, find the STM32 demo file directory, use Keil5 to open oled_demo.uvprojx in the \STM32\STM32-F103RBT6\MDK-ARM directory.
- Then modify the corresponding function comment in the main.c according to the LCD model you are using, and then recompile and download to your board.
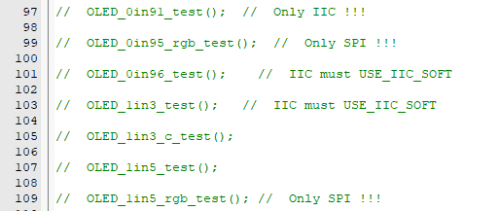
- If you are using a 1.3-inch OLED Module (C), you need to comment out line 105. (Note: there cannot be multiple sentences without comment at the same time; the line number may be changed, please modify it according to the actual situation.)
- The demo folder of each LCD model can find in the following table:
| Screen Model | Demo Function |
|---|---|
| 0.91inch OLED Module | OLED_0in91_test(); |
| 0.95inch RGB OLED (A)/(B) | OLED_0in95_rgb_test(); |
| 0.96inch OLED (A)/(B) | OLED_0in96_test(); |
| 0.96inch OLED Module (C)/(D)/(E) | OLED_0in96_test(); |
| 0.96inch RGB OLED Module | OLED_0in96_rgb_test(); |
| 1.27inch RGB OLED Module | OLED_1in27_rgb_test(); |
| 1.3inch OLED (A)/(B) | OLED_1in3_test(); |
| 1.3inch OLED Module (C) | OLED_1in3_c_test(); |
| 1.32inch OLED Module | OLED_1in32_test(); |
| 1.5inch OLED Module | OLED_1in5_test(); |
| 1.5inch OLED Module(B) | OLED_1in5_b_test(); |
| 1.5inch RGB OLED Module | OLED_1in5_rgb_test(); |
| 1.54inch OLED Module | OLED_1in54_test(); |
| 2.42inch OLED Module | OLED_2in42_test(); |
Software description
- The demo is developed based on the HAL library. Download the demo, find the STM32 program file directory, and open the oled_demo.uvprojx in the STM32\STM32F103RBT6\MDK-ARM directory to check the program.
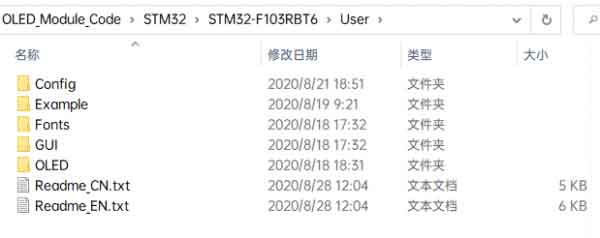
- In addition, you can see the file directory of the project in the STM32\STM32-F103RBT6\User\ directory. The five folders are the underlying driver, sample demo, font, GUI, and OLED driver.
Demo description
Hardware interface
We package the bottom for different hardware platforms. You can check the DEV_Config.c(.h) file for more description.
- Interface selection
#define USE_SPI_4W 		 1
#define USE_IIC      	         0
#define USE_IIC_SOFT		 0
Note: Switch SPI/I2C directly modified here
- Data type
#define UBYTE      uint8_t
#define UWORD      uint16_t
#define UDOUBLE    uint32_t
- Module initialization and exit processing
UBYTE	System_Init(void);
void    System_Exit(void);
Note:
1. Here is some GPIO processing before and after using the LCD screen.
2. After the System_Exit(void) function is used, the OLED display will be turned off;
- Write and read GPIO
void 	DEV_Digital_Write(UWORD Pin, UBYTE Value);
UBYTE 	DEV_Digital_Read(UWORD Pin);
- SPI write data
UBYTE SPI4W_Write_Byte(uint8_t value);
- IIC write data
void I2C_Write_Byte(uint8_t value, uint8_t Cmd);
Application Function
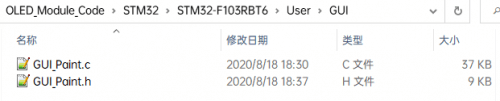
For the screen, if you need to draw pictures, display Chinese and English characters, display pictures, etc., you can use the upper application to do, and we provide some basic functions here about some graphics processing, you can check in the directory STM32\STM32F103RB\User\GUI\GUI_Paint.c(.h)
The character font GUI dependent is in the directory STM32\STM32F103RB\User\Fonts
- New image properties: Create a new image property, this property includes the image buffer name, width, height, flip Angle, and color.
void Paint_NewImage(UWORD Width, UWORD Height, UWORD Rotate, UWORD Color)
Parameters:
    Width: image buffer Width;
    Height: the Height of the image buffer;
    Rotate: Indicates the rotation Angle of an image
    Color: the initial Color of the image;
- Set the clear screen function:
void Paint_SetClearFuntion(void (*Clear)(UWORD));
parameter:
    Clear: Pointer to the clear screen function, used to quickly clear the screen to a certain color;
- Set the drawing pixel function:
void Paint_SetDisplayFuntion(void (*Display)(UWORD,UWORD,UWORD));
parameter:
    Display: Pointer to the pixel drawing function, which is used to write data to the specified location in the internal RAM of the OLED;
- Select image buffer: the purpose of the selection is that you can create multiple image attributes, there can be multiple images buffer, you can select each image you create.
void Paint_SelectImage(UBYTE *image)
Parameters:
    Image: the name of the image cache, which is actually a pointer to the first address of the image buffer
- Image rotation: Set the selected image rotation Angle, preferably after Paint_SelectImage(), you can choose to rotate 0, 90, 180, 270.
void Paint_SetRotate(UWORD Rotate)
Parameters:
    Rotate: ROTATE_0, ROTATE_90, ROTATE_180, and ROTATE_270 correspond to 0, 90, 180, and 270 degrees respectively;
- Image mirror flip: Set the mirror flip of the selected image. You can choose no mirror, horizontal mirror, vertical mirror, or image center mirror.
void Paint_SetMirroring(UBYTE mirror)
Parameters:
    Mirror: indicates the image mirroring mode. MIRROR_NONE, MIRROR_HORIZONTAL, MIRROR_VERTICAL, MIRROR_ORIGIN correspond to no mirror, horizontal mirror, vertical mirror, and about image center mirror respectively.
- Set points of display position and color in the buffer: here is the core GUI function, processing points display position and color in the buffer.
void Paint_SetPixel(UWORD Xpoint, UWORD Ypoint, UWORD Color)
Parameters:
    Xpoint: the X position of a point in the image buffer
    Ypoint: Y position of a point in the image buffer
    Color: indicates the Color of the dot
- Image buffer fill color: Fills the image buffer with a color, usually used to flash the screen into blank.
void Paint_Clear(UWORD Color)
Parameters:
    Color: fill Color
- The fill color of a certain window in the image buffer: the image buffer part of the window filled with a certain color, usually used to fresh the screen into blank, often used for time display, fresh the last second of the screen.
void Paint_ClearWindows(UWORD Xstart, UWORD Ystart, UWORD Xend, UWORD Yend, UWORD Color)
Parameters:
    Xstart: the x-starting coordinate of the window
    Ystart: indicates the Y starting point of the window
    Xend: the x-end coordinate of the window
    Yend: indicates the y-end coordinate of the window
    Color: fill Color
- Draw point: In the image buffer, draw points on (Xpoint, Ypoint), you can choose the color, the size of the point, and the style of the point.
void Paint_DrawPoint(UWORD Xpoint, UWORD Ypoint, UWORD Color, DOT_PIXEL Dot_Pixel, DOT_STYLE Dot_Style)
Parameters:
    Xpoint: indicates the X coordinate of a point
    Ypoint: indicates the Y coordinate of a point
    Color: fill Color
    Dot_Pixel: The size of the dot, providing a default of eight size points
        typedef enum {
            DOT_PIXEL_1X1  ,		// 1 x 1
            DOT_PIXEL_2X2  , 		// 2 X 2
            DOT_PIXEL_3X3  , 	 	// 3 X 3
            DOT_PIXEL_4X4  , 	 	// 4 X 4
            DOT_PIXEL_5X5  , 		// 5 X 5
            DOT_PIXEL_6X6  , 		// 6 X 6
            DOT_PIXEL_7X7  , 		// 7 X 7
            DOT_PIXEL_8X8  , 		// 8 X 8
        } DOT_PIXEL;
    Dot_Style: the size of a point that expands from the center of the point or from the bottom left corner of the point to the right and up
        typedef enum {
            DOT_FILL_AROUND  = 1,
            DOT_FILL_RIGHTUP,
        } DOT_STYLE;
- Draw the line: In the image buffer, draw a line from (Xstart, Ystart) to (Xend, Yend), you can choose the color, line width, and line style.
void Paint_DrawLine(UWORD Xstart, UWORD Ystart, UWORD Xend, UWORD Yend, UWORD Color, LINE_STYLE Line_Style ,  LINE_STYLE Line_Style)
Parameters:
    Xstart: the x-starting coordinate of the line
    Ystart: the y-starting coordinate of the line
    Xend: the x-end coordinate of the line
    Yend: the y-end coordinate of the line
    Color: fill Color
    Line_width: The width of the line, the demo provides 8 sizes of width by default.
        typedef enum {
            DOT_PIXEL_1X1  ,		// 1 x 1
            DOT_PIXEL_2X2  , 		// 2 X 2
            DOT_PIXEL_3X3  ,		// 3 X 3
            DOT_PIXEL_4X4  ,		// 4 X 4
            DOT_PIXEL_5X5  , 		// 5 X 5
            DOT_PIXEL_6X6  , 		// 6 X 6
            DOT_PIXEL_7X7  , 		// 7 X 7
            DOT_PIXEL_8X8  , 		// 8 X 8
        } DOT_PIXEL;
    Line_Style: line style. Select whether the lines are joined in a straight or dashed way
        typedef enum {
            LINE_STYLE_SOLID = 0,
            LINE_STYLE_DOTTED,
        } LINE_STYLE;
- Draw a rectangle: In the image buffer, draw a rectangle from (Xstart, Ystart) to (Xend, Yend), you can choose the color, the width of the line, and whether to fill the inside of the rectangle.
void Paint_DrawRectangle(UWORD Xstart, UWORD Ystart, UWORD Xend, UWORD Yend, UWORD Color, DOT_PIXEL Line_width,  DRAW_FILL Draw_Fill)
Parameters:
        Xstart: the starting X coordinate of the rectangle
        Ystart: the starting Y coordinate of the rectangle
        Xend: the x-end coordinate of the rectangle
        Yend: the y-end coordinate of the rectangle
        Color: fill Color
        Line_width: The width of the four sides of a rectangle. And the demo provides 8 sizes of width by default.
                DOT_PIXEL_1X1  ,		// 1 x 1
                DOT_PIXEL_2X2  , 		// 2 X 2
                DOT_PIXEL_3X3  ,		// 3 X 3
                DOT_PIXEL_4X4  ,		// 4 X 4
                DOT_PIXEL_5X5  , 		// 5 X 5
                DOT_PIXEL_6X6  , 		// 6 X 6
                DOT_PIXEL_7X7  , 		// 7 X 7
                DOT_PIXEL_8X8  , 		// 8 X 8
            } DOT_PIXEL;
        Draw_Fill: Fill, whether to fill the inside of the rectangle
            typedef enum {
                DRAW_FILL_EMPTY = 0,
                DRAW_FILL_FULL,
            } DRAW_FILL;
- Draw a circle: In the image buffer, draw a circle of Radius with (X_Center Y_Center) as the center. You can choose the color, the width of the line, and whether to fill the inside of the circle.
void Paint_DrawCircle(UWORD X_Center, UWORD Y_Center, UWORD Radius, UWORD Color, DOT_PIXEL Line_width,  DRAW_FILL Draw_Fill)
Parameters:
    X_Center: the x-coordinate of the center of a circle
    Y_Center: the y-coordinate of the center of the circle
    Radius: indicates the Radius of a circle
    Color: fill Color
    Line_width: The width of the arc, with a default of 8 widths
        typedef enum {
            DOT_PIXEL_1X1  ,		// 1 x 1
            DOT_PIXEL_2X2  , 		// 2 X 2
            DOT_PIXEL_3X3  ,		// 3 X 3
            DOT_PIXEL_4X4  ,		// 4 X 4
            DOT_PIXEL_5X5  , 		// 5 X 5
            DOT_PIXEL_6X6  , 		// 6 X 6
            DOT_PIXEL_7X7  , 		// 7 X 7
            DOT_PIXEL_8X8  , 		// 8 X 8
        } DOT_PIXEL;
    Draw_Fill: fill, whether to fill the inside of the circle
        typedef enum {
            DRAW_FILL_EMPTY = 0,
            DRAW_FILL_FULL,
        } DRAW_FILL;
- Write Ascii character: In the image buffer, use (Xstart Ystart) as the left vertex, and write an Ascii character, you can select Ascii visual character library, font foreground color, and font background color.
void Paint_DrawChar(UWORD Xstart, UWORD Ystart, const char Ascii_Char, sFONT* Font, UWORD Color_Foreground,  UWORD Color_Background)
Parameters:
    Xstart: the x-coordinate of the left vertex of a character
    Ystart: the Y-coordinate of the left vertex of a character
    Ascii_Char: indicates the Ascii character
    Font: Ascii visual character library, in the Fonts folder provides the following Fonts:
        Font8: 5*8 font
        Font12: 7*12 font
        Font16: 11*16 font
        Font20: 14*20 font
        Font24: 17*24 font
    Color_Foreground: Font color
    Color_Background: indicates the background color
- Write English string: In the image buffer, use (Xstart Ystart) as the left vertex, and write a string of English characters, you can choose Ascii visual character library, font foreground color, or font background color.
void Paint_DrawString_EN(UWORD Xstart, UWORD Ystart, const char * pString, sFONT* Font, UWORD Color_Foreground,  UWORD Color_Background)
Parameters:
    Xstart: the x-coordinate of the left vertex of a character
    Ystart: the Y-coordinate of the left vertex of a character
    PString: string, string is a pointer
    Font: Ascii visual character library, in the Fonts folder provides the following Fonts:
        Font8: 5*8 font
        Font12: 7*12 font
        Font16: 11*16 font
        Font20: 14*20 font
        Font24: 17*24 font
     Color_Foreground: Font color
     Color_Background: indicates the background color
- Write Chinese string: in the image buffer, use (Xstart Ystart) as the left vertex, and write a string of Chinese characters, you can choose GB2312 encoding character font, font foreground color, font background color.
void Paint_DrawString_CN(UWORD Xstart, UWORD Ystart, const char * pString, cFONT* font, UWORD Color_Foreground,  UWORD Color_Background)
Parameters:
    Xstart: the x-coordinate of the left vertex of a character
    Ystart: the Y-coordinate of the left vertex of a character
    PString: string, string is a pointer
    Font: GB2312 encoding character Font library, in the Fonts folder provides the following Fonts:
        Font12CN: ASCII font 11*21, Chinese font 16*21
        Font24CN: ASCII font24 *41, Chinese font 32*41
    Color_Foreground: Font color
    Color_Background: indicates the background color
- Write numbers: In the image buffer, use (Xstart Ystart) as the left vertex, and write a string of numbers, you can choose Ascii visual character library, font foreground color, font background color.
void Paint_DrawNum(UWORD Xpoint, UWORD Ypoint, double Nummber, sFONT* Font, UWORD Digit, UWORD Color_Foreground,   UWORD Color_Background)
Parameters:
    Xstart: the x-coordinate of the left vertex of a character
    Ystart: the Y-coordinate of the left vertex of a character
    Nummber: indicates the number displayed, which can be a decimal
    Digit: It's a decimal number
    Font: Ascii visual character library, in the Fonts folder provides the following Fonts:
        Font8: 5*8 font
        Font12: 7*12 font
        Font16: 11*16 font
        Font20: 14*20 font
        Font24: 17*24 font
    Color_Foreground: Font color
    Color_Background: indicates the background color
- Display time: in the image buffer, use (Xstart Ystart) as the left vertex, display time,you can choose Ascii visual character font, font foreground color, font background color.
void Paint_DrawTime(UWORD Xstart, UWORD Ystart, PAINT_TIME *pTime, sFONT* Font, UWORD Color_Background,  UWORD Color_Foreground)
Parameters:
    Xstart: the x-coordinate of the left vertex of a character
    Ystart: the Y-coordinate of the left vertex of a character
    PTime: display time, here defined a good time structure, as long as the hour, minute and second bits of data to the parameter;
    Font: Ascii visual character library, in the Fonts folder provides the following Fonts:
        Font8: 5*8 font
        Font12: 7*12 font
        Font16: 11*16 font
        Font20: 14*20 font
        Font24: 17*24 font
    Color_Foreground: Font color
    Color_Background: indicates the background color
Arduino User Guide
Provide a demo based on UNO PLUS.
Hardware Connection
The example code we provide is based on the UNO PLUS, and the provided connections correspond to the pins of the UNO PLUS. If you need to port the demo, please make sure to connect it according to the actual pin configuration.
| OLED | UNO |
| VCC | 3.3V/5V |
| GND | GND |
| DIN | SPI:D11 / I2C:SDA |
| CLK | SPI:D13 / I2C:SCL |
| CS | D10 |
| DC | D7 |
| RST | D8 |
Four-wire SPI wiring diagram: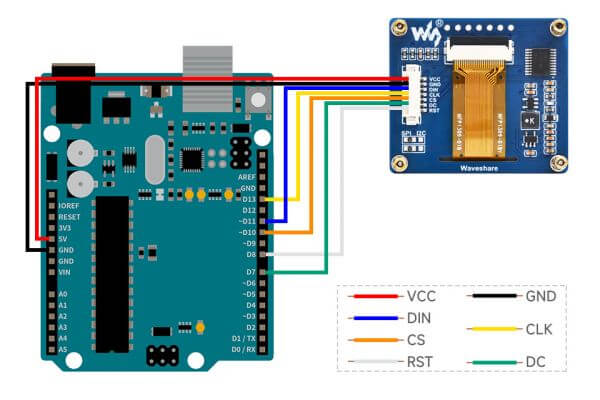
IDE Installation
Software Description
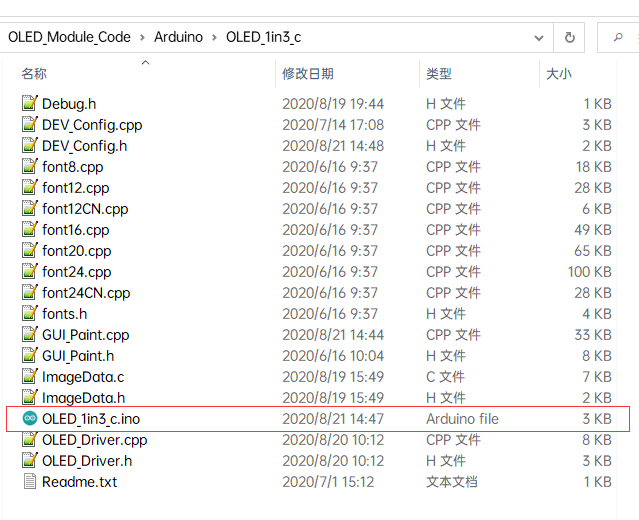
- Download the demo on the #Resource, and open the Arduino demo file directory, you can see the Arduino program for different models of OLED.
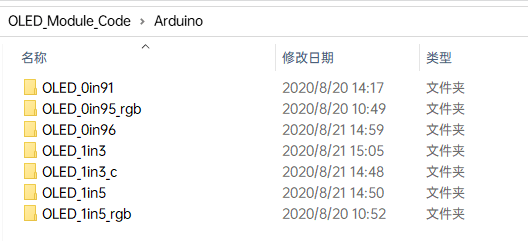
- Choose the folder according to the LCD model you are using, and open the xxx.ino file. Take the 1.3-inch OLED Module (C) as an example: open OLED_1in3_c, then double-click OLED_1in3_c.ino to open the Arduino project.

- The demo folder of each LCD model can find in the following table:
| LCD Model | Demo File |
|---|---|
| 0.91inch OLED Module | OLED_0in91 |
| 0.95inch RGB OLED (A)/(B) | OLED_0in95_rgb |
| 0.96inch OLED (A)/(B) | OLED_0in96 |
| 0.96inch OLED Module (C)/(D)/(E) | OLED_0in96 |
| 0.96inch RGB OLED Module | OLED_0in96_rgb |
| 1.27inch RGB OLED Module | OLED_1in27_rgb |
| 1.3inch OLED (A)/(B) | OLED_1in3 |
| 1.3inch OLED Module (C) | OLED_1in3_c |
| 1.32inch OLED Module | OLED_1in32 |
| 1.5inch OLED Module | OLED_1in5 |
| 1.5inch OLED Module(B) | OLED_1in5_B |
| 1.5inch RGB OLED Module | OLED_1in5_rgb |
| 1.51inch Transparent OLED | OLED_1in51 |
| 1.54inch OLED Module | OLED_1in54 |
| 2.42inch OLED Module | OLED_2in42 |
Demo Description
Underlying hardware interface
Because the hardware platform and the internal implementation are different. If you need to know the internal implementation, you can see many definitions in the directory DEV_Config.c(.h)
- Interface selection
#define USE_SPI_4W 		 1
#define USE_IIC      	         0
Note: Switch SPI/I2C directly modified here
- Data type
#define UBYTE      uint8_t
#define UWORD      uint16_t
#define UDOUBLE    uint32_t
- Module initialization and exit processing
UBYTE	System_Init(void);
void    System_Exit(void);
Note:
1. Here is some GPIO processing before and after using the LCD screen.
2. After the System_Exit(void) function is used, the OLED display will be turned off;
- Write and read GPIO
void 	DEV_Digital_Write(UWORD Pin, UBYTE Value);
UBYTE 	DEV_Digital_Read(UWORD Pin);
- SPI writes data
UBYTE SPI4W_Write_Byte(uint8_t value);
- IIC writes data
void I2C_Write_Byte(uint8_t value, uint8_t Cmd);
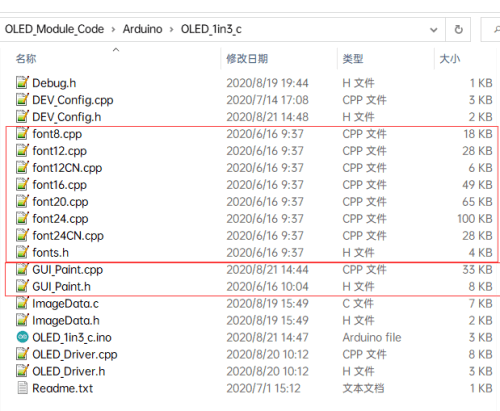
The Upper Application
For the screen, if you need to draw pictures, display Chinese and English characters, display pictures, etc., you can use the upper application to do, and we provide some basic functions here about some graphics processing in the directory:
Arduino\OLED_xxx\GUI_Paint.c(.h)
- New image properties: Create a new image property, this property includes the image buffer name, width, height, flip Angle, and color.
void Paint_NewImage(UWORD Width, UWORD Height, UWORD Rotate, UWORD Color)
Parameters:
    Width: image buffer Width;
    Height: the Height of the image buffer;
    Rotate: Indicates the rotation Angle of an image
    Color: the initial Color of the image;
- Set the clear screen function, usually call the clear function of OLED directly.
void Paint_SetClearFuntion(void (*Clear)(UWORD));
parameter:
    Clear: Pointer to the clear screen function, used to quickly clear the screen to a certain color;
- Set the drawing pixel function.
void Paint_SetDisplayFuntion(void (*Display)(UWORD,UWORD,UWORD));
parameter:
    Display: Pointer to the pixel drawing function, which is used to write data to the specified location in the internal RAM of the OLED;
- Select image buffer: the purpose of the selection is that you can create multiple image attributes, an image buffer can exist multiple, and you can select each image you create.
void Paint_SelectImage(UBYTE *image)
Parameters:
    Image: the name of the image cache, which is actually a pointer to the first address of the image buffer
- Image rotation: Set the selected image rotation Angle, preferably after Paint_SelectImage(), you can choose to rotate 0, 90, 180, 270.
void Paint_SetRotate(UWORD Rotate)
Parameters:
    Rotate: ROTATE_0, ROTATE_90, ROTATE_180, and ROTATE_270 correspond to 0, 90, 180, and 270 degrees respectively;
- Image mirror flip: Set the mirror flip of the selected image. You can choose no mirror, horizontal mirror, vertical mirror, or image center mirror.
void Paint_SetMirroring(UBYTE mirror)
Parameters:
    Mirror: indicates the image mirroring mode. MIRROR_NONE, MIRROR_HORIZONTAL, MIRROR_VERTICAL, MIRROR_ORIGIN correspond to no mirror, horizontal mirror, vertical mirror, and about image center mirror respectively.
- Set points of display position and color in the buffer: here is the core GUI function, processing points display position and color in the buffer.
void Paint_SetPixel(UWORD Xpoint, UWORD Ypoint, UWORD Color)
Parameters:
    Xpoint: the X position of a point in the image buffer
    Ypoint: Y position of a point in the image buffer
    Color: indicates the Color of the dot
- Image buffer fill color: Fills the image buffer with a color, usually used to flash the screen into blank.
void Paint_ClearWindows(UWORD Xstart, UWORD Ystart, UWORD Xend, UWORD Yend, UWORD Color)
Parameters:
    Xstart: the x-starting coordinate of the window
    Ystart: indicates the Y starting point of the window
    Xend: the x-end coordinate of the window
    Yend: indicates the y-end coordinate of the window
    Color: fill Color
- Draw points: In the image buffer, draw points on (Xpoint, Ypoint), you can choose the color, the size of the point, and the style of the point.
void Paint_DrawPoint(UWORD Xpoint, UWORD Ypoint, UWORD Color, DOT_PIXEL Dot_Pixel, DOT_STYLE Dot_Style)
Parameters:
    Xpoint: indicates the X coordinate of a point
    Ypoint: indicates the Y coordinate of a point
    Color: fill Color
    Dot_Pixel: The size of the dot, providing a default of eight size points
        typedef enum {
                DOT_PIXEL_1X1  ,		// 1 x 1
                DOT_PIXEL_2X2  , 		// 2 X 2
                DOT_PIXEL_3X3  , 	 	// 3 X 3
                DOT_PIXEL_4X4  , 	 	// 4 X 4
                DOT_PIXEL_5X5  , 		// 5 X 5
                DOT_PIXEL_6X6  , 		// 6 X 6
                DOT_PIXEL_7X7  , 		// 7 X 7
                DOT_PIXEL_8X8  , 		// 8 X 8
        } DOT_PIXEL;
    Dot_Style: the size of a point that expands from the center of the point or from the bottom left corner of the point to the right and up
        typedef enum {
                DOT_FILL_AROUND  = 1,
                DOT_FILL_RIGHTUP,
        } DOT_STYLE;
- Line drawing: In the image buffer, a line from (Xstart, Ystart) to (Xend, Yend), you can choose the color, line width, and line style.
void Paint_DrawLine(UWORD Xstart, UWORD Ystart, UWORD Xend, UWORD Yend, UWORD Color, LINE_STYLE Line_Style ,  LINE_STYLE Line_Style)
Parameters:
        Xstart: the x-starting coordinate of a line
        Ystart: indicates the Y starting point of a line
        Xend: x-terminus of a line
        Yend: the y-end coordinate of a line
        Color: fill Color
        Line_width: The width of the line, which provides a default of eight widths
                typedef enum {
                        DOT_PIXEL_1X1  ,		// 1 x 1
                        DOT_PIXEL_2X2  , 		// 2 X 2
                        DOT_PIXEL_3X3  ,		// 3 X 3
                        DOT_PIXEL_4X4  ,		// 4 X 4
                        DOT_PIXEL_5X5  , 		// 5 X 5
                        DOT_PIXEL_6X6  , 		// 6 X 6
                        DOT_PIXEL_7X7  , 		// 7 X 7
                        DOT_PIXEL_8X8  , 		// 8 X 8
                    } DOT_PIXEL;
        Line_Style: line style. Select whether the lines are joined in a straight or dashed way
                typedef enum {
                        LINE_STYLE_SOLID = 0,
                        LINE_STYLE_DOTTED,
                } LINE_STYLE;
- Draw a rectangle: In the image buffer, draw a rectangle from (Xstart, Ystart) to (Xend, Yend), you can choose the color, the width of the line, and whether to fill the inside of the rectangle.
void Paint_DrawRectangle(UWORD Xstart, UWORD Ystart, UWORD Xend, UWORD Yend, UWORD Color, DOT_PIXEL Line_width,  DRAW_FILL Draw_Fill)
Parameters:
        Xstart: the starting X coordinate of the rectangle
        Ystart: indicates the Y starting point of the rectangle
        Xend: X terminus of the rectangle
        Yend: specifies the y-end coordinate of the rectangle
        Color: fill Color
        Line_width: The width of the four sides of a rectangle. Default eight widths are provided
        typedef enum {
                DOT_PIXEL_1X1  ,		// 1 x 1
                DOT_PIXEL_2X2  , 		// 2 X 2
                DOT_PIXEL_3X3  ,		// 3 X 3
                DOT_PIXEL_4X4  ,		// 4 X 4
                DOT_PIXEL_5X5  , 		// 5 X 5
                DOT_PIXEL_6X6  , 		// 6 X 6
                DOT_PIXEL_7X7  , 		// 7 X 7
                DOT_PIXEL_8X8  , 		// 8 X 8
        } DOT_PIXEL;
        Draw_Fill: Fill, in whether to fill the inside of the rectangle
        typedef enum {
                DRAW_FILL_EMPTY = 0,
                DRAW_FILL_FULL,
        } DRAW_FILL;
- Draw a circle: In the image buffer, draw a circle of Radius with (X_Center Y_Center) as the center. You can choose the color, the width of the line, and whether to fill the inside of the circle.
void Paint_DrawCircle(UWORD X_Center, UWORD Y_Center, UWORD Radius, UWORD Color, DOT_PIXEL Line_width,  DRAW_FILL Draw_Fill)
Parameters:
        X_Center: the x-coordinate of the center of a circle
        Y_Center: Y coordinate of the center of a circle
        Radius: indicates the Radius of a circle
        Color: fill Color
        Line_width: The width of the arc, with a default of 8 widths
        typedef enum {
                DOT_PIXEL_1X1  ,		// 1 x 1
                DOT_PIXEL_2X2  , 		// 2 X 2
                DOT_PIXEL_3X3  ,		// 3 X 3
                DOT_PIXEL_4X4  ,		// 4 X 4
                DOT_PIXEL_5X5  , 		// 5 X 5
                DOT_PIXEL_6X6  , 		// 6 X 6
                DOT_PIXEL_7X7  , 		// 7 X 7
                DOT_PIXEL_8X8  , 		// 8 X 8
        } DOT_PIXEL;
        Draw_Fill: fill, whether to fill the inside of the circle
        typedef enum {
                DRAW_FILL_EMPTY = 0,
                DRAW_FILL_FULL,
        } DRAW_FILL;
- Write Ascii character: In the image buffer, at (Xstart Ystart) as the left vertex, write an Ascii character, you can select Ascii visual character library, font foreground color, and font background color.
void Paint_DrawChar(UWORD Xstart, UWORD Ystart, const char Ascii_Char, sFONT* Font, UWORD Color_Foreground,  UWORD Color_Background)
Parameters:
        Xstart: the x-coordinate of the left vertex of a character
        Ystart: the Y coordinate of the font's left vertex
        Ascii_Char: indicates the Ascii character
        Font: Ascii visual character library, in the Fonts folder provides the following Fonts:
                Font8: 5*8 font
                Font12: 7*12 font
                Font16: 11*16 font
                Font20: 14*20 font
                Font24: 17*24 font
        Color_Foreground: Font color
        Color_Background: indicates the background color
- Write English string: In the image buffer, use (Xstart Ystart) as the left vertex, write a string of English characters, can choose Ascii visual character library, font foreground color, font background color.
void Paint_DrawString_EN(UWORD Xstart, UWORD Ystart, const char * pString, sFONT* Font, UWORD Color_Foreground,  UWORD Color_Background)
Parameters:
        Xstart: the x-coordinate of the left vertex of a character
        Ystart: the Y coordinate of the font's left vertex
        PString: string, string is a pointer
        Font: Ascii visual character library, in the Fonts folder provides the following Fonts:
                Font8: 5*8 font
                Font12: 7*12 font
                Font16: 11*16 font
                Font20: 14*20 font
                Font24: 17*24 font
        Color_Foreground: Font color
        Color_Background: indicates the background color
- Write Chinese string: in the image buffer, use (Xstart Ystart) as the left vertex, write a string of Chinese characters, you can choose GB2312 encoding character font, font foreground color, font background color.
void Paint_DrawString_CN(UWORD Xstart, UWORD Ystart, const char * pString, cFONT* font, UWORD Color_Foreground,  UWORD Color_Background)
Parameters:
        Xstart: the x-coordinate of the left vertex of a character
        Ystart: the Y coordinate of the font's left vertex
        PString: string, string is a pointer
        Font: GB2312 encoding character Font library, in the Fonts folder provides the following Fonts:
                Font12CN: ASCII font 11*21, Chinese font 16*21
                Font24CN: ASCII font24 *41, Chinese font 32*41
        Color_Foreground: Font color
        Color_Background: indicates the background color
- Write numbers: In the image buffer, use (Xstart Ystart) as the left vertex, and write a string of numbers, you can choose Ascii visual character library, font foreground color, or font background color.
void Paint_DrawNum(UWORD Xpoint, UWORD Ypoint, double Nummber, sFONT* Font, UWORD Digit, UWORD Color_Foreground,   UWORD Color_Background)
Parameters:
        Xpoint: the x-coordinate of the left vertex of a character
        Ypoint: the Y coordinate of the left vertex of the font
        Nummber: indicates the number displayed, which can be a decimal
        Digit: It's a decimal number
        Font: Ascii visual character library, in the Fonts folder provides the following Fonts:
                Font8: 5*8 font
                Font12: 7*12 font
                Font16: 11*16 font
                Font20: 14*20 font
               Font24: 17*24 font
        Color_Foreground: Font color
        Color_Background: indicates the background color
- Display time: in the image buffer, use (Xstart Ystart) as the left vertex, For display time, you can choose Ascii visual character font, font foreground color, and font background color.
void Paint_DrawTime(UWORD Xstart, UWORD Ystart, PAINT_TIME *pTime, sFONT* Font, UWORD Color_Background,  UWORD Color_Foreground)
Parameters:
        Xstart: the x-coordinate of the left vertex of a character
        Ystart: the Y coordinate of the font's left vertex
        PTime: display time, here defined a good time structure, as long as the hour, minute and second bits of data to the parameter;
        Font: Ascii visual character library, in the Fonts folder provides the following Fonts:
                Font8: 5*8 font
                Font12: 7*12 font
                Font16: 11*16 font
                Font20: 14*20 font
                Font24: 17*24 font
        Color_Foreground: Font color
        Color_Background: indicates the background color
ESP32 User Guide
Provide the demo based on ESP32.
Hardware Connection
The demo we provide is based on the ESP32-S3, and the connections provided correspond to the pins of the ESP32-S3. If you need to port the demo, please connect it according to the actual pins.
| OLED | ESP32 |
| VCC | 3.3V/5V |
| GND | GND |
| DIN | SPI:IO11 / I2C:IO17 |
| CLK | SPI:IO12 / I2C:IO16 |
| CS | IO10 |
| DC | IO46 |
| RST | IO3 |
Four-wire SPI wiring diagram: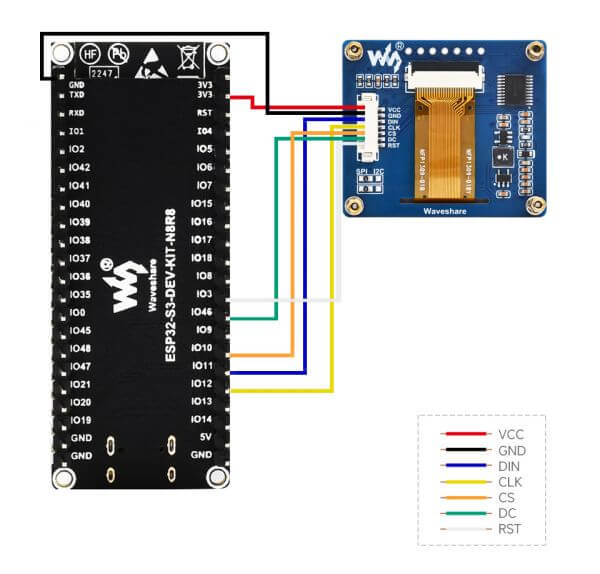
IDE Installation
Demo Running
- Download the demo and open the ESP32 demo file directory, and you can see the Arduino demo of 1in54 OLED.
- Open the file folder according to the screen size and type you bought, and then double-click OLED_1in54.ino to open the Arduino project.
Demo Description
Low-level Hardware Interface
We have encapsulated the low-level hardware interface. Due to different hardware platforms, the internal implementations vary. If you need to understand the internal implementation, you can check the corresponding directory. In DEV_Config.c(.h), you can find many definitions.
- Interface selection
#define USE_SPI_4W  1
#define USE_IIC     0
Note: Modify here to switch SPI/I2C
- Data type:
#define UBYTE   uint8_t
#define UWORD   uint16_t
#define UDOUBLE uint32_t
- Module initialization and exit:
UBYTE	System_Init(void);
void    System_Exit(void);
Note:
1. Here we are handling some GPIO operations before and after using the LCD screen.
2. After using the System_Exit function, the OLED display screen will be turned off.
- GPIO read/write:
void 	DEV_Digital_Write(UWORD Pin, UBYTE Value);
UBYTE 	DEV_Digital_Read(UWORD Pin);
- SPI writes data:
UBYTE SPI4W_Write_Byte(uint8_t value);
- IIC writes data:
void I2C_Write_Byte(uint8_t value, uint8_t Cmd);
The Upper Application
For the screen, if you need to draw pictures, display Chinese and English characters, display pictures, etc., you can use the upper application to do so, and we provide some basic functions here about some graphics processing in the directory: ESP32\OLED_xxx\GUI_Paint.c(.h)
- New image properties: Create a new image property, this property includes the image buffer name, width, height, flip Angle, and color.
void Paint_NewImage(UWORD Width, UWORD Height, UWORD Rotate, UWORD Color)
Parameters:
    Width: image buffer Width;
    Height: the Height of the image buffer;
    Rotate: Indicates the rotation Angle of an image
    Color: the initial Color of the image;
- Set the clear screen function, usually call the clear function of OLED directly.
void Paint_SetClearFuntion(void (*Clear)(UWORD));
parameter:
    Clear: Pointer to the clear screen function, used to quickly clear the screen to a certain color;
- Set the drawing pixel function.
void Paint_SetDisplayFuntion(void (*Display)(UWORD,UWORD,UWORD));
parameter:
    Display: Pointer to the pixel drawing function, which is used to write data to the specified location in the internal RAM of the OLED;
- Select image buffer: the purpose of the selection is that you can create multiple image attributes, an image buffer can exist multiple, and you can select each image you create.
void Paint_SelectImage(UBYTE *image)
Parameters:
    Image: the name of the image cache, which is actually a pointer to the first address of the image buffer
- Image rotation: Set the selected image rotation Angle, preferably after Paint_SelectImage(), you can choose to rotate 0, 90, 180, 270.
void Paint_SetRotate(UWORD Rotate)
Parameters:
    Rotate: ROTATE_0, ROTATE_90, ROTATE_180, and ROTATE_270 correspond to 0, 90, 180, and 270 degrees respectively;
- Image mirror flip: Set the mirror flip of the selected image. You can choose no mirror, horizontal mirror, vertical mirror, or image center mirror.
void Paint_SetMirroring(UBYTE mirror)
Parameters:
    Mirror: indicates the image mirroring mode. MIRROR_NONE, MIRROR_HORIZONTAL, MIRROR_VERTICAL, MIRROR_ORIGIN correspond to no mirror, horizontal mirror, vertical mirror, and about image center mirror respectively.
- Set points of display position and color in the buffer: here is the core GUI function, processing points display position and color in the buffer.
void Paint_SetPixel(UWORD Xpoint, UWORD Ypoint, UWORD Color)
Parameters:
    Xpoint: the X position of a point in the image buffer
    Ypoint: Y position of a point in the image buffer
    Color: indicates the Color of the dot
- Image buffer fill color: Fills the image buffer with a color, usually used to flash the screen into blank.
void Paint_ClearWindows(UWORD Xstart, UWORD Ystart, UWORD Xend, UWORD Yend, UWORD Color)
Parameters:
    Xstart: the x-starting coordinate of the window
    Ystart: indicates the Y starting point of the window
    Xend: the x-end coordinate of the window
    Yend: indicates the y-end coordinate of the window
    Color: fill Color
- Draw points: In the image buffer, draw points on (Xpoint, Ypoint), you can choose the color, the size of the point, and the style of the point.
void Paint_DrawPoint(UWORD Xpoint, UWORD Ypoint, UWORD Color, DOT_PIXEL Dot_Pixel, DOT_STYLE Dot_Style)
Parameters:
    Xpoint: indicates the X coordinate of a point
    Ypoint: indicates the Y coordinate of a point
    Color: fill Color
    Dot_Pixel: The size of the dot, providing a default of eight size points
        typedef enum {
                DOT_PIXEL_1X1  ,		// 1 x 1
                DOT_PIXEL_2X2  , 		// 2 X 2
                DOT_PIXEL_3X3  , 	 	// 3 X 3
                DOT_PIXEL_4X4  , 	 	// 4 X 4
                DOT_PIXEL_5X5  , 		// 5 X 5
                DOT_PIXEL_6X6  , 		// 6 X 6
                DOT_PIXEL_7X7  , 		// 7 X 7
                DOT_PIXEL_8X8  , 		// 8 X 8
        } DOT_PIXEL;
    Dot_Style: the size of a point that expands from the center of the point or from the bottom left corner of the point to the right and up
        typedef enum {
                DOT_FILL_AROUND  = 1,
                DOT_FILL_RIGHTUP,
        } DOT_STYLE;
- Line drawing: In the image buffer, a line from (Xstart, Ystart) to (Xend, Yend), you can choose the color, line width, and line style.
void Paint_DrawLine(UWORD Xstart, UWORD Ystart, UWORD Xend, UWORD Yend, UWORD Color, LINE_STYLE Line_Style ,  LINE_STYLE Line_Style)
Parameters:
        Xstart: the x-starting coordinate of a line
        Ystart: indicates the Y starting point of a line
        Xend: x-terminus of a line
        Yend: the y-end coordinate of a line
        Color: fill Color
        Line_width: The width of the line, which provides a default of eight widths
                typedef enum {
                        DOT_PIXEL_1X1  ,		// 1 x 1
                        DOT_PIXEL_2X2  , 		// 2 X 2
                        DOT_PIXEL_3X3  ,		// 3 X 3
                        DOT_PIXEL_4X4  ,		// 4 X 4
                        DOT_PIXEL_5X5  , 		// 5 X 5
                        DOT_PIXEL_6X6  , 		// 6 X 6
                        DOT_PIXEL_7X7  , 		// 7 X 7
                        DOT_PIXEL_8X8  , 		// 8 X 8
                    } DOT_PIXEL;
        Line_Style: line style. Select whether the lines are joined in a straight or dashed way
                typedef enum {
                        LINE_STYLE_SOLID = 0,
                        LINE_STYLE_DOTTED,
                } LINE_STYLE;
- Draw a rectangle: In the image buffer, draw a rectangle from (Xstart, Ystart) to (Xend, Yend), you can choose the color, the width of the line, and whether to fill the inside of the rectangle.
void Paint_DrawRectangle(UWORD Xstart, UWORD Ystart, UWORD Xend, UWORD Yend, UWORD Color, DOT_PIXEL Line_width,  DRAW_FILL Draw_Fill)
Parameters:
        Xstart: the starting X coordinate of the rectangle
        Ystart: indicates the Y starting point of the rectangle
        Xend: X terminus of the rectangle
        Yend: specifies the y-end coordinate of the rectangle
        Color: fill Color
        Line_width: The width of the four sides of a rectangle. Default eight widths are provided
        typedef enum {
                DOT_PIXEL_1X1  ,		// 1 x 1
                DOT_PIXEL_2X2  , 		// 2 X 2
                DOT_PIXEL_3X3  ,		// 3 X 3
                DOT_PIXEL_4X4  ,		// 4 X 4
                DOT_PIXEL_5X5  , 		// 5 X 5
                DOT_PIXEL_6X6  , 		// 6 X 6
                DOT_PIXEL_7X7  , 		// 7 X 7
                DOT_PIXEL_8X8  , 		// 8 X 8
        } DOT_PIXEL;
        Draw_Fill: Fill, in whether to fill the inside of the rectangle
        typedef enum {
                DRAW_FILL_EMPTY = 0,
                DRAW_FILL_FULL,
        } DRAW_FILL;
- Draw a circle: In the image buffer, draw a circle of Radius with (X_Center Y_Center) as the center. You can choose the color, the width of the line, and whether to fill the inside of the circle.
void Paint_DrawCircle(UWORD X_Center, UWORD Y_Center, UWORD Radius, UWORD Color, DOT_PIXEL Line_width,  DRAW_FILL Draw_Fill)
Parameters:
        X_Center: the x-coordinate of the center of a circle
        Y_Center: Y coordinate of the center of a circle
        Radius: indicates the Radius of a circle
        Color: fill Color
        Line_width: The width of the arc, with a default of 8 widths
        typedef enum {
                DOT_PIXEL_1X1  ,		// 1 x 1
                DOT_PIXEL_2X2  , 		// 2 X 2
                DOT_PIXEL_3X3  ,		// 3 X 3
                DOT_PIXEL_4X4  ,		// 4 X 4
                DOT_PIXEL_5X5  , 		// 5 X 5
                DOT_PIXEL_6X6  , 		// 6 X 6
                DOT_PIXEL_7X7  , 		// 7 X 7
                DOT_PIXEL_8X8  , 		// 8 X 8
        } DOT_PIXEL;
        Draw_Fill: fill, whether to fill the inside of the circle
        typedef enum {
                DRAW_FILL_EMPTY = 0,
                DRAW_FILL_FULL,
        } DRAW_FILL;
- Write Ascii character: In the image buffer, at (Xstart Ystart) as the left vertex, write an Ascii character, you can select Ascii visual character library, font foreground color, and font background color.
void Paint_DrawChar(UWORD Xstart, UWORD Ystart, const char Ascii_Char, sFONT* Font, UWORD Color_Foreground,  UWORD Color_Background)
Parameters:
        Xstart: the x-coordinate of the left vertex of a character
        Ystart: the Y coordinate of the font's left vertex
        Ascii_Char: indicates the Ascii character
        Font: Ascii visual character library, in the Fonts folder provides the following Fonts:
                Font8: 5*8 font
                Font12: 7*12 font
                Font16: 11*16 font
                Font20: 14*20 font
                Font24: 17*24 font
        Color_Foreground: Font color
        Color_Background: indicates the background color
- Write English string: In the image buffer, use (Xstart Ystart) as the left vertex, write a string of English characters, can choose Ascii visual character library, font foreground color, font background color.
void Paint_DrawString_EN(UWORD Xstart, UWORD Ystart, const char * pString, sFONT* Font, UWORD Color_Foreground,  UWORD Color_Background)
Parameters:
        Xstart: the x-coordinate of the left vertex of a character
        Ystart: the Y coordinate of the font's left vertex
        PString: string, string is a pointer
        Font: Ascii visual character library, in the Fonts folder provides the following Fonts:
                Font8: 5*8 font
                Font12: 7*12 font
                Font16: 11*16 font
                Font20: 14*20 font
                Font24: 17*24 font
        Color_Foreground: Font color
        Color_Background: indicates the background color
- Write Chinese string: in the image buffer, use (Xstart Ystart) as the left vertex, write a string of Chinese characters, you can choose GB2312 encoding character font, font foreground color, font background color.
void Paint_DrawString_CN(UWORD Xstart, UWORD Ystart, const char * pString, cFONT* font, UWORD Color_Foreground,  UWORD Color_Background)
Parameters:
        Xstart: the x-coordinate of the left vertex of a character
        Ystart: the Y coordinate of the font's left vertex
        PString: string, string is a pointer
        Font: GB2312 encoding character Font library, in the Fonts folder provides the following Fonts:
                Font12CN: ASCII font 11*21, Chinese font 16*21
                Font24CN: ASCII font24 *41, Chinese font 32*41
        Color_Foreground: Font color
        Color_Background: indicates the background color
- Write numbers: In the image buffer, use (Xstart Ystart) as the left vertex, and write a string of numbers, you can choose Ascii visual character library, font foreground color, or font background color.
void Paint_DrawNum(UWORD Xpoint, UWORD Ypoint, double Nummber, sFONT* Font, UWORD Digit, UWORD Color_Foreground,   UWORD Color_Background)
Parameters:
        Xpoint: the x-coordinate of the left vertex of a character
        Ypoint: the Y coordinate of the left vertex of the font
        Nummber: indicates the number displayed, which can be a decimal
        Digit: It's a decimal number
        Font: Ascii visual character library, in the Fonts folder provides the following Fonts:
                Font8: 5*8 font
                Font12: 7*12 font
                Font16: 11*16 font
                Font20: 14*20 font
               Font24: 17*24 font
        Color_Foreground: Font color
        Color_Background: indicates the background color
- Display time: in the image buffer, use (Xstart Ystart) as the left vertex, For display time, you can choose Ascii visual character font, font foreground color, and font background color.
void Paint_DrawTime(UWORD Xstart, UWORD Ystart, PAINT_TIME *pTime, sFONT* Font, UWORD Color_Background,  UWORD Color_Foreground)
Parameters:
        Xstart: the x-coordinate of the left vertex of a character
        Ystart: the Y coordinate of the font's left vertex
        PTime: display time, here defined a good time structure, as long as the hour, minute and second bits of data to the parameter;
        Font: Ascii visual character library, in the Fonts folder provides the following Fonts:
                Font8: 5*8 font
                Font12: 7*12 font
                Font16: 11*16 font
                Font20: 14*20 font
                Font24: 17*24 font
        Color_Foreground: Font color
        Color_Background: indicates the background color
Pico User Guide
Provide a demo based on Pico.
Hardware Connection
The demo we provide is based on Pico, and the connections provided correspond to Pico's pins. If you need to port the demo, please connect it according to the actual pins.
| OLED | Pico |
| VCC | 3.3V/5V |
| GND | GND |
| DIN | SPI:GP11 / I2C:GP8 |
| CLK | SPI:GP10 / I2C:GP9 |
| CS | GP13 |
| DC | GP14 |
| RST | GP12 |
4-spi SPI wiring diagram: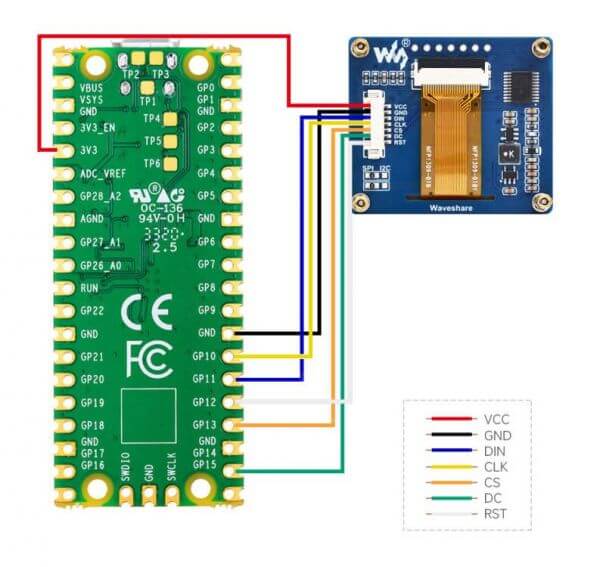
Demo Running
1): Press and hold the button on the Pico board, then connect the Pico to your computer's USB port using a Micro USB cable. Afterward, release the button. Once connected, your computer should automatically recognize a removable drive named "RPI-RP2."

2): Copy the "rp2-pico-20210418-v1.15.uf2" file from the "micropython" directory to the recognized removable drive ("RPI-RP2").

3): Update the Thonny IDE:
    sudo apt upgrade thonny

4): Open the Thonny IDE by clicking on the Raspberry Pi logo, navigating to "Programming," and selecting "Thonny Python IDE."
Then, go to "Tools" -> "Options..." -> "Interpreter."
Choose "MicroPython (Raspberry Pi Pico and ttyACM0 port)."

5): In the Thonny IDE, open the "Code\Pico\micropython\Pico-OLED-1.54(spi).py" file, and then run the current script (the green triangle).
Demo Description
Low-level Hardware Insterface
- SPI/I2C writes commands:
def write_cmd(self, cmd)
- SPI/I2C writes data:
def write_data(self, buf)
- Display initialization:
def init_display(self)
- Display pixels
def show(self)
Jetson Nano User Guide
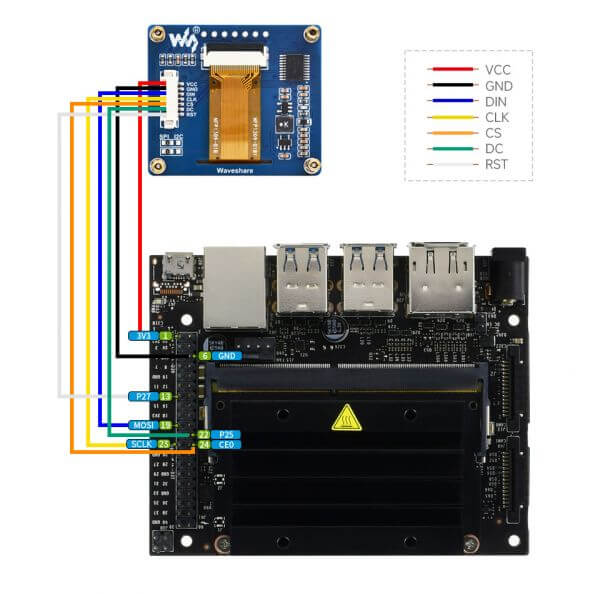
Hardware Connection
When connecting the Jetson Nano, choose to connect it with a 7PIN cable. Please refer to the pinout table below.
| OLED | Jetson Nano | |
| BCM | Board | |
| VCC | 3.3V | 3.3V |
| GND | GND | GND |
| DIN | MOSI / SDA | 19 / 3 |
| CLK | SCLK / SCL | 23 / 5 |
| CS | CE0 | 24 |
| DC | 25 | 22 |
| RST | 27 | 13 |
- 4-wire SPI wiring diagram:
Enable SPI & I2C Interface
- Open the Jetson Nano terminal, and click here to see how to Open SPI:
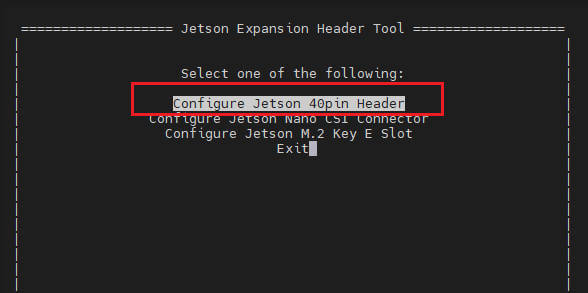
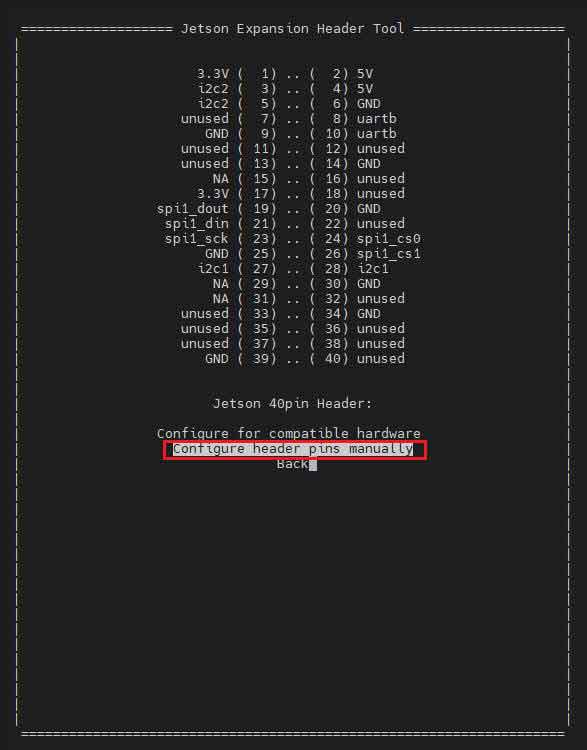
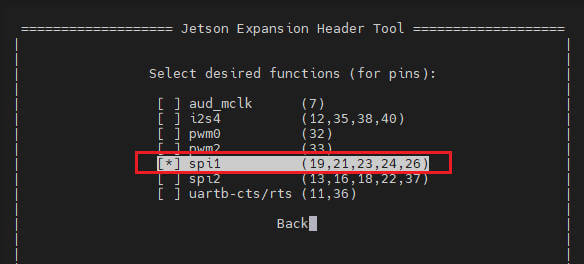
It is the same as I2C. Open the Jetson Nano terminal and click here to see how to open I2C.
Library Installation
- Install Python function library:
#python2
sudo apt-get update
sudo apt-get install python-pip
sudo apt-get install python-pil
sudo apt-get install python-numpy
sudo pip install Jetson.GPIO
sudo pip install spidev
sudo apt-get install python-smbus
#python3
sudo apt-get update
sudo apt-get install python3-pip
sudo apt-get install python3-pil
sudo apt-get install python3-numpy
sudo pip install Jetson.GPIO
sudo pip3 install spidev
sudo apt-get install python3-smbus
Download & Test the Demo
Open the Jetson Nano terminal and execute:
sudo apt-get install p7zip-full
sudo wget https://files.waveshare.com/upload/2/2c/OLED_Module_Code.7z
7z x OLED_Module_Code.7z -o./OLED_Module_Code
cd OLED_Module_Code/RaspberryPi
Run the Test Demo
Please run the following commands on the Jetson Nano directory, or it can not be indexed the directory.
Python
- Enter the Python demo directory:
cd python/example
- Run the OLED demo according to the model, and the demo supports python2/3.
If you purchased 1.54inch OLED Module. please input:
# python2
sudo python OLED_1in54_test.py
# python3
sudo python3 OLED_1in54_test.py
- The commands for different models:
#1.54inch OLED Module
sudo python OLED_1in54_test.py
------------------------------------
#2.42inch OLED Module
sudo python OLED_2in42_test.py
- Please make sure the SPI is not occupied by other devices, and you can check it on '/boot/config.txt'.
Python
Applicable for python and python3.
config.py
- Interface selection:
Device_SPI = 1
Device_I2C = 0
Note: Modify here to switch SPI/I2C.
- Module initialization and exit:
def module_init()
def module_exit()
Note:
1. Here is some GPIO processing before and after using the LCD screen.
2. The module_init() function is automatically called in the INIT () initializer on the LCD, but the module_exit() function needs to be called by itself
- SPI writes data:
def spi_writebyte(data)
- IIC writes data:
i2c_writebyte(reg, value):
Main.py
The main function, if your Python version is Python2, is re-executed in Linux command mode as follows.
sudo python main.py
If your Python version is Python3, run the following command in Linux.
sudo python3 main.py
GUI Functions
Python has an image library PIL official library link, it does not need to write code from the logical layer like C and can directly call the image library for image processing. The following will take a 1.54-inch LCD as an example, we provide a brief description of the demo.
- It needs to use the image library and install the library.
sudo apt-get install python3-pil
And then import the library
from PIL import Image,ImageDraw,ImageFont.
Among them, Image is the basic library, ImageDraw is the drawing function, and ImageFont is the text function.
- Define an image buffer:
image1 = Image.new("1", (disp.width, disp.height), "WHITE")
The first parameter defines the color depth of the image, which is defined as "1" to indicate the bitmap of one-bit depth. The second parameter is a tuple that defines the width and height of the image. The third parameter defines the default color of the buffer, which is defined as "WHITE".
- Create a drawing object based on Image1 on which all drawing operations will be performed on here.
draw = ImageDraw.Draw(image1)
- Draw a line:
draw.line([(0,0),(127,0)], fill = 0)
The first parameter is a four-element tuple starting at (0, 0) and ending at (127,0). Draw a line. Fill ="0" means the color of the line is white.
- Draw a rectangle:
draw.rectangle([(20,10),(70,60)],fill = "WHITE",outline="BLACK")
The first argument is a tuple of four elements. (20,10) is the coordinate value in the upper left corner of the rectangle, and (70,60) is the coordinate value in the lower right corner of the rectangle. Fill =" WHITE" means BLACK inside, and outline="BLACK" means the color of the outline is black.
- Draw a circle:
draw.arc((150,15,190,55),0, 360, fill =(0,255,0)
Draw an inscribed circle in the square, the first parameter is a tuple of 4 elements, with (150, 15) as the upper left corner vertex of the square, (190, 55) as the lower right corner vertex of the square, specifying the level median line of the rectangular frame is the angle of 0 degrees, the second parameter indicates the starting angle, the third parameter indicates the ending angle, and fill = 0 indicates that the color of the line is white. If the figure is not square according to the coordination, you will get an ellipse.
Besides the arc function, you can also use the chord function for drawing a solid circle.
draw.ellipse((150,65,190,105), fill = 0)
The first parameter is the coordination of the enclosing rectangle. The second and third parameters are the beginning and end degrees of the circle. The fourth parameter is the fill color of the circle.
- Write a character:
The ImageFont module needs to be imported and instantiated:
Font1 = ImageFont.truetype("../Font/Font01.ttf",25)
Font2 = ImageFont.truetype("../Font/Font01.ttf",35)
Font3 = ImageFont.truetype("../Font/Font02.ttf",32)
You can use the fonts of Windows or other fonts which is in ttc format..
Note: Each character library contains different characters; If some characters cannot be displayed, it is recommended that you can refer to the encoding set ro used. To draw English characters, you can directly use the fonts; for Chinese characters, you need to add a symbol u:
draw.text((5, 68), 'Hello world', fill = 0, font=Font1)
text= u"微雪电子"
draw.text((5, 200), text, fill = 0, font=Font3)
The first parameter is a two-element tuple with (5,68) as the left vertex, and use font1, fill is font color, fill = 0 means that the font color is white, and the second sentence shows '微雪电子', and the font color is white.
- Read local pictures:
image = Image.open('../pic/pic.bmp')
The parameter is the image path.
- Other functions:
Python's image library is very powerful, if you need to achieve other features, you can go to the official website to learn http://effbot.org/imagingbook pil.