- sales/support
Google Chat: zj734465502@gmail.com
- sales
+86-0755-88291180
- sales01
sales@spotpear.com
- sales02
dragon_manager@163.com
- support
tech-support@spotpear.com
- CEO-Complaints
zhoujie@spotpear.com
- sales/support
WhatsApp:13246739196
Raspberry Pi 1.14inch 1.3inch LCD - Python Stats Example User Guide
- If you have previously installed the Kernel Driver with the PiTFT Easy Setup, you will need to remove it first in order to run this example.
We can also display some stats about your Pi such as the IP address, resource usage, and even the CPU Temperature. Start by saving the code below as stats.py in your home directory on your Raspberry Pi.
- # -*- coding: utf-8 -*-
- import time
- import subprocess
- import digitalio
- import board
- from PIL import Image, ImageDraw, ImageFont
- import adafruit_rgb_display.st7789 as st7789
- # Configuration for CS and DC pins (these are FeatherWing defaults on M0/M4):
- cs_pin = digitalio.DigitalInOut(board.CE0)
- dc_pin = digitalio.DigitalInOut(board.D25)
- reset_pin = None
- # Config for display baudrate (default max is 24mhz):
- BAUDRATE = 64000000
- # Setup SPI bus using hardware SPI:
- spi = board.SPI()
- # Create the ST7789 display:
- disp = st7789.ST7789(
- spi,
- cs=cs_pin,
- dc=dc_pin,
- rst=reset_pin,
- baudrate=BAUDRATE,
- width=135,
- height=240,
- x_offset=53,
- y_offset=40,
- )
- # Create blank image for drawing.
- # Make sure to create image with mode 'RGB' for full color.
- height = disp.width # we swap height/width to rotate it to landscape!
- width = disp.height
- image = Image.new("RGB", (width, height))
- rotation = 90
- # Get drawing object to draw on image.
- draw = ImageDraw.Draw(image)
- # Draw a black filled box to clear the image.
- draw.rectangle((0, 0, width, height), outline=0, fill=(0, 0, 0))
- disp.image(image, rotation)
- # Draw some shapes.
- # First define some constants to allow easy resizing of shapes.
- padding = -2
- top = padding
- bottom = height - padding
- # Move left to right keeping track of the current x position for drawing shapes.
- x = 0
- # Alternatively load a TTF font. Make sure the .ttf font file is in the
- # same directory as the python script!
- # Some other nice fonts to try: http://www.dafont.com/bitmap.php
- font = ImageFont.truetype("/usr/share/fonts/truetype/dejavu/DejaVuSans.ttf", 24)
- # Turn on the backlight
- backlight = digitalio.DigitalInOut(board.D22)
- backlight.switch_to_output()
- backlight.value = True
- while True:
- # Draw a black filled box to clear the image.
- draw.rectangle((0, 0, width, height), outline=0, fill=0)
- # Shell scripts for system monitoring from here:
- # https://unix.stackexchange.com/questions/119126/command-to-display-memory-usage-disk-usage-and-cpu-load
- cmd = "hostname -I | cut -d' ' -f1"
- IP = "IP: " + subprocess.check_output(cmd, shell=True).decode("utf-8")
- cmd = "top -bn1 | grep load | awk '{printf \"CPU Load: %.2f\", $(NF-2)}'"
- CPU = subprocess.check_output(cmd, shell=True).decode("utf-8")
- cmd = "free -m | awk 'NR==2{printf \"Mem: %s/%s MB %.2f%%\", $3,$2,$3*100/$2 }'"
- MemUsage = subprocess.check_output(cmd, shell=True).decode("utf-8")
- cmd = 'df -h | awk \'$NF=="/"{printf "Disk: %d/%d GB %s", $3,$2,$5}\''
- Disk = subprocess.check_output(cmd, shell=True).decode("utf-8")
- cmd = "cat /sys/class/thermal/thermal_zone0/temp | awk '{printf \"CPU Temp: %.1f C\", $(NF-0) / 1000}'" # pylint: disable=line-too-long
- Temp = subprocess.check_output(cmd, shell=True).decode("utf-8")
- # Write four lines of text.
- y = top
- draw.text((x, y), IP, font=font, fill="#FFFFFF")
- y += font.getsize(IP)[1]
- draw.text((x, y), CPU, font=font, fill="#FFFF00")
- y += font.getsize(CPU)[1]
- draw.text((x, y), MemUsage, font=font, fill="#00FF00")
- y += font.getsize(MemUsage)[1]
- draw.text((x, y), Disk, font=font, fill="#0000FF")
- y += font.getsize(Disk)[1]
- draw.text((x, y), Temp, font=font, fill="#FF00FF")
- # Display image.
- disp.image(image, rotation)
- time.sleep(0.1)
Go ahead and run the script by typing:
python3 stats.py
It should display some system information.
Modifications for the 1.3" Display
To get the stats.py example to display properly on the 1.3" TFT Display, you will need to make some changes due to the different geometry of the display. The parameters you will need to adjust are the height, x_offset, y_offset, and rotation.
The new values should be:
height = 240x_offset = 0y_offset = 80rotation = 180
The easiest way to replace them may be to copy the following code block and replace it in the above code.
- # Create the ST7789 display:
- disp = st7789.ST7789(
- spi,
- cs=cs_pin,
- dc=dc_pin,
- rst=reset_pin,
- baudrate=BAUDRATE,
- width=240,
- height=240,
- x_offset=0,
- y_offset=80,
- )
- # Create blank image for drawing.
- # Make sure to create image with mode 'RGB' for full color.
- height = disp.width # we swap height/width to rotate it to landscape!
- width = disp.height
- image = Image.new("RGB", (width, height))
- rotation = 180
Running Stats on Boot
You can pretty easily make it so this handy program runs every time you boot your Pi.
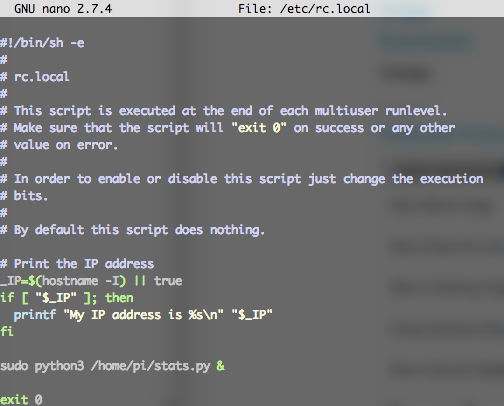
The fastest/easiest way is to put it in /etc/rc.local
Run sudo nano /etc/rc.local and add the line
sudo python3 /home/pi/stats.py &
on its own line right before exit 0
Then save and exit. Reboot to verify that the screen comes up on boot!

Troubleshooting Stats on Boot
For the normal installation of Blinka on Raspberry Pi, we have you install stuff without the sudo keyword, which will install the libraries locally. However, to have the script run at boot, you will need to have the libraries available on a more system wide level. You can test this out by running the following command and see if the the stats come up:
sudo python3 /home/pi/stats.py
If you have any errors, most can be fixed by running the following command:
sudo pip3 install --upgrade adafruit-blinka adafruit-circuitpython-rgb-display spidev
Once you can get it to come up, go ahead and press Control+C and reboot the system. It should come up now.
Sometimes the Pi can boot too fast, so you may also need to add sleep 10 on the line before the command you added in /etc/rc.local.


