


- sales/support
Google Chat:---
- sales
+86-0755-88291180
- sales01
sales@spotpear.com
- sales02
dragon_manager@163.com
- support
tech-support@spotpear.com
- CEO-Complaints
zhoujie@spotpear.com
- Only Tech-Support
WhatsApp:13246739196
- Purchase/Shipping/Refund
WhatsApp:13424403025
- HOME
- >
- ARTICLES
- >
- Common Moudle
- >
- LCD
10.1inch HDMI LCD (H) (with case) User Guide
Key descriptions
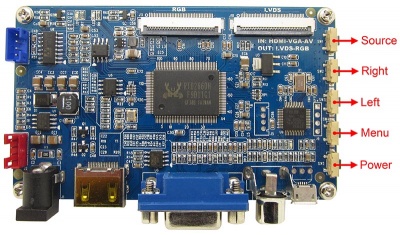
- Source key: For your first time using it, you should configure the corresponding signal source (when using the menu, this key can be served as Return).
- Right key: Direction key
- Left key: Direction key
- Menu key: Open the menu (when using the menu, this key can be served as Confirm)
- Power key: Turn on or turn off the LCD screen
Menu descriptions
Color page
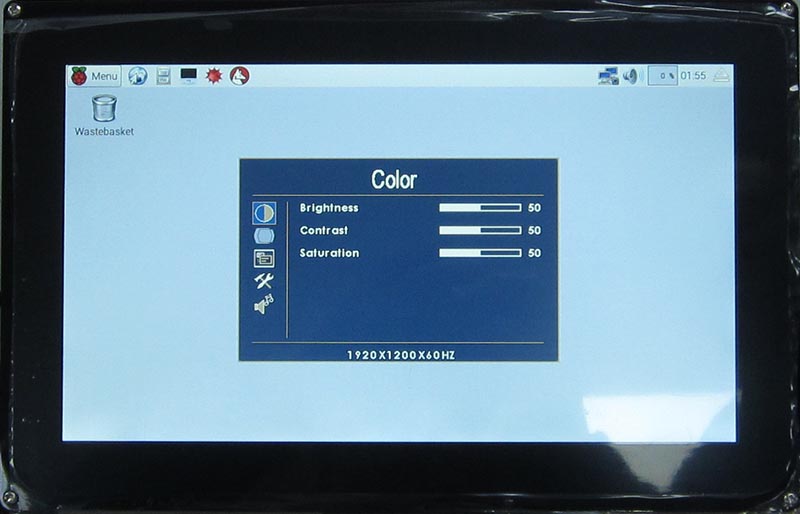
- Brightness – adjust the brightness
- Contrast – adjust the contrast
- Saturation – adjust the saturation
Menu page (On-screen Display)
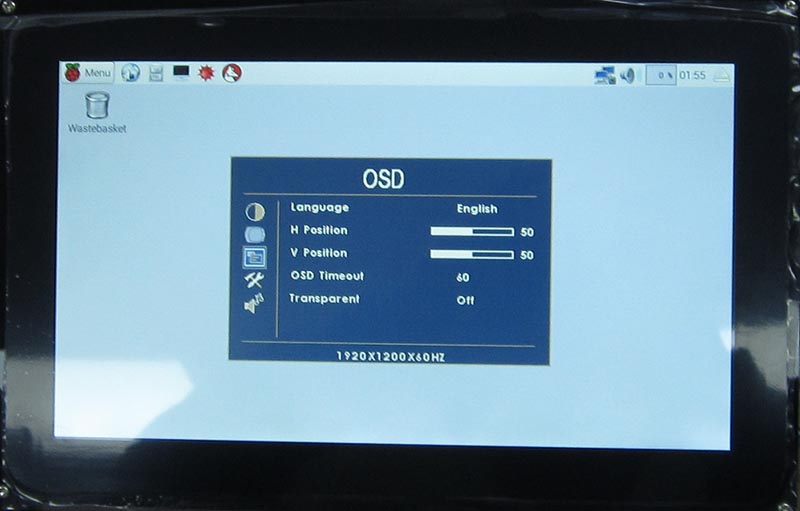
- Language – choose the menu language (English, Simplified Chinese, French, Italian, German, Spanish, Chinese Traditional and Russian)
- H Position – adjust the horizontal position
- V Position – adjust the vertical position
- OSD Timeout – adjust the menu display time
- Transparent – adjust the menu transparent
Function page
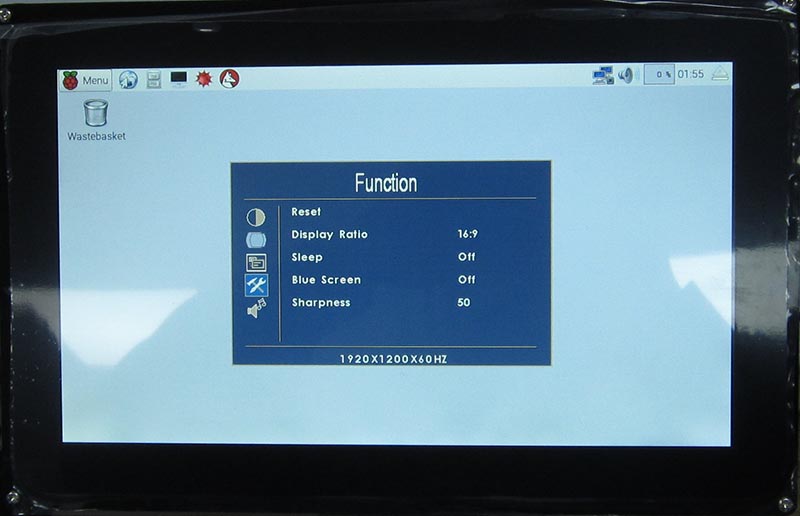
- Reset – reset to defaults
- Display Ratio – this option is generally set to 16:9 to make sure the screen display not stretched
- Sleep – set the time span between no-action and sleep mode (Reserved, not supported)
- Blue Screen – blue screen (Reserved, not supported)
- Sharpness – adjust the sharpness
Sound page
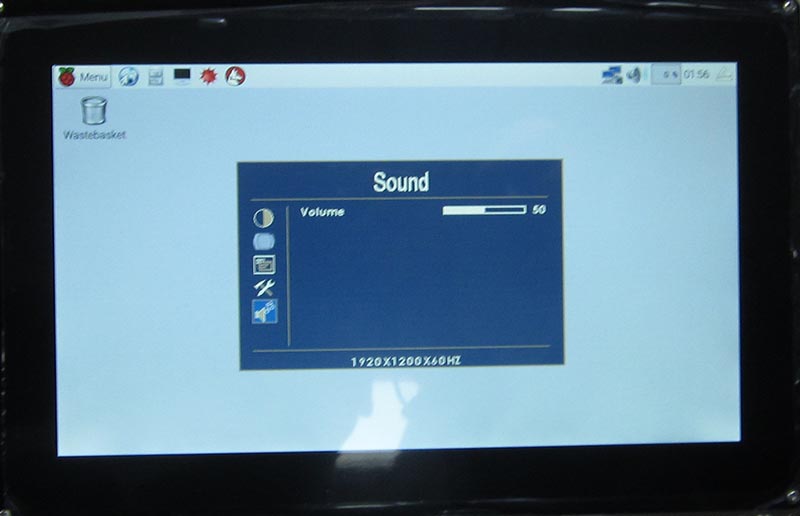
- Volume – adjust the volume (Reserved, not supported)
How to use 10.1inch HDMI LCD and Raspberry Pi (similar to other mini PC)
Use the Raspbian image from the CD
To use the Raspberry Pi with a LCD, you should configure the original Raspberry system before using. Of course, you can also apply the ready-to-use system mirror image directly. The image from the CD does not support Raspberry Pi 3. If you are using a Raspberry Pi 3, please download the official image and set a proper resolution, see: #How to use Raspberry Pi with LCD?
- Copy and extract the image (a file with expansion name .img) to your PC. Or you can also download the corresponding image from this address.
- You can apply the software ADFormatter.exe to format the TF card. Notice: The capability of TF card in used here should be more than 4GB. In this operation, a TF card reader is also required, which has to be purchased separately.
- Start the software Win32DiskImager.exe, and select the system image you downloaded, and click the button Write to program the system image.
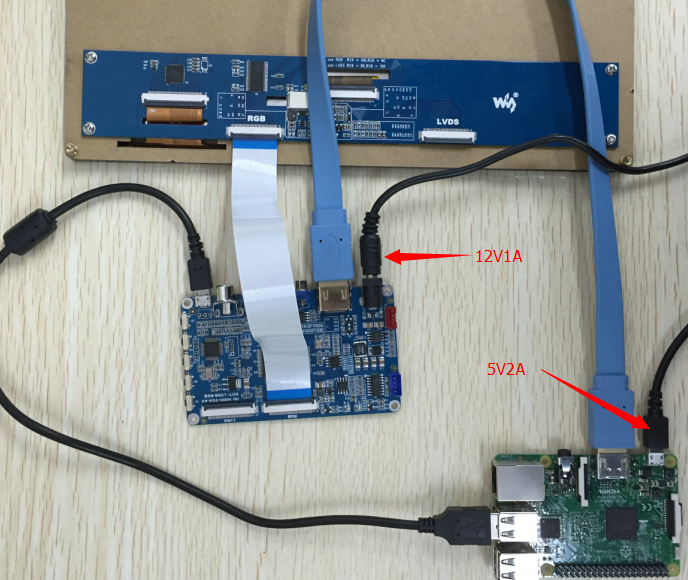
Hardware connection
- Connect the main control board to the 10.1inch Capacitive Touch LCD with a 40 pins FFC cable (The FFC cable, with its contacts downwards, is connected to the RGB interface. Although LVDS interface is supported, the LVDS firmware is unavailable).
- Connect the main control board to the HDMI interface of Raspberry Pi with a HDMI cable.
- Connect Micro USB interface of the main control board to any USB interface of the Raspberry Pi with a type A to micro USB cable
- Connect a 12V 1A power adapter to the main control board
- Insert the TF card described above into the Raspberry Pi, and connect the Raspberry Pi to a 5V 2A power adapter (In case that you want to use some big power devices, such as camera, it is recommended to use a 5V 2.5A power adapter for the Raspberry Pi).
Here is the hardware connection:
Test steps
- Power up the main control board, and then you will see the LCD displays the current signal source of the main control board on the upper left. Then, select the option HDMI as the signal source to be used.
- If the displayed signal source is VGA or AV, you should press the button Source, and enter the signal source selection -> use the button Right/Left to go to the option HDMI -> press the button Menu to select this signal source and confirm this selection
- If there is nothing display on the LCD, please check whether the hardware connection is fine, especially the FFC cable.
- Power up the Raspberry Pi, you can find that the screen display and the screen touch of the LCD work properly if everything is running well.
How to use Raspberry Pi with LCD?
Please note that the images in CD do not support Raspberry Pi 3 Model B. Instead, you should download the image (latest version for Pi 3) from Raspberry Pi Website.
For Raspbian
A Raspberry Pi can work with the LCD without using the Waveshare mirror image. You only need to modify the resolution of the Raspberry Pi, when working with a LCD. Download the RASPBIAN mirror image from the Raspberry website, and add the lines at the end of the file config.txt:
max_usb_current=1
hdmi_group=2
hdmi_mode=87
hdmi_cvt 1024 600 60 6 0 0 0
You must make sure that there are no spaces on either side of the equal sign.
Note:
- In a certain version of Raspbian (e.g. 2017-03-02-raspbian-jessie), the cursor on the screen may hold left click even if you tap the screen and release. Please try the following commands in such cases:
sudo apt-get install xserver-xorg-input-evdev
sudo mv /usr/share/X11/xorg.conf.d/40-libinput.conf /usr/share/X11/xorg.conf.d/40-libinput.conf_bak
reboot
- Some versions of Raspbian system may enter terminal interface with default after booted up. For easier to use LCD, it is recommended to set the relative configuration to make the system enters graphic interface directly after booted up. Please refer to the steps listed below to make the settings.
- Enter the setting of Raspbian, and run the code:
sudo raspi-config
- Select the option Enable Boot to Desktop/Scratch, and apply the direction keys, space key and /or carriage return key to make the settings.
- Select the option Desktop Login as user 'Pi' at the graphical desktop.
- When you see the hint ‘Would you like to reboot now?’, choose the option Yes to reboot the system.
For Ubuntu
Download the mirror image UBUNTU MATE from the Raspberry website, and add the lines at the end of the file config.txt:
max_usb_current=1
hdmi_group=2
hdmi_mode=87
hdmi_cvt 1024 600 60 6 0 0 0
You must make sure that there are no spaces on either side of the equal sign.
For Windows 10 IoT Core
Download the file Windows 10 IoT Core from the Microsoft website, and make the mirror image file Windows 10 IoT Core according to the tutorial, then, program the image file into the TF card. Find out the file config.txt under the root directory in the TF card, and add the lines at the end of the file:
max_usb_current=1
hdmi_group=2
hdmi_mode=87
hdmi_cvt 1024 600 60 6 0 0 0
You must make sure that there are no spaces on either side of the equal sign.
Firmware upgrade
The factory default firmware is the latest. DO NOT upgrade if not necessary. Steps
- Connect the main control board to your PC with a type A to micro USB cable, and power off the main control board;
- Long press the Power key to power up the main control board and then release the Power key after 5 seconds;
- Wait for the PC loading the driver (For the first time use, it may take several minutes). If driver loading is successful, there will be 2 removable storage devices can be identified (Video and USB Touch);
- Copy the display firmware into the Video, and wait about 20 seconds for the main control board restart.
- After the board restarted, you should copy the touch firmware into the USB Touch within 5 seconds. About 1 second later, the main control board will restart again.
- Wait 5 seconds, the main control board may restart once more, which means the firmware has been upgraded.
- Power up the main control board again, and the board will start to run the new firmware.