


- sales/support
Google Chat: zj734465502@gmail.com
- sales
+86-0755-88291180
- sales01
sales01@spotpear.com
- sales02
dragon_manager@163.com
- support
services01@spotpear.com
- CEO-Complaints
manager01@spotpear.com
- sales/support
WhatsApp:13246739196
Raspberry Pi 5.5inch 1440x2560 LCD User Guide
Overview
Note: This product displays vertically by default, and the resolution (H×V) is 1440 × 2560. The horizontal screen display can be performed by modifying the software settings.
Introduction
This product is a general-purpose 5.5-inch IPS display with an HDMI port and a resolution of 1440 × 2560, which is an optical bonding capacitive touch panel.
Supports Raspberry Pi 4B and CM4, and can also be used as a computer monitor.
Feature
- 5.5-inch IPS display with a hardware resolution of 1440 × 2560
- 10-point capacitive touch control with toughened glass panel, hardness up to 6H
- Adopts the optical bonding touch technique for better use
- Supports Raspberry Pi OS / Ubuntu / Kali and Retropie when working with Raspberry Pi 4B
- Supports Windows 11/10/8.1/8/7 when working as a computer monitor
- Supports HDMI audio output with 3.5mm Jack and 4PIN header
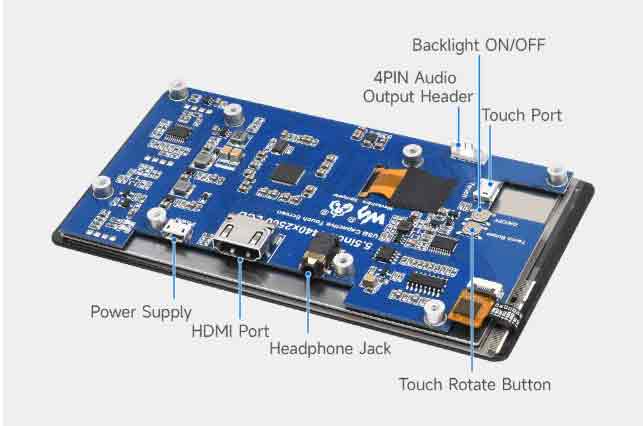
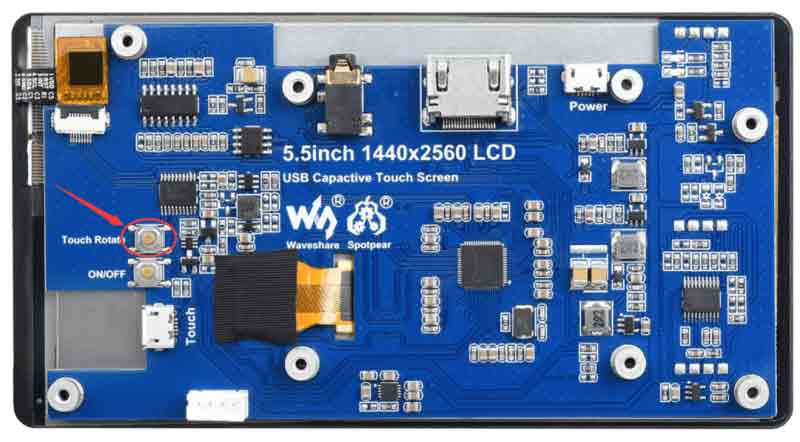
Onboard Resources
Working With Raspberry Pi 4B
For Raspberry Pi OS / Ubuntu / Kali and Retropie systems.
When the LCD works on systems such as Raspberry Pi, the resolution must be manually set, otherwise, it will cause an abnormal display.
1. Please download the latest version of the image from the Raspberry Pi official website. Download the compressed file to your PC, and unzip the ".img" file.
2. Connect the TF card to the PC and use SDFormatter to format the TF card.
3. Open the Win32DiskImager software, select the system image prepared in step 1, and click "write" to program the system image.
4. After the programming is completed, open the config.txt file in the root directory of the TF card, add the following code at the end of config.txt, save and safely eject the TF card, and insert the TF card into the Raspberry Pi.
hvs_priority=0x32ff
gpu_mem=256
config_hdmi_boost=10
hdmi_force_hotplug=1
hdmi_group=2
hdmi_mode=87
hdmi_drive=2
hdmi_pixel_freq_limit=268500000
#pi4:
hdmi_timings=1440 0 10 10 140 2560 0 11 2 2 0 0 0 50 0 206000000 3
#3B/ZERO needs to change to the following line of timings configuration and block dtoverlay=vc4-kms-v3d or dtoverlay=vc4-fkms-v3d
#hdmi_timings=1440 0 10 10 140 2560 0 11 2 2 0 0 0 50 0 180000000 3
disable_overscan=1
framebuffer_width=1440
framebuffer_height=2560
max_framebuffer_width=1440
max_framebuffer_height=2560
extra_transpose_buffer=2
5. Connect the Touch port of the display to the USB port of the Raspberry Pi.
6. Connect the HDMI port of the display screen to the HDMI port of the Raspberry Pi, power on the Raspberry Pi, and wait for a few seconds to display normally.
The screen is displayed vertically by default. For convenience, you can adjust the display orientation of the screen, see #Display Rotation.
Display Rotation
Note: Only the Raspberry Pi 4th generation controller supports display rotation. Limited by hardware, Raspberry Pi 3rd generation or zero only supports the default vertical screen display, and cannot support rotation.
Update Software Version
Raspberry Pi OS Bullseye branch needs to update the software version, other systems can skip this step.
sudo apt-get update
sudo apt-get full-upgrade
Raspberry Pi OS & Kail Display Rotation
First, check whether the KMS or FKMS driver is loaded on the system you are using.
How to check: In /boot/config.txt, check whether the corresponding board has turned on "dtoverlay=vc4-kms-v3d" or "dtoverlay=vc4-fkms-v3d".
Load KMS Or FKMS Driver
Use the following command for display rotation:
sudo nano /etc/xdg/lxsession/LXDE-pi/autostart
#Enter the command corresponding to the display rotation angle at the end of the autostart file, and it will take effect after restarting
#0: rotate 0 degrees; 1: rotate 270 degrees; 2: rotate 180 degrees; 3: rotate 90 degrees
xrandr -o 1
No KMS Or FKMS Driver Loaded
Use the following command for display rotation:
sudo nano /boot/config.txt
#Enter the command corresponding to the display rotation angle at the end of the config.txt file, and it will take effect after restarting
#0: rotate 0 degrees; 1: rotate 90 degrees; 2: rotate 180 degrees; 3: rotate 270 degrees
display_rotate=3
Touch To Rotate
After the display rotation is performed, the touch position is not correct because the touch does not change with the display angle. Hence, we need to modify the touch.
- Hardware Rotate Touch: Short press the Touch Rotate button on the bottom panel, and each short press will rotate the touch direction by 90 degrees.
- If there are special circumstances that cannot be rotated by hardware, please refer to the following software to rotate the touch:
1. Install libinput.
sudo apt-get install xserver-xorg-input-libinput
If you installed the Ubuntu system or Jetson Nano. The installation instructions are:
sudo apt install xserver-xorg-input-synaptics
2. Create the Xorg.conf.d directory under /etc/X11/ (if the directory already exists, this goes directly to step 3).
sudo mkdir /etc/X11/xorg.conf.d
3. Copy the 40-libinput-conf file to the directory just created.
sudo cp /usr/share/X11/xorg.conf.d/40-libinput.conf /etc/X11/xorg.conf.d/
4. Edit the file.
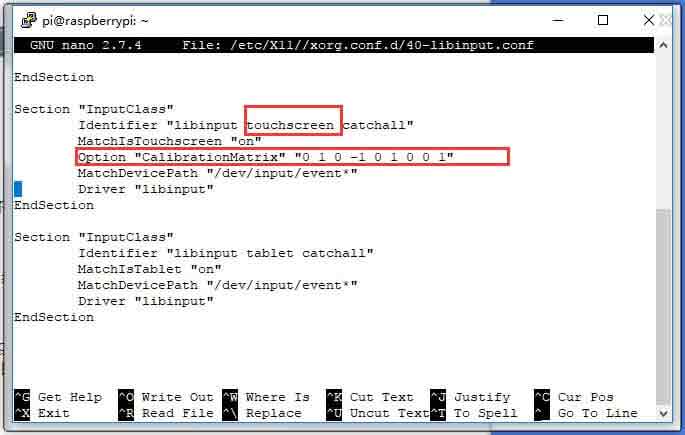
sudo nano /etc/X11/xorg.conf.d/40-libinput.conf
Find the touchscreen part, add the following statement to it, and save it.
Option "CalibrationMatrix" "0 1 0 -1 0 1 0 0 1"
Similar to the picture below:
5. Reboot the Raspberry Pi.
sudo reboot
Complete the above steps to perform a 90-degree rotation.
Note:
90 degree rotation: Option "CalibrationMatrix" "0 1 0 -1 0 1 0 0 1"
180 degree rotation: Option "CalibrationMatrix" "-1 0 1 0 -1 1 0 0 1"
270 degree rotation: Option "CalibrationMatrix" "0 -1 1 1 0 0 0 0 1"
Interface Optimization
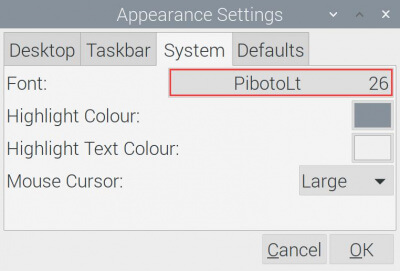
Due to the high resolution of the screen, it is recommended to modify the theme to a larger size for enjoying a better touching experience. This feature is not supported on all systems. The following mainly uses the Raspbian system to describe the relevant operations, and other systems are similar.
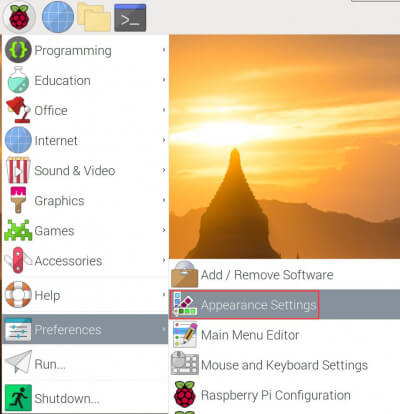
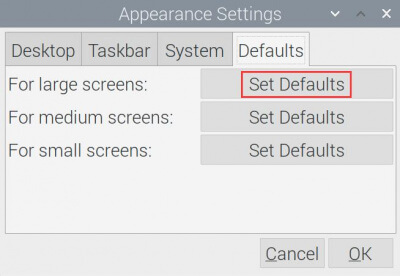
- Select Menu -> Preferences -> Appearance Settings -> Defaults -> For large screens: Set Defaults -> OK.
- Set the font size of the System.
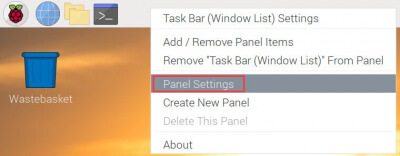
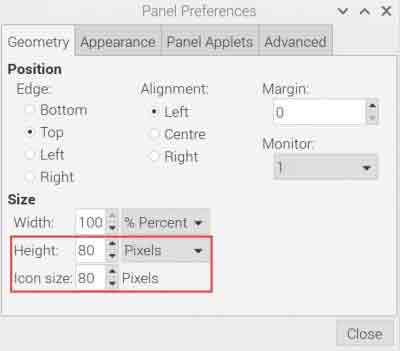
- Right-click on the taskbar -> "Panel Preferences" -> "Geometry" -> "Size".
Set The Screen Always On
Some users want to display without being affected by the screen saver function, and can be set it as follows. Turn off the screen saver function.
Open lightdm.conf
sudo nano /etc/lightdm/lightdm.conf
Modify lightdm.conf to find "xserver-command" under the [SeatDefaults] section, uncomment it, and modify it as follows:
#xserver-command=X
change into
xserver-command=X -s 0 -dpms
- -s # – set screen saver not enabled
- dpms - turn off power saving management
Reboot
sudo reboot
Working With PC
Support Windows 11/10/8.1/8/7 system. How to use:
1) Connect the Touch interface of the display screen to the USB interface of the PC. After a while, Windows will automatically recognize the touch function.
2) Connect the HDMI interface of the display to the HDMI interface of the PC, and wait for about 10 seconds to see that the display is displayed normally. If you need to output sound, you can connect 3.5mm headphones through the HP audio output interface.
Note 1: When the computer is connected to multiple monitors at the same time, the touch effect works on the main screen by default. If you need to specify the touch to the secondary screen, see #Calibration touch on Windows.
Note 2: The USB interface of some PCs may cause insufficient power supply due to aging. In this case, you can use the USB interface on the back of the PC host, or connect an external 5V 2A power adapter to the "power" interface.
Note 3: This product defaults to vertical display, and the resolution (H×V) is 1440 × 2560. You can enter the display settings of the windows system and rotate it to landscape display.
Calibration touch on Windows
Take the windows10 system as an example:
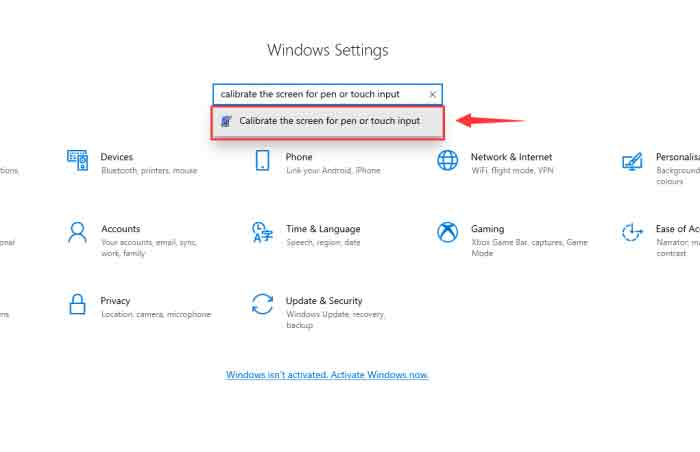
- 1. Enter the Windows settings of the system, type in the search bar and click "Calibrate the screen for pen or touch input" (as shown in the picture below).
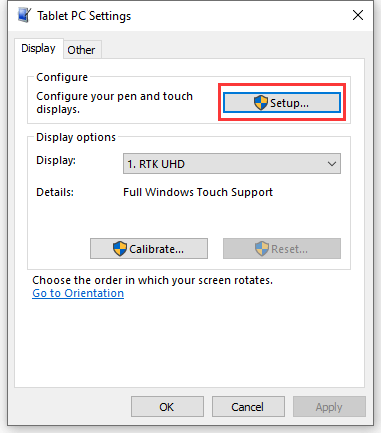
- 2. Click "Setup" in the pop-up "Tablet PC Settings" interface:
- 3. The following text prompt will appear on the screen. Please tap the touch screen with your finger, and the computer will recognize it as a touch screen.
【Note】If the touch screen is blank, press the "Enter" key, and the text prompt will switch to the touch screen. (The screen which displays the text prompt will be used as a touch screen!) 
Working With Tinker Board 2
Hardware Connection
- Connect the Touch interface of the LCD to the USB connector of Tinker Board 2.
- Connect the HDMI port of the LCD to the HDMI port of Tinker Board 2.
Software Setting
Android and Debian systems for Tinker Board 2.
- Please download the newest image from Tinker Board official website. Download the compressed file to the PC and then unzip it to get the "img" file.
- Connect the TF card to the PC and use SDFormatter to format the TF card.
- Open the Win32DiskImager software and select the system image prepared in the first step, and click "write" to program the system image.
- After programming, you can insert the TF card to Tinker Board 2 and the power on it,


