- sales/support
Google Chat: zj734465502@gmail.com
- sales
+86-0755-88291180
- sales01
sales01@spotpear.com
- sales02
dragon_manager@163.com
- support
services01@spotpear.com
- CEO-Complaints
manager01@spotpear.com
- sales/support
WhatsApp:13246739196
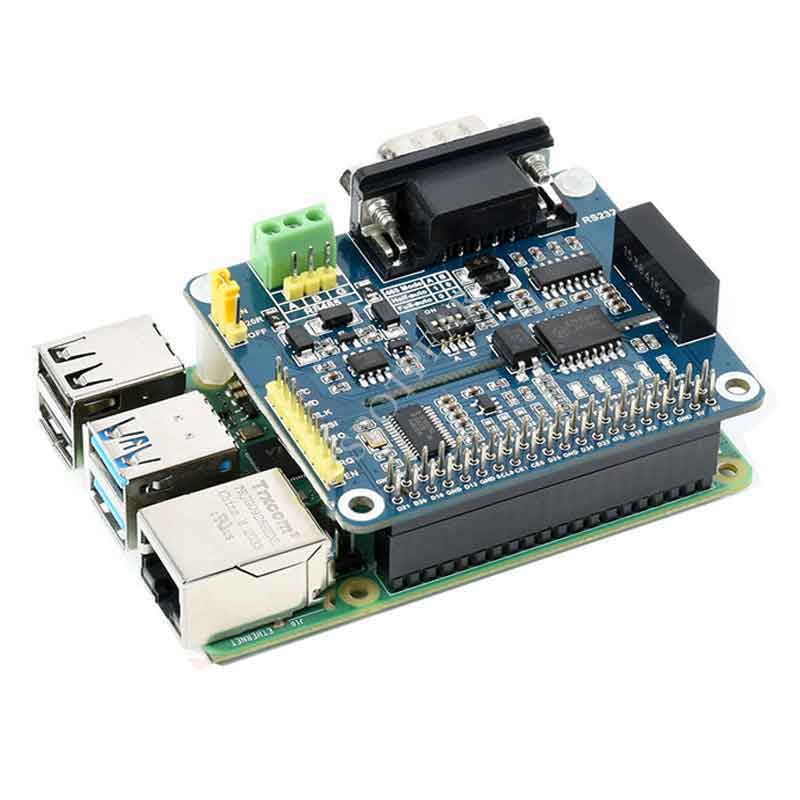
Raspberry Pi RS485 RS232 HAT User Guide
Product Description
RS485 RS232 HAT is an isolated RS485 and RS232 expansion board specially designed by Waveshare for Raspberry Pi. It adopts SC16IS752+SP3485, SP3232 scheme, built-in power isolation, ADI magnetic coupling isolation and TVS and other protection circuits.
Feature
- Based on Raspberry Pi 40pin GPIO interface, suitable for Raspberry Pi series boards.
- Using SC16IS752 and SP3485, SP3232 multi-chip combination scheme, can realize SPI to RS485, RS232, the communication rate is up to 921600bps.
- RS485 supports manual or automatic sending and receiving of data, which can be set by DIP switch.
- RS485 onboard resettable fuse and protection diode can ensure stable output of current and voltage, prevent overcurrent and overvoltage, and improve shock resistance.
- Onboard TVS (transient voltage suppression tube), which can effectively suppress the surge voltage and transient peak voltage in the circuit, and protect against lightning and static electricity.
- Onboard power supply and serial port transceiver indicators, easy to check the module power supply and communication status.
- Lead out the SPI control interface for easy access to main control boards such as Arduino.
- Provide complete supporting information manuals (C and python sample programs and user manuals, etc.).
Product parameters
- Serial port expansion chip: SC16IS752
- RS485 transceiver: SP3485
- RS232 transceiver: SP3232
- Communication Interface: SPI
- Communication rate: 300~921600 bps
- Operating Voltage: 3.3/5V
- Dimension: 65mm × 56.5mm
- Via diameter: 3.0mm
Interface Description
- Pin function
| Pin Number | Identification | Pin Description |
| 1 | VCC | 3.3V/5V Power |
| 2 | GND | GND |
| 3 | SCLK | SPI clock input |
| 4 | MOSI | SPI data input |
| 5 | MISO | SPI data output |
| 6 | CS | SPI Chip select signal |
| 7 | IRQ | interrupt output |
| 8 | EN | RS485 output enable |
Hardware Description
Controller
This product uses SC16IS752 as the control chip. SC16IS752 is a dual-channel high-performance UART expansion chip that supports SPI and I2C interface communication. This module uses the SPI interface. Onboard power isolation, ADI magnetic coupling isolation, onboard TVS (transient voltage suppression tube), self-recovery fuse and protection diode and automatic transceiver conversion circuit. It can effectively suppress the surge voltage and transient peak voltage in the circuit, prevent lightning and static electricity, prevent overcurrent and overvoltage, improve the anti-shock ability, and can carry out signal isolation. It has the advantages of high reliability, strong anti-interference, and low power consumption.
Letter of Agreement
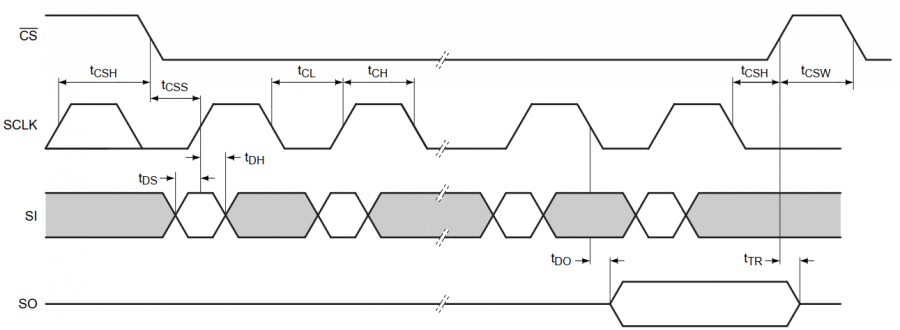
CS: letter of agreement
SCLK: SPI communication clock
MOSI/SI:SPI communication master sends, slave receives
MIS0/SO:SPI communication master receives, slave sends
Timing:CPHL=0, CPOL=0 (SPI0)
[Remarks] For specific information about SPI communication, you can search for information online.
Hardware connection
Detailed connection: The C and python routines need an additional RS485 to serial port module connected to channel 1 to see the effect. test.py in Python requires channel 1 and channel 2 to be connected.
| Function Pins | Raspberry Pi Interface (BCM) | Description |
| VCC | 5V | 3.3V/5V power supply positive |
| GND | GND | Power Ground |
| SCLK | D21(SPI1 SCLK) | SPI clock input |
| MOSI | D20(SPI1 MOSI) | SPI data input |
| MISO | D19(SPI1 MISO) | SPI data output |
| CS | D18(SPI1 CS) | SPI Chip Select Signal |
| IRQ | D24 | Interrupt output, can be switched to D16, D12, D25 pins |
| EN | D22 | RS485 transceiver enable: high level transmit enable, low level receive enable |
Add driver
- Execute in terminal:
sudo nano /boot/config.txt
#Add the following, int_pin is set according to the actual welding method:
dtoverlay=sc16is752-spi1,int_pin=24
#reboot device
sudo reboot
After restarting, the driver of SC16IS752 will be loaded into the system kernel. At this time, you can run ls /dev to check the following devices: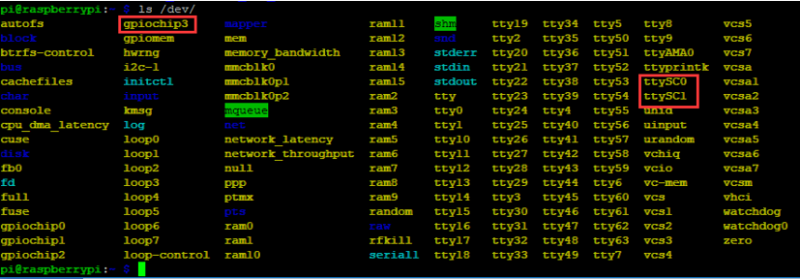
In the Raspberry Pi system on 2020-05-27, gpiochip3 has not become gpiochip2
Install the library
- Install BCM
wget http://www.airspayce.com/mikem/bcm2835/bcm2835-1.71.tar.gz
tar zxvf bcm2835-1.71.tar.gz
cd bcm2835-1.71/
sudo ./configure && sudo make && sudo make check && sudo make install
# For more information, please refer to the official website: http://www.airspayce.com/mikem/bcm2835/
- Install wiringPi
sudo apt-get install wiringpi
#For Raspberry Pi 4B may need to be upgraded;
cd /tmp
wget https://project-downloads.drogon.net/wiringpi-latest.deb
sudo dpkg -i wiringpi-latest.deb
gpio -v
# Run gpio -v and version 2.52 will appear. If it does not appear, the installation is wrong
- Install python2 library
sudo apt-get update
sudo apt-get install python-pip
sudo pip install RPi.GPIO
sudo apt-get install python-serial
- Install python3 library
sudo apt-get update
sudo apt-get install python3-pip
sudo pip3 install RPi.GPIO
sudo apt-get install python3-serial
Testing
- Download and run the test routine
sudo apt-get install p7zip-full
wget https://www.waveshare.com/w/upload/4/44/RS485_RS232_HAT.zip
7z x RS485_RS232_HAT.zip
sudo chmod 777 -R  RS485_RS232_HAT
cd RS485_RS232_HAT/
- C program
cd c
make clean
make
sudo ./main
- PYTHON program
cd python
cd examples
#Use RS485 for communication
sudo python3 RS485.py
#Use RS232 for communication
sudo python3 RS232.py
#Use RS232 TO RS485 to make the modules communicate with each other
sudo python3 test.py