


- sales/support
Google Chat: zj734465502@gmail.com
- sales
+86-0755-88291180
- sales01
sales01@spotpear.com
- sales02
dragon_manager@163.com
- support
services01@spotpear.com
- CEO-Complaints
manager01@spotpear.com
- sales/support
WhatsApp:13246739196
Raspberry Pi Pico-Audio User Guide
Overview
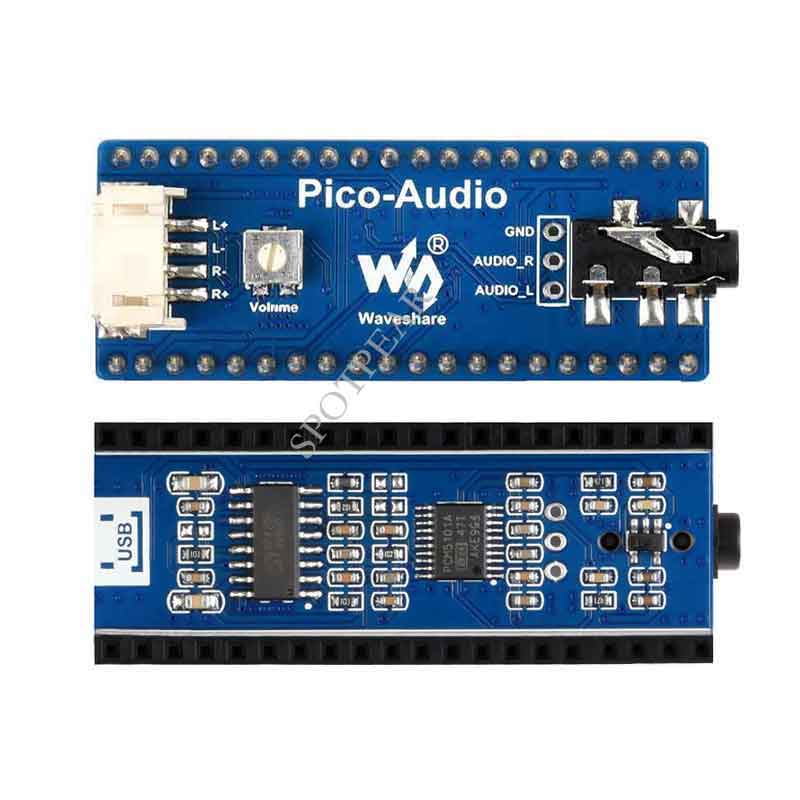
The Pico-Audio is an audio expansion module designed for Raspberry Pi Pico, which incorporates PCM5101A low power stereo decoder, and uses I2S bus for transmitting the audio signals. It supports a wide range of audio sampling rates, allows headphone and speaker signal output at the same time.
Features
- Standard Raspberry Pi Pico header supports Raspberry Pi Pico series
- Standard 3.5mm audio jack, for connecting an external headphone
- Dual channels speaker headers, for direct driving speakers
- 8~384000Hz audio sampling rate
- Stereo sound effect output
- Using 3-wire I2S, effectively reducing EMI
Specification
- operating voltage: 5V
- Audio Decoder: PCM5101A
- DAC SNR: 106 dB
- Logic level: 3.3V
- Audio bus: I2S
- Speaker driving: 2.6W/channel (4ohm BTL)
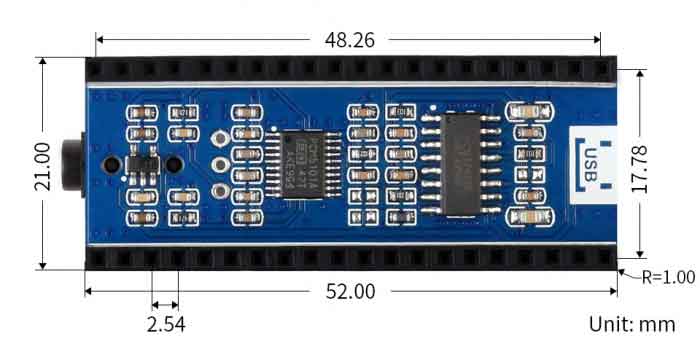
Dimension
I2S
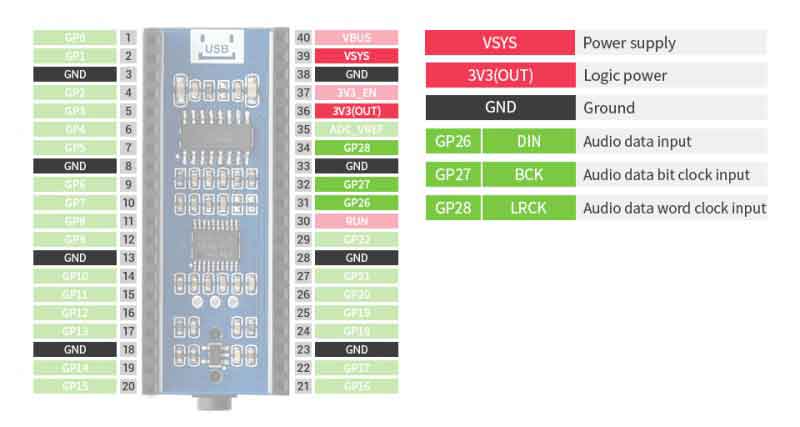
The most important thing to note about the I2S protocol is that it takes the second clock after the change of the sampling pulse as the first bit of data, and the first clock after the change of the following sampling pulse as the last bit of data。
LRCK: Audio data word clock input, when it is low level for the left channel data acquisition, when it is high level for the right channel data acquisition.
BCK: Audio data bit clock input, when it produces a rise edge jump to collect data, the frequency must be 32 or 48 or 64 times the frequency of LRCK.
DATA: Audio data input, note that the data is signed data, data transmission can choose 16-bit, 24-bit, 32-bit data, high in the front, low in the back.
Hardware connection
Please take care of the direction when connect the board to Pico according to the USB port.
You can also wire it according to the table
| PCM5101A | Pico | Description |
| VSYS | VSYS | Power input(5V) |
| 3V3(OUT) | 3V3(OUT) | Logic level(3.3V) |
| GND | GND | Ground |
| DIN | GPIO26 | Audio data input |
| BCk | GPIO27 | Audio data bit clock input |
| LRCK | GPIO28 | Audio data word clock input |
Download examples
Open a terminal of Raspberry Pi and run the following commands:
sudo apt-get install p7zip-full
cd ~
sudo wget  https://www.waveshare.com/w/upload/7/7c/Pico_Audio.7z
7z x Pico_Audio.7z -o./Pico-Audio
cd ~/Pico_Audio
There are two folders in the Pico_Audio directory, The Pico_Audio includes the examples of Audio output example. In the usb_sound_card folder, the sound driver file (.uf2) is saved, which you should copy to the Pico.
cp usb_sound_card.uf2 /media/pi/RPI-RP2/
Run examples
C codes
- Go into the Pico-Audio directory and build the codes.
cd ~/Pico_Audio/Pico-Audio/
Create and go into the build folder, add the path of SDK:
../../pico-sdk is the default path of SDK, you need to modify it if the actual path is different in your pi.
We have created the build folder in example, you can just enter it.
cd build
export PICO_SDK_PATH=../../pico-sdk
Run cmake to generate Makefile file
cmake ..
Run make command to build the codes
make -j9
After building, the uf2 file is generated.
Press and hold the key on the Pico board to connect the Pico to the USB port of the computer through the Micro USB cable, then release the key. After plugging in, the computer will automatically recognize a removable disk (RPI-RP2). Copy the audio_firmware.uf2 file in the build folder to the removable disk (RPI-RP2) recognized.
cp audio_firmware.uf2 /media/pi/RPI-RP2/