


- sales/support
Google Chat:---
- sales
+86-0755-88291180
- sales01
sales@spotpear.com
- sales02
dragon_manager@163.com
- support
tech-support@spotpear.com
- CEO-Complaints
zhoujie@spotpear.com
- Only Tech-Support
WhatsApp:13246739196
- Purchase/Shipping/Refund
WhatsApp:13424403025
- HOME
- >
- ARTICLES
- >
- Common Moudle
- >
- ESP
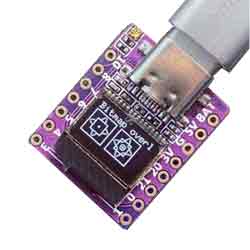
ESP32 C3 0.42LCD WIFI
1. Open the arduino IDE
2. Select Chip
2.1. Click on tools
2.2. Click on board
2.3. Click on esp32 and select esp32-c3
3.Substitution code burning
#include<WiFi.h>
voidsetup()
{
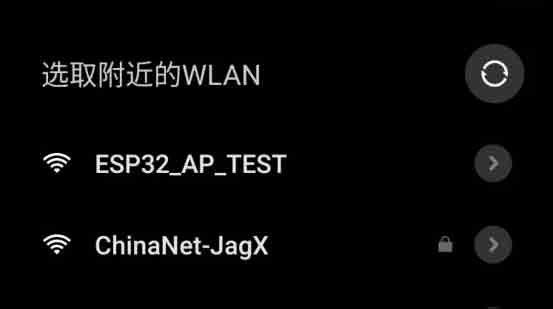
WiFi.softAP("ESP32_AP_TEST");
}
voidloop()
{
}
3.1. Copy the code into the Arduino IDE
3.2. Use a type-c cable to connect the computer to the ESP 32-c3 development board. After successful connection, the serial port will be displayed in the computer management window
3.3Click on Tools in the Arduino IDE, then click on Port and select the serial port Adafruit QT ESP32-C3
3.4Click on Verify
3.5.Click on upload
3.6 The test results are as follows
TAG:
Raspberry Pi ZERO
DDSM115 Direct Drive Servo Motor All-In-One Design Hub RS485 Motor
Mini Uninterruptible Power Supply module Supports charging And Power output at the same time 5V 2.5A
Raspberry Pi Pico 10.1inch DVI LCD
Raspberry Pi Pico 2 RP2350 1.43 inch AMOLED TouchScreen Development Board 466x466 1.43inch Display QMI8658 6-Axis | PCF85063 RTC | SD | Battery Port
0.96inch RGB OLED
Raspberry Pi ST7789
Raspberry Pi 3 LCD HAT
0.85inch Display
ESP32 C3 Voice Robot Mini Development Board AI DeepSeek Toy Doll Core 1.28 inch 1.54inch LCD
spotpear
ESP32-S3 SIM7670G 4G Development Board With Camera LTE Cat-1/4G/GNSS/GPS Global Band Portable WIFI
ESP32-S3 A7670E 4G development board supports LTE Cat-1/2G/GNSS positioning/WiFi/Bluetooth
ESP32 P4 Development Board 7inch Display 7 inch TouchScreen Onboard ESP32-C6/Camera-Port/Speaker-Port
Wireless AW CB375N 2.4G/5GHz Dual Band WiFi5 Wireless module RTL8822CE CG Bluetooth 5.0
Type-C Power Adapter
RS422 to CAN
Spotpear
ESP32-S3
Milk-V Duo S Usage of USB Type A interface
TAG:
X1007 Raspberry Pi 5 PCIe Dual 2.5&amp;quot; SATA HDD SSD Double-SATA
Rockchip
Raspberry Pi 5 PCIe to M.2 Multi Function Adapter Board Supports Dual 4K HDMI Output
ESP32 S3
ESP32 S3
Raspberry Pi 5 PCIe M.2 NVMe SSD Pi5 2230-Board mini
ESP32 S3 Development Board 2.41 inch AMOLED Display 600x450 TouchScreen For Arduino LVGL With SD-Port/ QMI8658C 6-Axis Sensor
Raspberry Pi 5 MIPI Camera Cable
Raspberry Pi Pico 2 RP2350 2.8 inch LCD Capacitive TouchScreen Development Board 240x320 Display QMI8658 6-Axis /PCM5101 Audio /SD /RTC /Battery Port
UNO R4 Case
Raspberry Pi 5 PCIe M.2 NVMe SSD Pi5 2280-2242 2230 X1002
Circular LCD Screen
Raspberry Pi
SpeedyBee Bee35 3.5 inch Frame RC FPV Drone
Case For Luckfox Pico Mini A Or B
Desktop Ornament
Jetson Orin Nano 4 8GB AI 20 40Tops Lower Power Autonomous Machines For NVIDIA
Raspberry Pi 8 inch DSI LCD Display MIPI 800×480 Capacitive TouchScreen 5MP Front Camera
Raspberry Pi CM5 Compute Module 5 Dual Gigabit Ethernet RJ45 Expansion IO Base Board
Raspberry Pi Pico 2 RP2350A 1.54inch TouchScreen 1.54 inch ePaper Display Development Board 200×200