


- sales/support
Google Chat:---
- sales
+86-0755-88291180
- sales01
sales@spotpear.com
- sales02
dragon_manager@163.com
- support
tech-support@spotpear.com
- CEO-Complaints
zhoujie@spotpear.com
- Only Tech-Support
WhatsApp:13246739196
- Purchase/Shipping/Refund
WhatsApp:13424403025
Raspberry Pi USB TO M.2 B KEY User Guide
Features
- Support 5G modules with M.2 (NGFF) Key B interface, suitable for SIMCom and Quectel 5G module.
- Support 5G modules with 3042/3052 form factor, such as SIM82XX, and RM50XQ series 5G modules.
- Onboard USB 3.1 Type A interface, easy to be inserted into a computer, Raspberry Pi, or Jetson Nano for a 5G network.
- Onboard 4-Ch IPEX 4 to the SMA antenna interface, easy to directly install and fix the antenna.
- Onboard SIM card slot for NANO SIM card.
- On-board power and network indicators and multiple pads are reserved to check the working status of the module and test other functions.
- PCB immersion gold process, reserved multi-slots and location holes for integration.
- Comes with customized aluminum alloy panel with good heat dissipation, which is nice, protective, and durable.
Working With RM50XX Module
Selection Guide
| 5G Sub-6 | RM500U-CNV | RM500Q-GL 5G HAT | RM502Q-AE 5G HAT | RM520N-GL | RM530N-GL | |
|---|---|---|---|---|---|---|
| 5G Standard | 3GPP R15 | 3GPP R16 | ||||
| 5G Chip | UNISOC | Qualcomm | ||||
| 5G | Sub-6 GHz | Sub-6 GHz & mmWave | ||||
| Region/Operator | China, EMEA, Asia-Pacific | except Americas | except China | Global | ||
| Operating Temperature | -30°C ~ +75°C | |||||
| Extension Temperature | -40°C ~ +85°C | |||||
| Module Size | 30.0 × 52.0 × 2.3 (mm) | |||||
| Module Weight | 8.8g | 8.7g | 8.8g | |||
| Power Supply | 3.3~4.4V, Typ. 3.7V | 3.135~4.4V, Typ. 3.7V | ||||
| Power Consumption | 78μA @ shutdown; 5.1mA @ hibernate; | 70μA @ shutdown; 4.0mA @ hibernate; | 80μA @ shutdown; 4.2mA @ hibernate; | 195μA @ shutdown; 4.7mA @ hibernate; | 173μA @ shutdown; 5.1mA @ hibernate; | |
| Frequency Band | ||||||
| 5G | 5G NR | - | n257, n258, n260, n261 | |||
| 5G NR NSA | n41, n78, n79 | n41, n77, n78, n79 | n1, n2, n3, n5, n7, n8, n12, n20, n25, n28, n38, n40, n41, n48, n66, n71, n77, n78, n79 | n1, n2, n3, n5, n7, n8, n12, n13, n14, n18, n20, n25, n26, n28, n29, n30, n38, n40, n41, n48, n66, n70, n71, n75, n76, n77, n78, n79 | ||
| 5G NR SA | n1, n2, n3, n5, n8, n28, n41, n77, n78, n79 | n1, n2, n3, n5, n7, n8, n12, n20, n25, n28, n38, n40, n41, n48, n66, n71, n77, n78, n79 | n1, n2, n3, n5, n7, n8, n12, n13, n14, n18, n20, n25, n26, n28, n29, n30, n38, n40, n41, n48, n66, n70, n71, n75, n76, n77, n78, n79 | |||
| LTE | LTE-FDD | B1, B3, B5, B8 | B1, B2, B3, B4, B5, B7, B8, B12, B13, B14, B17, B18, B19, B20, B25, B26, B28, B29, B30, B32, B66, B71 | |||
| LTE-TDD | B34, B38, B39, B40, B41 | B34, B38, B39, B40, B41, B42, B43, B48 | ||||
| LAA | - | B46 | ||||
| UMTS | WCDMA | B1, B5, B8 | B1, B2, B3, B4, B5, B6, B8, B19 | B1, B2, B4, B5, B8, B19 | ||
| GNSS | - | GPS / GLONASS / BeiDou(Compass) / Galileo / QZSS (only RM520N-GL and RM530N-GL support) | ||||
| Data Rate | ||||||
| 5G mmWave | - | DL 4.0Gbps; UL 1.4Gbps | ||||
| 5G SA Sub-6 | DL 2Gbps; UL 1Gbps | DL 2.1Gbps; UL 900Mbps | DL 4.2Gbps; UL 450Mbps | DL 2.4Gbps; UL 900Mbps | ||
| 5G NSA Sub-6 | DL 2.2Gbps; UL 575Mbps | DL 2.5Gbps; UL 600/650Mbps | DL 5Gbps; UL 650Mbps | DL 3.4Gbps; UL 550Mbps | ||
| LTE | DL 600Mbps; UL 150Mbps | DL 1.0Gbps; UL 200Mbps | DL 2Gbps; UL 200Mbps | DL 1.6Gbps; UL 200Mbps | ||
| UMTS | DL 42.2Mbps; UL 11Mbps | DL 42Mbps; UL 5.76Mbps | ||||
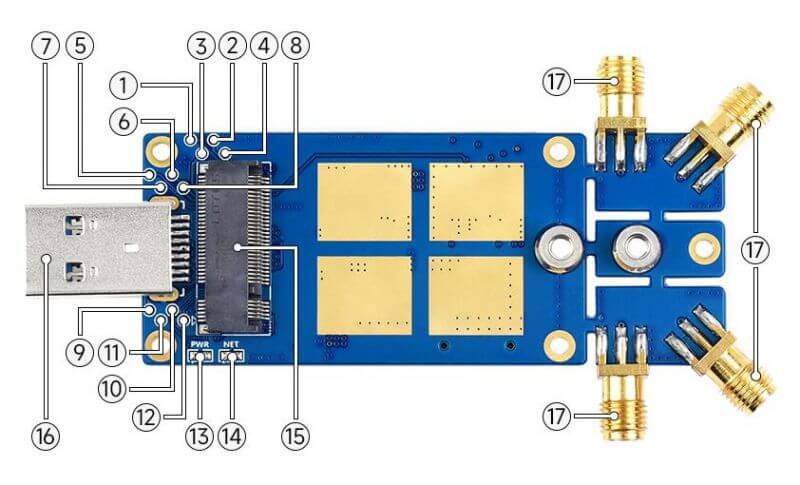
Onboard Resources
| Number | Pin Number | SIMxx Description | RM50XX Description |
|---|---|---|---|
| ① | 56 | Antenna tuner control3 (Antenna tuner MIPI CLK) | Used for external MIPI IC control |
| ② | 58 | Antenna tuner control2 (Antenna tuner MIPIDATA) | Used for external MIPI IC control |
| ③ | 67 | System reset control input Active low | Reset the module. Active LOW |
| ④ | 60 | I2S master clock | Notification from WLAN to SDR when WLAN transmitting |
| ⑤ | 61 | Antenna tuner control1 | Antenna tuner GPIO control |
| ⑥ | 65 | WiFi 5G TX indicator | Power supply for RFFE |
| ⑦ | 59 | Antenna tuner control0 | Notification from SDR to WLAN when LTE transmitting |
| ⑧ | 63 | n79 TX indicator | Antenna tuner GPIO control |
| ⑨ | 23 | Wake on the host Active low | Wake up the host. Active LOW |
| ⑩ | 25 | Dynamic power reduction H: Max transmitting power will not be reduced (default) L: Max transmitting power will be reduced | Dynamic power reduction |
| ⑪ | 26 | GNSS disable Active low | GNSS control. Active LOW |
| ⑫ | 8 | WWAN RF disable Active low | Airplane mode control. Active LOW |
| ⑬ | / | Power indicator | |
| ⑭ | / | Network indicator(flickering when access to the network) | |
| ⑮ | / | M.2 B KEY Interface | |
| ⑯ | / | USB3.1 | |
| ⑰ | / | Antenna Interface | |
4G/5G Module Compatibility Test
| Provider | 4G/5G | Model | Test |
|---|---|---|---|
| SIMCom | 5G | SIM8202G-M2 | Support |
| SIMCom | 5G | SIM8262E-M2 | Support |
| SIMCom | 5G | SIM8262A-M2 | Support |
| SIMCom | 4G | SIM7600G-M2 | Support |
| QUECTEL | 5G | RM500U-CN | Support |
| QUECTEL | 5G | RM500Q-GL | Support |
| QUECTEL | 5G | RM500Q-AE | Support |
| QUECTEL | 5G | RM502Q-AE | Support |
| QUECTEL | 5G | RM520N-GL | Support |
4G/5G Module Compatibility Description
If you need to use the USB TO M.2 B KEY for other 4G/5G modules, you can refer to the M.2 connection diagram below, check whether there is any pin conflict, and then connect to test: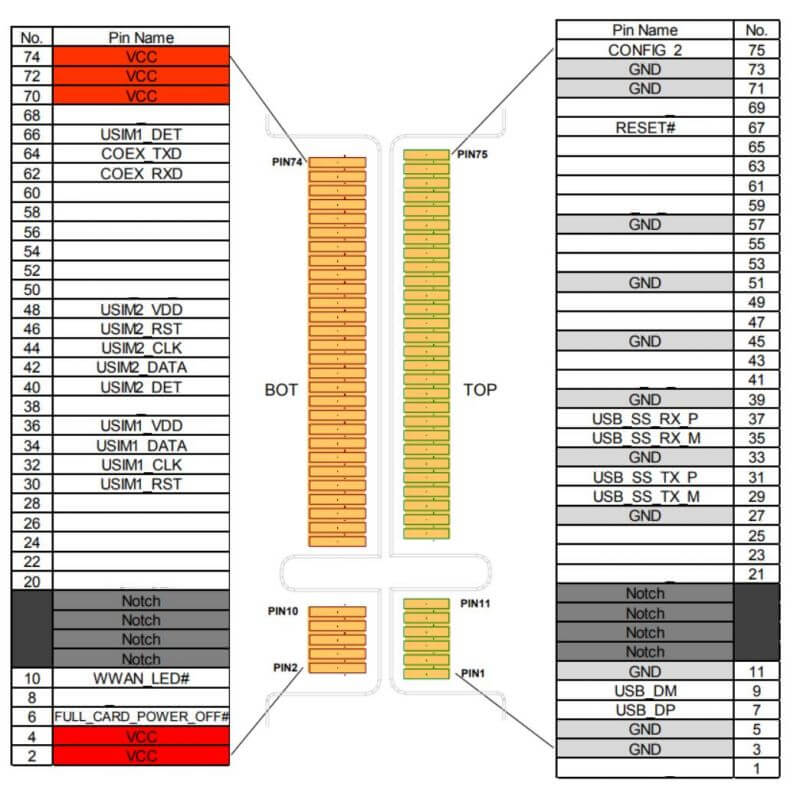
Test Description
Common AT Commands
| Command | Description | Return |
|---|---|---|
| AT | AT Test Command | OK |
| ATE | ATE1 sets echo ATE0 closes echo | OK |
| AT+CGMI | Query module manufacturer | OK |
| AT+CGMM | Query module model | OK |
| AT+CGSN | Query product serial number | OK |
| AT+CSUB | Query module version and chip | OK |
| AT+CGMR | Query the firmware version serial number | OK |
| AT+IPR? | Set the module hardware serial port baud rate | +IPR: OK |
| AT+CFUN=1,1 | Reset module | OK |
| AT+QUIMSLOT? | Query SIM card selection: Return 1, select SIM card 1; Return 2, select SIM card 2 | +QUIMSLOT: 1/2 OK |
| AT+CPIN? | Query the status of the SIM card, return READY, the SIM card can be recognized normally | +CPIN: READY |
| AT+COPS? | Query the current operator, the operator information will be returned after normal networking | +COPS: OK |
| AT+CEREG? | Query network registration status | +CEREG: OK |
| AT+C5GREG? | Query 5G network registration status | +C5GREG: OK |
| AT+QENG="servingcell" | Query UE system information | |
| AT+QNWPREFCFG=? | Network mode selection command: "mode_pref":Automatic "nr5g_band" : 5G NR "lte_band":LTE only "gw_band":WCDMA only ... .... | OK |
Working With Windows
Install Drivers
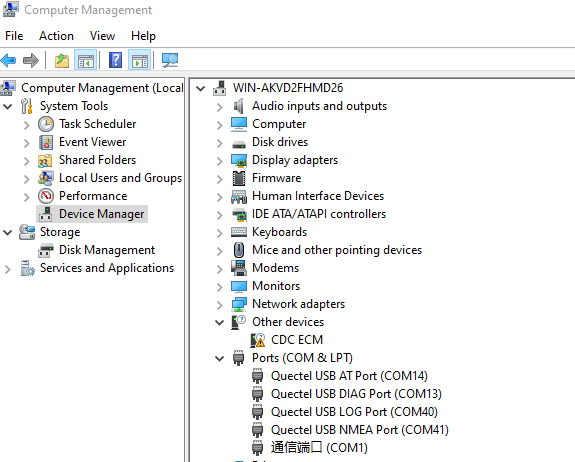
- Connect 5G HAT to the computer by the dual plug USB3.0 cable, there will show a series of devices without drivers in "Other devices", as shown below:

- Enter the RM50XQ_Driver directory.
- Click "setup.exe" to install the driver, and the "computer management" will show as below after installation:
Networking Speed Test

- Install the testing software, for instance: https://www.speedtest.cn/pc/download
About the speed measurement speed
Due to many inconsistencies between actual and laboratory conditions, the 5G speed cannot be ideally maintained at 100MBPS. The following points:
- Base station distance, the closer you are to the 5G base station, the better the signal and the faster the speed;
- Base station load, the fewer people use, the faster the speed will be, and the commute will be slower during peak hours;
- Number of base stations: Due to the spectrum relationship, the same amount of 4G coverage requires double the number of 5G base stations
- Operator: You need to confirm whether your 5G card is speed-limited, you can periodically ask the operator to reset your network
- Indoors are worse than outdoors: building penetration loss and indoor diffraction loss
PS: The current number of base stations still does not have good coverage, and the speed measurement in different locations is not the same.
MBIM Dail-up
RM5XXQ series also can choose MBIM to surf the Internet, as shown below:
- Open RM5XXQ AT port, and send the following command for dial-up.
AT+QENG="servingcell"
AT+QCFG="usbnet",2
AT+QNETDEVCTL=2,3,1
AT+QNETDEVSTATUS=2
AT+CFUN=1,1
- After dialing and restarting, the mobile network card appears on the computer network connection interface, and the dialing is successful.

GPS Positioning
- Connect the passive GPS antenna to the ANT3 of the module, pay attention to the side with the characters facing down, and place the antenna in an open outdoors.
- Then use the AT port to send AT commands:
AT+QGPS=1        //Turn on the GPS positioning
AT+QGPSLOC=0     //Get the GPS position
AT+QGPS=0        //Close the GPS positioning

3. Now open the NEMA port, and you can get GPS data: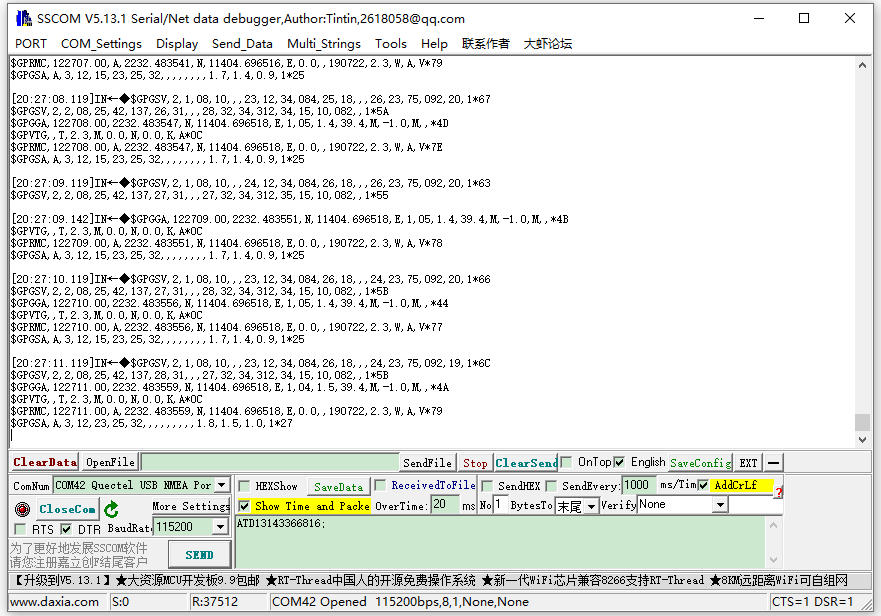
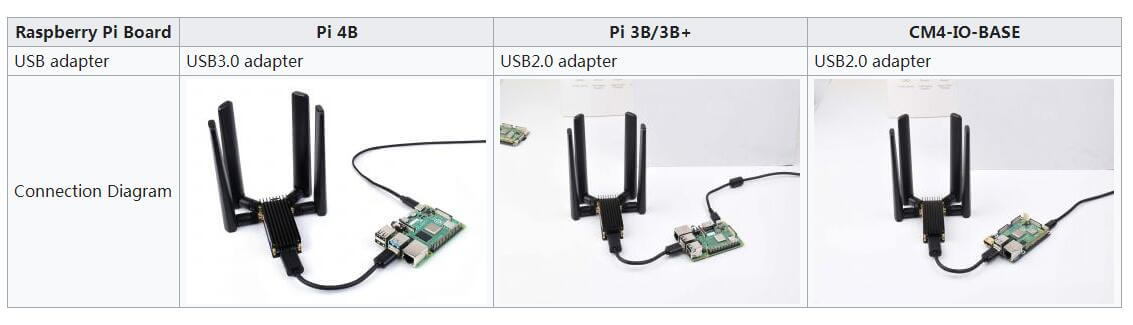
Working With Raspberry Pi
Hardware Connection
Connect the 5G HAT with the dual plug USB 3.0 and connect the external 5V power supply for the 5G HAT by Type-c interface.
EMC Dial-up Configuration
Step 1: upload "modernmanager" and "network-manager".
sudo apt purge modemmanager -y
sudo apt purge network-manager -y
Step 2: test 5G module.
- Please make sure "usb-serial" driver program is correctly upload to the module interface, and you check it by the
usb-devices:
pi@raspberrypi:~ $ usb-devices
T: Bus=02 Lev=01 Prnt=01 Port=00 Cnt=01 Dev#= 3 Spd=5000 MxCh= 0
D: Ver= 3.20 Cls=00(>ifc) Sub =00 Prot=00 MxPS= 9 #Cfgs= 1
P: Vendor=2c7c ProdID=0800 Rev=04.14
S: Manufacturer=
Quectel S: Product=RM502Q-AE
S: SerialNumber=377628d2
C: #Ifs= 5 Cfg#= 1 Atr=a0 MxPwr=896mA
I: If#=0x0 Alt= 0 #EPs= 2 Cls=ff(vend.) Sub=ff Prot=30 Driver=option
I: If#=0x1 Alt= 0 #EPs= 3 Cls= ff(vend.) Sub=00 Prot=00 Driver=option
I: If#=0x2 Alt= 0 #EPs= 3 Cls=ff(vend.) Sub=00 Prot=00 Driver=option
I: If#=0x3 Alt = 0 #EPs= 3 Cls=ff(vend.) Sub=00 Prot=00 Driver=option
I: If#=0x4 Alt= 0 #EPs= 3 Cls=ff(vend.) Sub=ff Prot=ff Driver= qmi_wwan
- Execute
ls /dev/ttyUSB*to check whether "ttyUSB0~ttyUSB4" is correctly identified: - Use minicom to test the transmission of AT commands:
sudo apt-get install minicom
sudo minicom - D /dev/ttyUSB2
Welcome to minicom 2.7.1

OPTIONS: I18n
Compiled on Aug 13 2017, 15:25:34.
Port /dev/ttyUSB2

Press CTRL-A Z for help on special keys

AT
OK
Step3: use AT command to configure the network.
AT+QCFG="usbnet",1
AT+CGDCONT=1,"IPV4V6","YOUR_APN"
AT+CFUN=1,1
Please wait for the modem to start up again (about 30 seconds). Once the modem restart, the minicom will be activated again.
After rebooting, open a new Linux terminal and use ifconfig or ipaddr command to check usbX in the network port.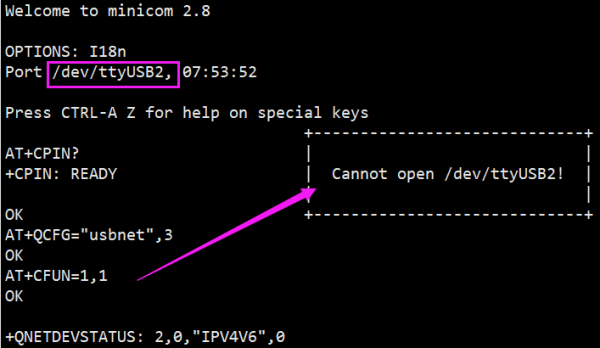
- After rebooting the module, the NET light is on. The following commands are for checking the network status (optional)
AT+QENG="servingcell"
- The following commands are for getting IP and setting DNS:
sudo dhclient -v usb0
sudo apt-get install udhcpc
sudo udhcpc -i usb0
sudo route add -net 0.0.0.0 usb0
Step 4: test the 5G network:
After dialing up, you can see that usb0 gets ip in the Raspberry Pi by the command ifconfig usb0 or ifconfig.
pi@raspberrypi:~ $ ifconfig usb0
usb0: flags=4163<UP,BROADCAST,RUNNING,MULTICAST>  mtu 1500
        inet 192.168.225.60  netmask 255.255.255.0  broadcast 192.168.225.255
        inet6 fe80::8543:f6a0:e678:2e20  prefixlen 64  scopeid 0x20
        ether 4a:aa:f8:62:36:bb  txqueuelen 1000  (Ethernet)
        RX packets 73  bytes 5047 (4.9 KiB)
        RX errors 0  dropped 0  overruns 0  frame 0
        TX packets 100  bytes 15116 (14.7 KiB)
        TX errors 0  dropped 0 overruns 0  carrier 0  collisions 0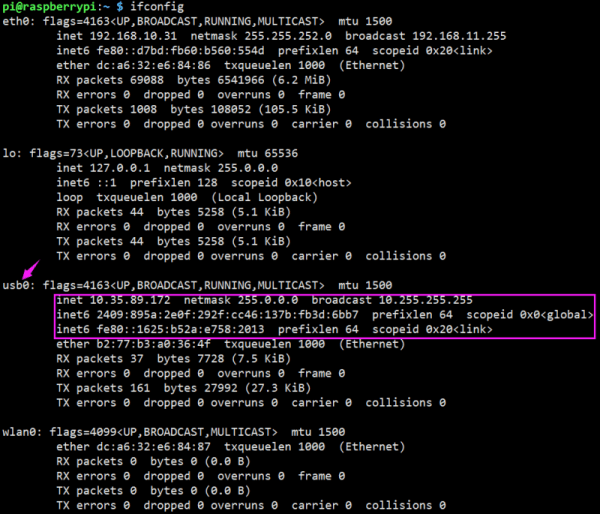
ping waveshare.com -I usb0
pi@raspberrypi:~ $ ping waveshare.com -I usb0
PING waveshare.com (104.26.11.134) from 192.168.10.27 usb0: 56(84) bytes of data.
64 bytes from 104.26.11.134 (104.26.11.134): icmp_seq=1 ttl=52 time=87 ms
64 bytes from 104.26.11.134 (104.26.11.134): icmp_seq=2 ttl=52 time=82 ms
64 bytes from 104.26.11.134 (104.26.11.134): icmp_seq=3 ttl=52 time=92 ms
64 bytes from 104.26.11.134 (104.26.11.134): icmp_seq=4 ttl=52 time=73 ms
64 bytes from 104.26.11.134 (104.26.11.134): icmp_seq=5 ttl=52 time=75 ms
5G Internet Speed Test
In the Linux system, you can install speedtest_cli to test:
## Raspberry Pi OS
sudo apt install speedtest-cli
speedtest      # or use speedtest_cli
or
## OpenWRT
opkg update
opkg install python3
opkg install python3-pip
pip install speedtest_cli
speedtest      # or use speedtest_cli
Working With Jetson Nano
Hardware Connection
Use the dual plug USB 3.0 cable to connect the USB TO M.2 Key as shown below: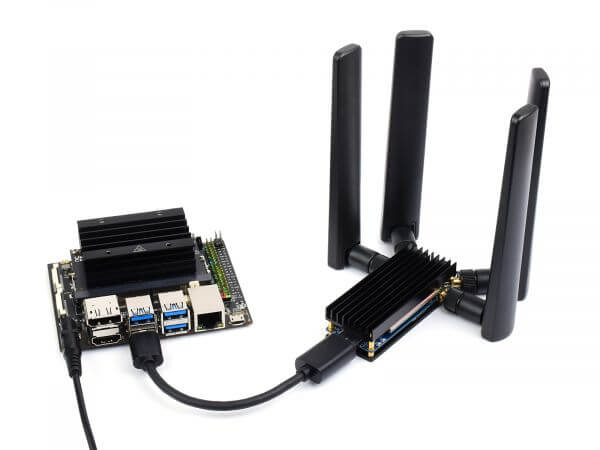
Load USB Device Descriptor
In order to identify the module and add the VID and PID information of the module to the file [kernel].
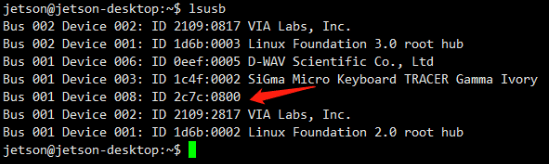
- Check the VID and PID of RM500U
lsusb
- Add VID and PID
sudo apt-get install unzip
wget https://www.waveshare.com/w/upload/0/09/RM5XXQ_For_Jetson_nano.zip
unzip RM5XXQ_For_Jetson_nano.zip
sudo chmod 777 -R RM5XXQ_For_Jetson_nano
cd RM5XXQ_For_Jetson_nano
sudo ./install.sh
sudo reboot
After successfully adding the PID and restarting Jetson nano, enter the following command in the command line interface to display five device symbols USB0-USB4
ls /dev/ttyUSB*

RNDIS
- Enable minicom
sudo apt-get install minicom
sudo minicom -D /dev/ttyUSB2
- Send the following command ECM in minicom
AT+CPIN?
AT+QCFG="usbnet",3
AT+CFUN=1,1
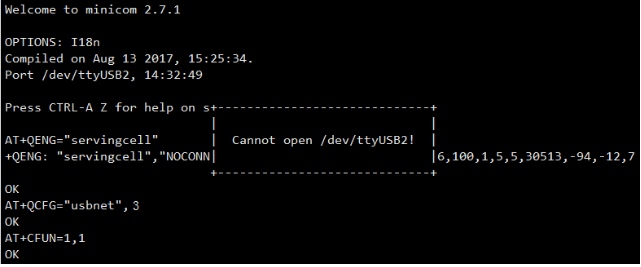
After the module restarts, the NET light is on, use the following command to check the network status (optional)
AT+QENG="servingcell"
Get the IP and set the DNS with the following commands:
sudo dhclient -v usb1
sudo apt-get install udhcpc
sudo udhcpc -i usb1
sudo route add -net 0.0.0.0 usb1
After dialing, you can see that usb1 gets the ip through the following command:
ip route
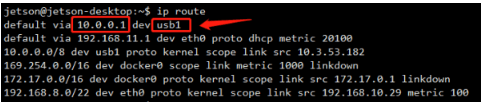
Test usb1 networking status
ping -I usb1 www.baidu.com

Working With SIM82XX Module
Parameter
| SIM8200EA-M2 | SIM8202G-M2 | SIM8262E-M2 | SIM8262A-M2 | |
|---|---|---|---|---|
| 5G Standard | 3GPP R15 | 3GPP R16 | ||
| Chip | Qualcomm Snapdragon X55 | Qualcomm Snapdragon X62 | ||
| Frequency Band | ||||
| Sub-6G | n1, n2, n3, n5, n7, n8, n12, n20, n28, n38, n40, n41, n48, n66, n71, n78 | n1, n2, n3, n5, n7, n8, n12, n20, n28, n38, n40, n41, n66, n71, n77, n78, n79 | n1, n3, n5, n7, n8, n20, n28, n38, n40, n41, n77, n78,n79 | n2, n5, n7, n12, n13, n14, n25, n30, n41, n48, n66, n71, n77, n78, n79 |
| LTE-FDD | B1, B2, B3, B4, B5, B7, B8, B12, B13, B14, B17, B18, B19, B20, B25, B26, B28, B29, B30, B32, B66, B71 | B1, B3, B5, B7, B8, B18, B19, B20, B26, B28, B32 | B2, B4, B5, B7, B12, B13, B14, B25, B26, B29, B30, B66, B71 | |
| LTE-TDD | B34, B38, B39, B40, B41, B42, B43, B48 | B38, B39, B40, B41, B42, B43 | B41, B46, B48 | |
| WCDMA | B1, B2, B3, B4, B5, B8 | B1, B5, B8 | B2, B4, B5 | |
| GNSS | GPS, GLONASS, Beidou, Galileo and QZSS | |||
| Data Rate | ||||
| Sub-6G | 2.4 Gbps (DL) / 500 Mbps (UL) | |||
| LTE | 1 Gbps (DL) / 200 Mbps (UL) | |||
| HSPA+ | 42 Mbps (DL) / 5.76 Mbps (UL) | |||
| Software Function | ||||
| Operating System | Windows/Linux/Android | |||
| Communication Protocol | TCP/IP, IPV4, IPV6, Multi-PDP, FTP, FTPS, HTTP, HTTPS, MQTTS, DNS, SSL3.0 | |||
| Dail Up | RNDIS, NDIS, PPP, MBIM | |||
| SMS | Support MT, MO, CB, Text, PDU | |||
| Firmware Upgrade | Supports firmware upgrade via USB port | |||
| Hardware Specification | ||||
| SIM Card | 1.8V/2.95V | |||
| Antenna | For 3G/4G/5G/GNSS | |||
| 6 × IPEX-4 Connectors | 4 × IPEX-4 Connectors | |||
| Power Supply | 3.135~4.4V | |||
| Form Factor | M.2 | |||
| Dimensions | 52.0 × 30.0 × 2.3mm | 42.0 × 30.0 × 2.3mm | ||
| Operating Temperature | -30℃ ~ +70℃ | |||
| Application Scenarios | ||||
| Region | China, US, Japan, and South Korea, Europe, the Middle East, the Americas | Other regions except for the Americas | Americas | |
| The applicable area is for reference only, and the appropriate module should be selected according to the frequency band covered and supported by the local operator's network. | ||||
| Typical Application | CPE, Smart Gateway, Drone, Live Video, Telemedicine, Smart Security | |||
Working with Windows PC
Install Driver
Downlaod the SIM8200 Driver from Resources part to your PC and unzip it.
Enter the SIM8200_OS_Driver\Windows directory
Enter the 1_install directory and run the setup.exe file to install.
After connecting, a mobile network icon appears, you can disconnect other network and test the mobile network.
Install driver manually
For some of PC, you need to add driver manullay. If your PC doesn't recognized any COM ports in Device Manger, find unkown devices and upate the driver manually:
d Power on the 5G module and set the Switch into ON. four(it may be more than four) unkow devices are recognized by Windows PC.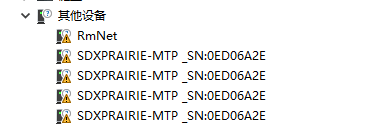
Right-click the device , update the driver manually, choose SIM8200_OS_Driver\Windows, and then choose thd driver according to the version of your OS. You need to update for all the four/five/six devices.: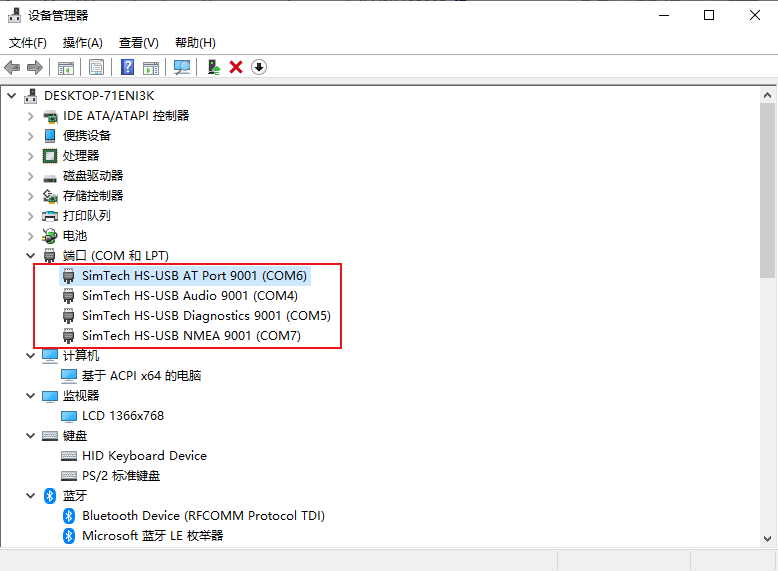
Four COM ports: AT is used for AT command controlling, Audio is used for dailing Diagnostics is used for debuggging, and NMEA is used for GPS.;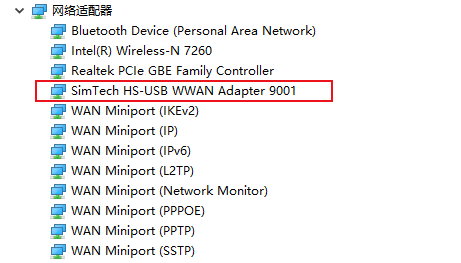

A mobile network will be setup automatically after updating, you can disconnect other network and test it.
Manual NDIS dial-up Internet
After installing the driver, some computers cannot automatically dial up to access the Internet, so you need to dial manually, the operation is as follows:
AT$QCRMCALL=1,1
After dialing is successful, as shown in the figure below, the computer can go online normally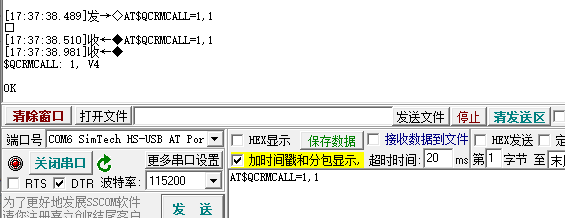
GPS Positioning
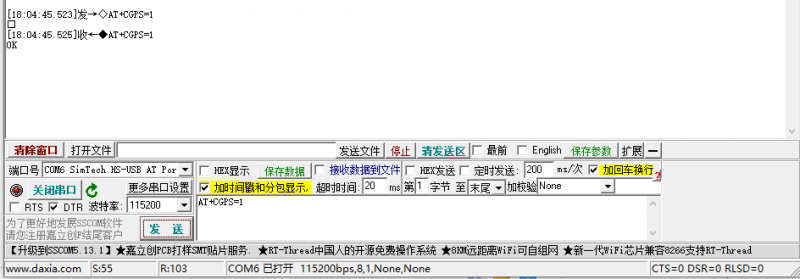
Connect the passive GPS antenna to the ANT5 of the module, and place the antenna outdoors facing the sky.Then send the AT command to turn on the GPS:
AT+CGPS=1
Now open the NEMA port, you can get GPS data:
Finally, turn off the GPS, you can use the AT command:
AT+CGPS=0
Working with Raspberry Pi
It is recommended to use the latest image The system's Linux kernel version is 5.4. If your kernel is different, it is recommended that you update to the same version as this version. This tutorial is based on the 5.4 kernel, which can minimize the chance of your using errors.

If the system you used is another Linux system, please download the driver in the SIM8200_OS_Driver\linux. You can port the documents or use the driver in the system. Please refer to SIM820X RNDIS Dial Up.
Configuration
This configuration is only needed at the first time.
Open a terminal and run the following commands:
sudo apt-get install p7zip-full
wget https://www.waveshare.com/w/upload/f/fb/SIM8200-M2_5G_HAT_code.7z
7z x SIM8200-M2_5G_HAT_code.7z
sudo chmod 777 -R SIM8200-M2_5G_HAT_code
cd SIM8200-M2_5G_HAT_code
sudo ./install.sh
Please do not modify option, qmi_wwan_simcom, default.script,install.sh files or directorys, otherwise the dirver cannot be installed normally.
If you get error information, please check ifyou use the 2020-08-20-raspios-buster-armhf OS and take screenshot of error information and contact our support team for help.
Run ifconfig -a command to check WWAN0 interface.
Testing with AT command
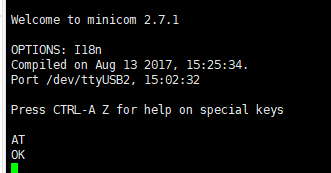
sudo apt-get install minicom
sudo minicom -D /dev/ttyUSB2

5G Networking
cd Goonline
make
sudo ./simcom-cm
After running codes, DNS information are shown as figure below: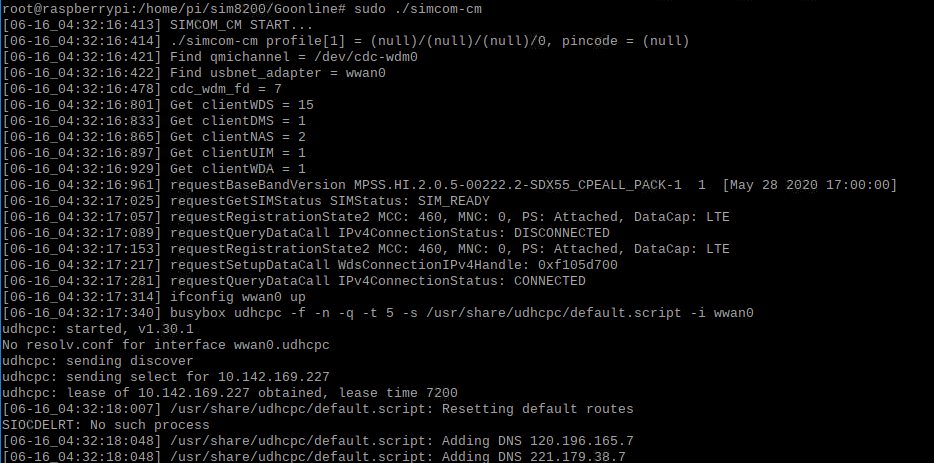
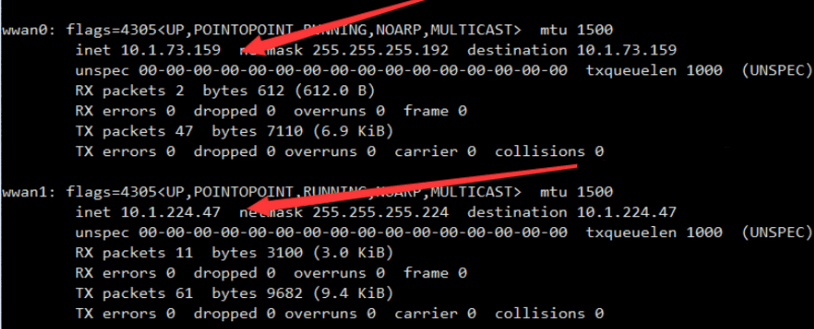
After connecting two SIM820X to Raspberry Pi through USB, two network cards—wwan0 and wwan1 can be recognized, and the two network cards can be dialed at the same time through the following commands: (The network speed cannot be superimposed)
sudo ./simcom-cm -i wwan0
sudo ./simcom-cm -i wwan1
- Note: If the IP cannot be obtained or the networking is not successful, use the following commands to obtain the IP and set the DNS networking:
sudo dhclient -v wwan0
sudo route add -net 0.0.0.0 wwan0
Auto-run
If you want to set the codes to auto-run after booting, you can modify rc.local file:
sudo nano /etc/rc.local
Add the line to file as below:
sudo /home/pi/SIM8200-M2_5G_HAT_code/Goonline/simcom-cm &
Note that you have to add "&" to the end of the command, make sure that the command can be run in the background, or the Pi may not boot normally.
Live Streaming With ffmpeg
If you are using the 2020-08-20-raspios-buster-armhf image, then you don't need to install anything as the system already comes with ffmpeg.
Going straight to the topic, assuming you already have a camera and it's properly connected to the Raspberry Pi, then proceed with the tutorial.
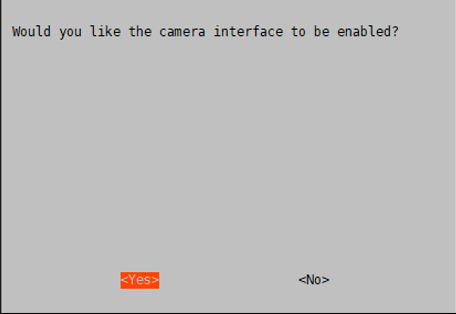
- The camera must be enabled by running the raspi-config command before using it:
sudo raspi-config
Select Enable Camera, select YES
- If it is a camera using the CSI interface, the system cannot find the device node of /dev/video0. A line for bcm2835-v4l2 needs to be added to the /etc/modules file:
sudo nano /etc/modules
add:
bcm2835-v4l2

Then after the system starts, the system will load the module name in this file and restart the system:
sudo reboot
ls /dev/video*
The video0 device node is found below.
Note: If after performing the first steps, please confirm that the operation and instructions are correct.
Suppose you are using Douyu Live now, register your account and enable the host function, open Douyu Live Host Center, and find the live broadcast settings.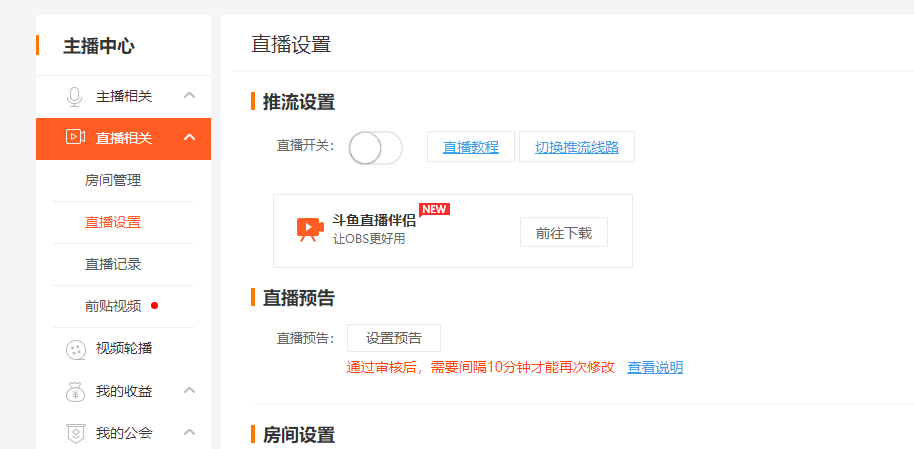
Open video plug flow setting: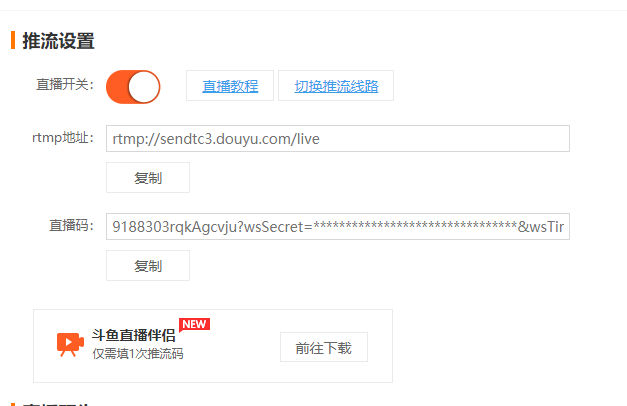
The rtmp address and live code will be obtained, and the Raspberry Pi will execute the command:
ffmpeg -f video4linux2 -s 640x480 -r 25 -i /dev/video0 -c:v h264_omx -f flv "rtmp address/live code"
For example: open a terminal first, runs the 5G network:
cd Goonline
sudo ./simcom-cm
and then open another terminal, run the following command:
ffmpeg -f video4linux2 -s 640x480 -r 25 -i /dev/video0 -c:v h264_omx -f flv "rtmp://sendtc3.douyu.com/live/9188303rTNGmU7CS?wsSecret=ef762877aae120262eaf23c3f60a28bf&wsTime=5f59dbf0&wsSeek=off&wm=0&tw=0&roirecognition=0"
rtmp://sendtc3.douyu.com/live is the address, and the next section is the live code. Enter the room number at this time, you can observe the live broadcast, the delay is about 1-2S.
How To Use OpenWrt
Introduction
Soft routing is using desktops or servers and other equipment with software. It mainly depends on the settings of the software to achieve the functions of the router. The hard routing is a unique hardware device, including a processor, power supply, and embedded software to provide router functionality.
OpenWrt is a very popular soft routing system. It is a highly modular and highly automated embedded Linux system with powerful network components and scalability. It is often used in industrial control equipment, routers, and other equipment.
In addition to the functions of general home routers, OpenWrt soft routing can also achieve port forwarding, intranet penetration, 4G networking, FTP server and more powerful functions.
Program the image
Download the RPI OpenWrt system, unzip the system in the Imgs directory, and use the burning tool to burn the system to the SD card.
Login & Initial Settings
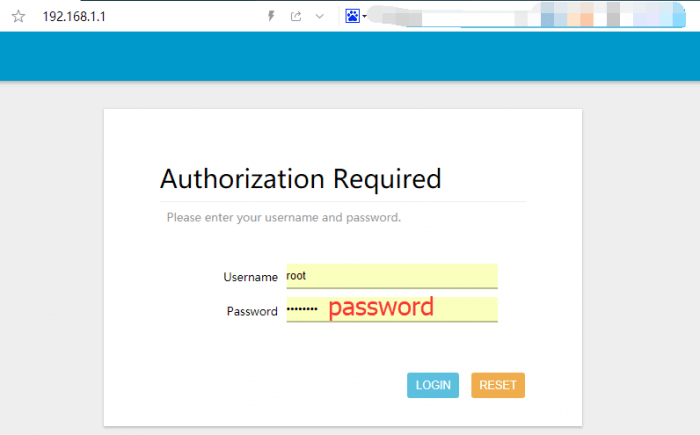
- After the OpenWrt system is turned on, the Raspberry Pi is equivalent to a router. Therefore, you can use a network cable to connect the Raspberry Pi to the computer according to the use of the router (you can also use the mobile phone to search for WIFI, the default name is "OpenWrt"). Enter 192.168.1.1 on the webpage, the default username: root, the default password: password, and enter the Web management interface of OpenWrt.
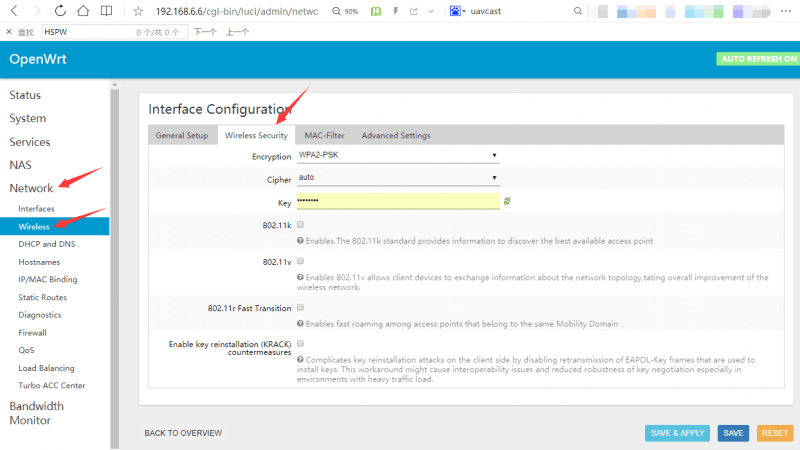
- Set WIFI password: Network -> Wireless -> Modify -> Interface Configuration -> Wireless Security, as shown below:
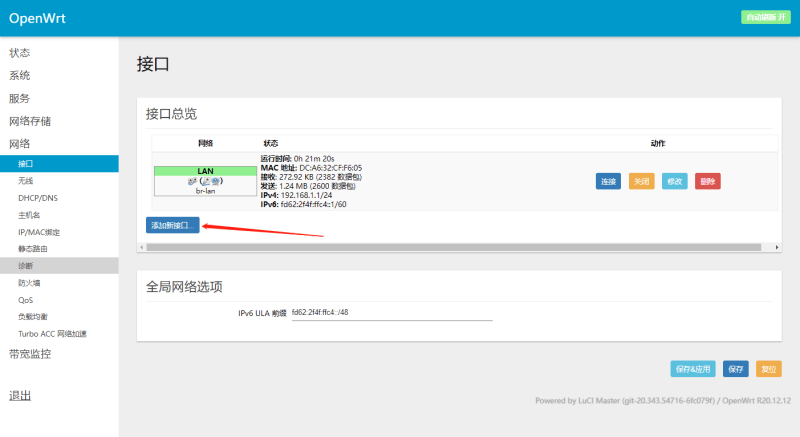
- Create the new interface: Network -> Interface -> Create interface
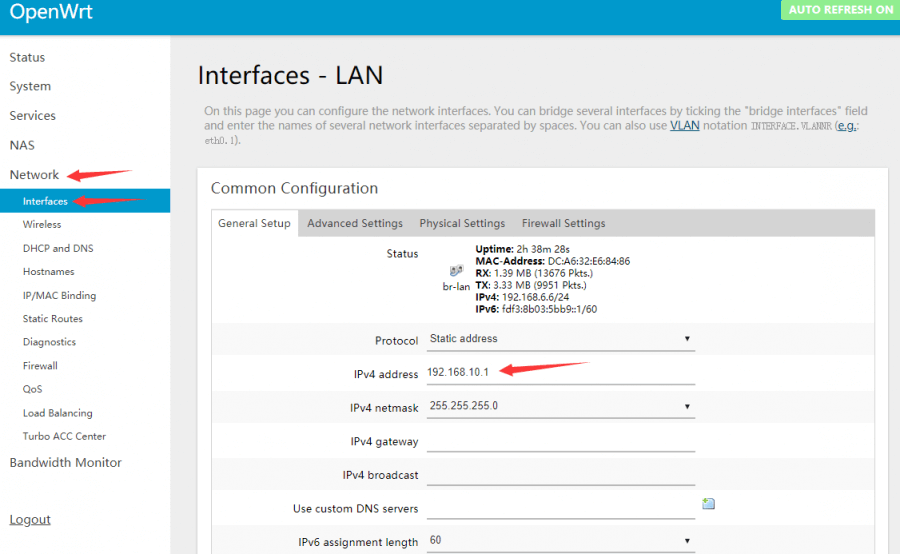
- Modify the IPv4 address of the LAN port to a different IP that is not the same as the LAN port IP of other routers in your home. (Many routers default the LAN port IP to 192.168.1.1. If you do not modify the IP of the OpenWrt, it will easily lead to conflicts and failure to connect to the Internet.)
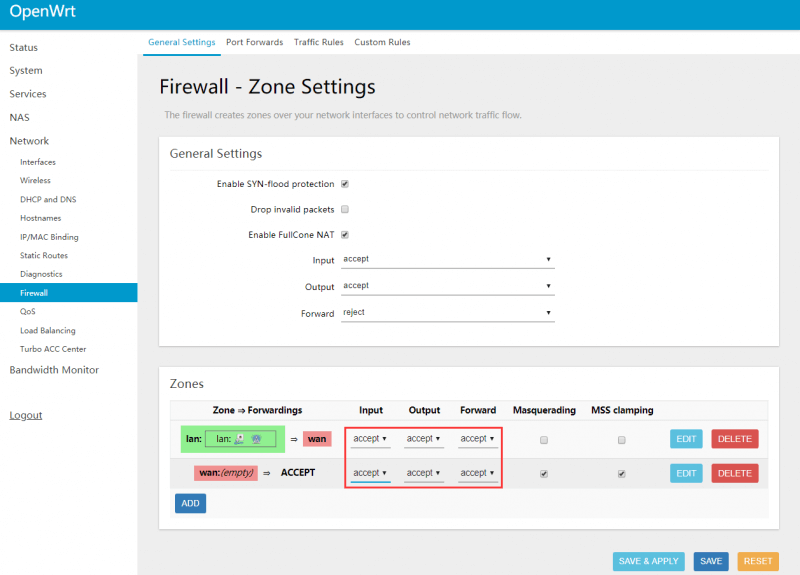
- In addition, it is recommended to adjust the Firewall setting to connect the OpenWrt terminal and Web management interface through the local area.
- Network —>Firewall, change all "reject" to "accept", and click "Save & Apply" after modification, as shown in the picture below:
- And then select System -> Administration, modify the allowed interface for SSH access to "unspecified" (that is, any interface can be accessed by ssh), check the Gateway port, and click "Save & Apply" after the modification is completed.

- At this point, you can connect to the OpenWrt web management interface or terminal through the IP address of the LAN port or wan port.
Network Config
- Insert the SIM card into the card slot of the communication module -> connect all 5G antennas, connect to the Raspberry Pi 4B via USB -> power on;
- Change the mobile communication module to RNDIS mode (USB network sharing mode), SIM8202G can be changed by sending the following commands through minicom in Openwrt:
sudo minicom -D /dev/ttyUSB2 //(Some modules need to add PID to have ttyUSB* device character)
at+cusbcfg=usbid,1e0e,9011 //(Different models of modules have different setting methods, see the module specification for details)
- Enter the Web management interface of OpenWrt, click Network —>Interface —>Create a new interface
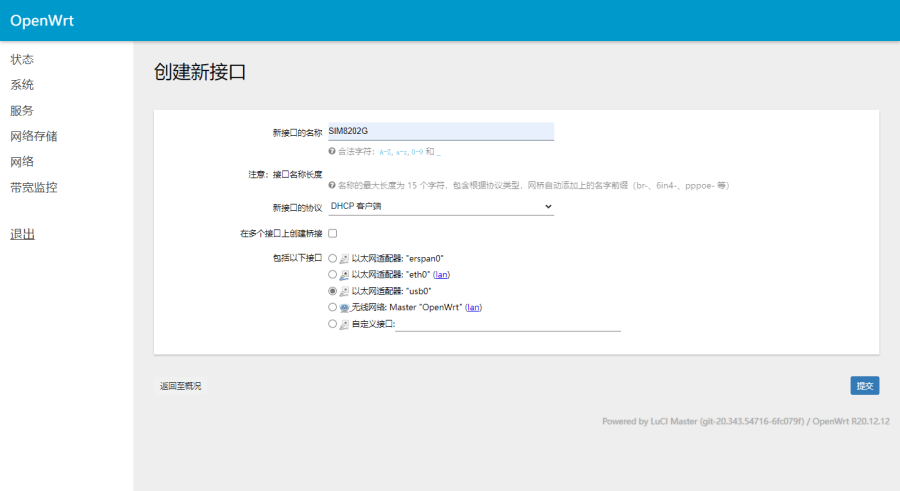
- Create new interface: name -> SIM8202G; protocol of new interface - DHCP client; include the following interfaces - ethernet adapter: "usb0", and then submit:
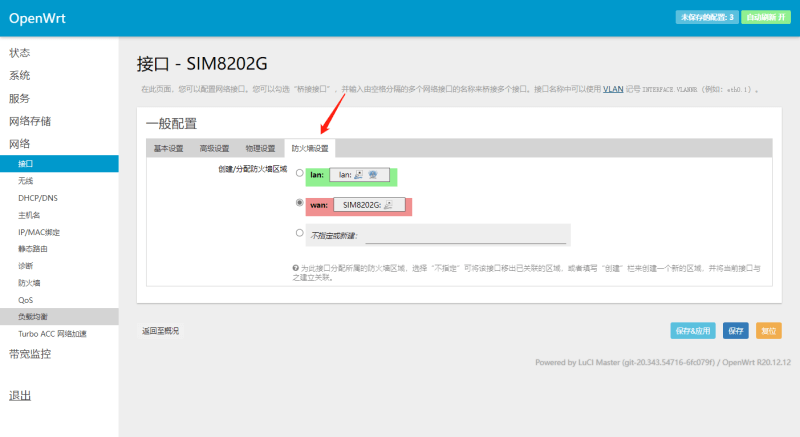
- Confirm that the interface selection in "Firewall Settings" is "wan"
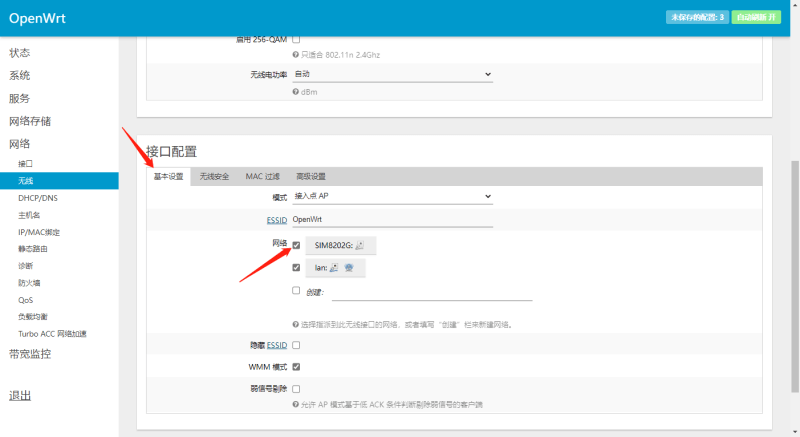
- Wireless configuration: Network->Wireless Network->Interface->Basic Config->Network,check SIM8202G and lan, save and apply.

Then the other devices can be connected to the OpenWrt wireless "OpenWrt" or through the network cable to connect to OpenWrt's own network port for networking.
5G network speed test
In terms of the speed measurement, as the Raspberry Pi comes with a Gigabit Ethernet port, and there are few USB network cards above Gigabit, we use the "SpeedTest For Python" tool to test the speed with the command.
Connect to the terminal of the OpenWrt, and enter the command one by one to test:
opkg update
opkg install python3
opkg install python3-pip
pip install speedtest_cli
speedtest or speedtest_cli
Use with Jetson Nano
It is recommended that you use the system image jetson-nano-sd-card-image (updated in October 2020). The Linux kernel version of this system is 4.9.140-tegra. The previous system is 4.4. This tutorial is based on the 4.9 kernels. If there is a difference, please update to the same version as this one, which will minimize the chance of your using it incorrectly.
If you are using other Linux systems, please download the driver under SIM8200_OS_Driver\linux and port it according to the documentation under it.
Configuration Required for First Use
- Please don't type the wrong letter, it's better to copy and paste:
sudo apt-get install p7zip-full
wget https://www.waveshare.com/w/upload/0/07/Sim8200_for_jetsonnano.7z
7z x Sim8200_for_jetsonnano.7z -r -o./Sim8200_for_jetsonnano
sudo chmod 777 -R Sim8200_for_jetsonnano
cd Sim8200_for_jetsonnano
sudo ./install.sh
Please do not delete or modify the options directory, qmi_wwan_simcom directory, default. script, install.sh these four directory files, otherwise it will affect the loading of the driver.
If there is an error, please confirm whether the system kernel is 4.9.140-tegra, and take a screenshot of the error message so that engineers can help you analyze and solve the problem.
Run ifconfig -a to see that WWAN0 has been generated.
AT Test Command
sudo apt-get install minicom
sudo minicom -D /dev/ttyUSB2
5G Network
cd Goonline
make
sudo ./simcom-cm
You can successfully see that DNS has been generated at the bottom.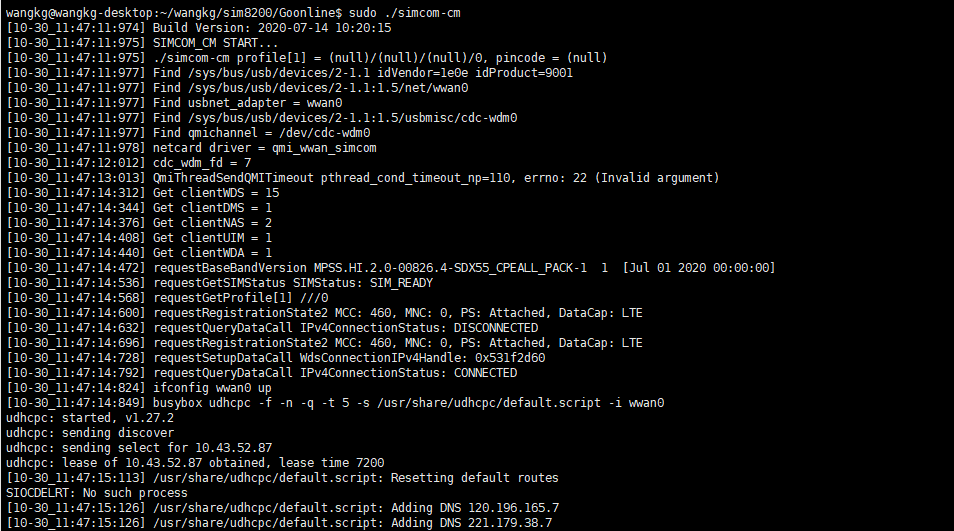
Other Usage
If you want to use this product on other systems, please download SIM8200_OS_Driver and add it according to SIMCOM official tutorials.
About the Speed
Due to the differences between actual and laboratory conditions, the 5G speed will not be ideal and stable at 100MBPS. There are the following points:
- Base station distance, the closer to the 5G base station, the better the signal and the faster the speed;
- Base station load, the fewer people using it, the faster the speed will be, and the rush hour will be slower;
- Number of base stations: Due to spectrum relationships, the same amount of 4G coverage requires double the number of 5G base stations.
- Operator: You need to confirm whether your 5G card is limited in speed, you can periodically ask the operator to reset your network.
- Indoors is worse than outdoor: building penetration loss, and indoor diffraction loss.
- PS: The current number of base stations still does not have good coverage, and the speed measurement in different locations is not the same.


_(4).png)
_(07).png)
_(08).png)
_(09).png)
_(010).png)