- sales/support
Google Chat: zj734465502@gmail.com
- sales
+86-0755-88291180
- sales01
sales@spotpear.com
- sales02
dragon_manager@163.com
- support
tech-support@spotpear.com
- CEO-Complaints
zhoujie@spotpear.com
- sales/support
WhatsApp:13246739196
Raspberry Pi UPS HAT (D) User Guide
Document
Demo Code
Related Resource
Introduction
The UPS HAT (D) is an uninterruptible power supply (UPS) expansion board specially designed for the Raspberry Pi series. Onboard switching Li battery charging chip with path management, boost converter chip, and voltage/current monitoring chip. Supports simultaneous charging and discharging, and can provide stable 5V voltage output. Also, you can monitor the parameters via the I2C interface, such as the battery voltage, current, and power. Supports displaying the battery level on the system, easy to check the battery's remaining capacity.
Feature
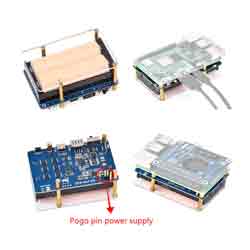
- Adopts pogo pins connector design, compatible with Raspberry Pi series boards.
- Onboard Li battery charging chip, with dynamic path management, a more stable power supply.
- Onboard boost converter chip for stable 5V power output.
- I2C bus communication, monitoring the battery voltage, current, power, and remaining capacity in real-time.
- Multi battery protection circuits: overcharge/discharge protection, over current protection, short circuit protection, more safe and stable.
- Onboard LED indicators for monitoring the battery operating status.
- Comes with online development resources and manuals.
Specification
- OUTPUT VOLTAGE: 5V
- CONTROL BUS: I2C
- BATTERY SUPPORT: 21700 rechargeable Li battery 3.6V
- CHARGER SUPPORT: 5V, Micro USB interface
- CURRENT CAPACITY: 5000mAh (Standard)
- DIMENSIONS: 56 × 85mm
- MOUNTING HOLE SIZE: 3.0mm
Onboard Interface
Hardware Description
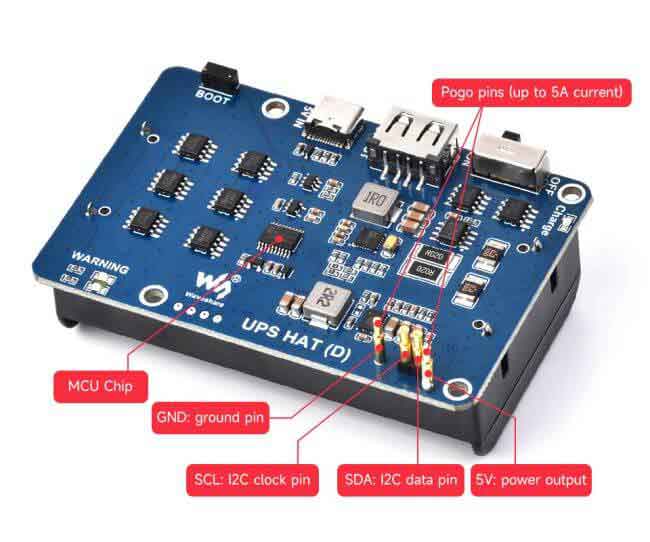
The USB Type C interface serves as the charging port with an input voltage of 5V. The LED lights up during charging and goes off when fully charged. The silk printing '0FF/ON' indicates the power switch.
- Note 1: Please switch the power switch to OFF when assembling or the board may be damaged as a result of a short circuit.
- Note 2: When you connect the battery first, it is necessary to charge it or press the BOOT button to activate the battery protection chip for power output.
- Note 3: When the battery is fully charged and connected to the charging power, the output current is approximately 4A. As the battery voltage decreases, the output current will also decrease. When connected to a heavy load, if the current drops too low, there may be unstable voltage boosting, leading to continuous restarts of the Raspberry Pi.
SAFETY CAUTIONS
- Li-ion and Li-po batteries are quite unstable. They may cause fire, personal injury, or property damage, if they're not properly recharged or used.
- Do not reversely connect the polarities when recharging or discharging the battery. Do not use inferior charger/charging panel to recharge the battery.
- Do not mix use old batteries with new ones, avoid using batteries of different brands.
- When buying Lithium battery, should always make sure the battery specification is compatible with the expansion board. Choose batteries from formal manufacturer, and ensure the batteries will work stably and safely by aging test.
- Lithium batteries have limited cycle life, they will also deteriorate as time goes by. Should be replaced with new ones when the batteries reaching their max cycle life, or working over two years, whichever comes first.
- Should be placed carefully and properly, keep it away from inflammables and explosives articles, away from children, avoid any safety accident caused by careless storage.
Raspberry Pi Demo
Enable I2C Interface
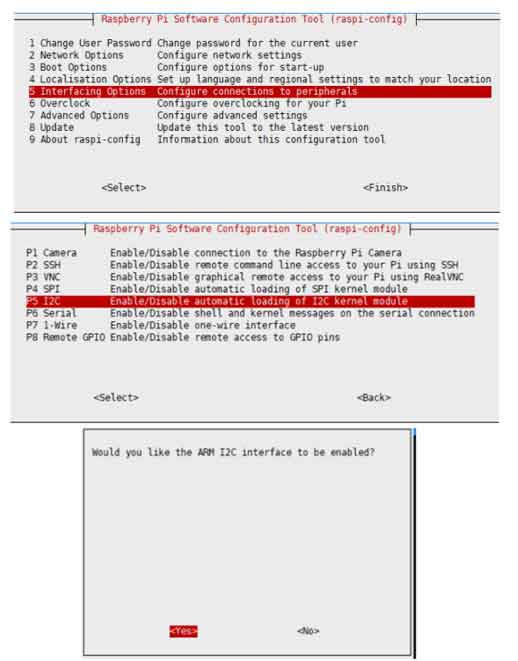
- Open the Raspberry Pi and input the following commands to enter the configuration interface:
sudo raspi-config
Select Interfacing Options -> I2C -> yes to enable i2C kernel driver
And then reboot the Raspberry Pi:
sudo reboot
INA219 Baterry Level Detection
To demonstrate this demo on the Raspberry Pi, you only need to insert the module into the Raspberry Pi headers or connect it to the I2C interface of the Raspberry Pi via a cable with VCC connected to 3.3V.br/> Enter the following command to run the demo:
sudo apt-get install p7zip
wget https://files.waveshare.com/wiki/UPS-HAT-(D)/UPS_HAT_D.7z
7zr x UPS_HAT_D.7z -r -o./
cd UPS_HAT_D
python3 INA219.py
The demo will output values such as battery voltage, current, power, and the remaining battery capacity percentage after it runs.
Note: If the current is negative, it indicates the battery output current (the Raspberry Pi's load current), and if the current is positive, it represents the battery charging current.
When the system load is high and the battery voltage is low, it is undesirable to see that the battery current may be insufficient, leading to continuous system restarts. In practical applications, you can prevent this by shutting down the system automatically when the battery voltage is too low.
In the example demo, battery voltage checking has been added. If the battery voltage is too low and there is no external charging power, the demo will shut down the system within 60 seconds.
The demo will display the following statement to indicate that the battery voltage is too low, and it is necessary to charge it promptly, otherwise, the demo will shut down automatically:
Voltage Low, please charge in time, otherwise, it will shut down in 58 s
Battery Level Display
Open the terminal and execute:
cd ~/UPS_HAT_D
./main.sh   #Do not add 'sudo'
sudo reboot
After rebooting, if you see a battery icon in the upper right corner, it indicates that the settings have been successful. When you move the mouse cursor to the battery icon, it will display information about the battery capacity, voltage, and remaining charge.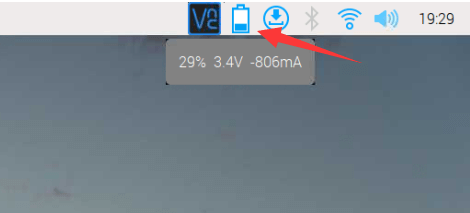
If the above operation takes no effect, you can test it as below:
cd ~/UPS_HAT_D
DISPLAY=':0.0' python3 batteryTray.py
The demo displays a battery icon in the upper right corner if it runs successfully. If you don't see the battery icon and there is no report for the cause of the error, you should check the I2C interface, and whether the library is installed.
When the battery level drops below 5%, a low battery warning will appear. After 60 seconds, it will power off automatically. If you plug in the power supply to charge the battery during the warning, it will exit the warning interface.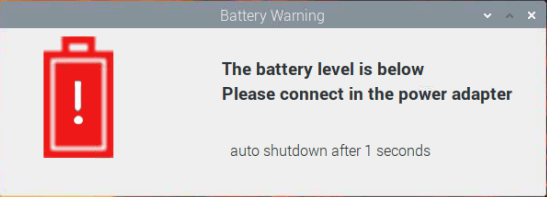
Power-On by Incoming Call
When a low voltage is detected, you can use a demo to control the Raspberry Pi to save data before shutting down, thereby avoiding data loss due to sudden power loss.
However, after the Raspberry Pi powers off, it will not automatically restart when power is applied again. But you can start the Raspberry Pi by pulling the GPIO3 pin (i.e., the SCL pin) low.
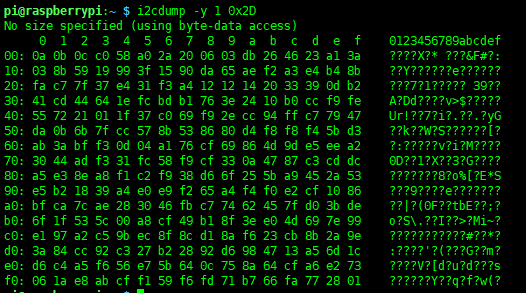
To detect I2C addresses, open the terminal and execute the following command.
i2cdetect -y 1
Among these, 0x43 is the address of INA219 and 0x2D is the i2c address of the MCU chip. Run the following instructions to check the register values. The 0x00,0x01,0x02 registers are 0x0a, 0x0b, 0x0c respectively.
After changing the value of the 0x01 register to 0x55, the MCU will start detecting the charging port after 30 seconds, and if there is an incoming call then pull the GPIO3 pin low to boot the Raspberry Pi.
Run the following command to set the 0x01 register to 0x55.
i2cset -y 1 0x2d 0x01 0x55
Note 1: The Raspberry Pi needs to be turned off immediately after setting 0x01 to 0x55, otherwise the incoming call power-on function cannot be enabled when the incoming call pulls the GPIO3 pin low.
Note 2: The incoming call power-on function has been added to the sample demo.