


- sales/support
Google Chat:---
- sales
+86-0755-88291180
- sales01
sales@spotpear.com
- sales02
dragon_manager@163.com
- support
tech-support@spotpear.com
- CEO-Complaints
zhoujie@spotpear.com
- Only Tech-Support
WhatsApp:13246739196
- Purchase/Shipping/Refund
WhatsApp:13424403025
Chapter 6 of KitiBot-Microbit: Running, KitiBot User Guide
Running, KitiBot
In the previous chapters we have learned how to control LED lights and buzzers. As we might presume, you will be eager to know how to control the car and make it move. In this chapter we'll learn how to do so!
Create a new project, click "Advance->Add Packages and input address: https://github.com/waveshare/pxt-KitiBot to add KitiBot software libraries. After adding, a KitiBot and APA102 classes will be added in blocks area
There are two motors on both sides of KitiBot, M1 and M2. This motor can control wheel to move forward or backward, control wheel's speed. With these motors, we could control KitiBot's movement.

Control motors
This block set motor speed, being range value from 0 to 255. 255 stands for faster wheel spin. -255 value represents the reversed wheel rotation (moving backwards) and 0 means stop

We make a simply program to control motors by A/B buttons.

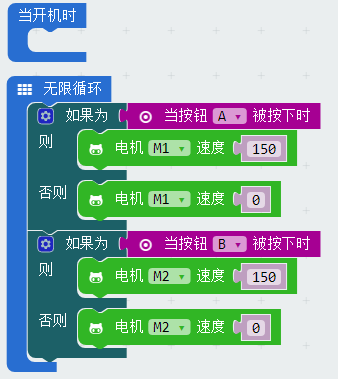
M1 motor is rolling when A is pressed until button is released. When B is pressed, M2 motor is rolling until button released. If you press A and B at the same time, both M1 and M2 are rolling.
Motion
When you run this program, KitiBot will move forward, backward, turn left, right and stop.
From the codes, we could know:
If both two motors move forward, the KitiBot will move forward;
If bot two motors move backward, the KitiBot will move backward;
If right motor moves forward and the left one stops or backwards, the KitiBot will turn left;
If left motor moves forward and the right one stops or backwards, the KitiBot will turn right;
If both motor stop, the KitiBot will stop.
Motion Block
This block can be used to control motion of KitiBot directly


Motion Block 2
This block is used to control Kitibot to move for some times, it has more a time parameter than the last one
