- sales/support
Google Chat:---
- sales
+86-0755-88291180
- sales01
sales@spotpear.com
- sales02
dragon_manager@163.com
- support
tech-support@spotpear.com
- CEO-Complaints
zhoujie@spotpear.com
- Only Tech-Support
WhatsApp:13246739196
- Purchase/Shipping/Refund
WhatsApp:13424403025
Raspberry Pi 10.1inch HDMI LCD (Old TFP401 Version) User Manual User Guide
Features
- 1024×600 high resolution
- Resistive touch control
- Compatible and Direct-connect with any revision of Raspberry Pi (except the Pi 1 model B or Pi Zero, which requires an HDMI cable)
- Raspbian/Ubuntu Drivers are provided (works with your own Raspbian/Ubuntu directly)
- Also works as a computer monitor, in this case, touch panel is unavailable and HDMI cable is required
- HDMI interface for displaying, no I/Os required (however, the touch panel still needs I/Os)
- Back light control to lower power consumption
Getting Started
Hardware Connection
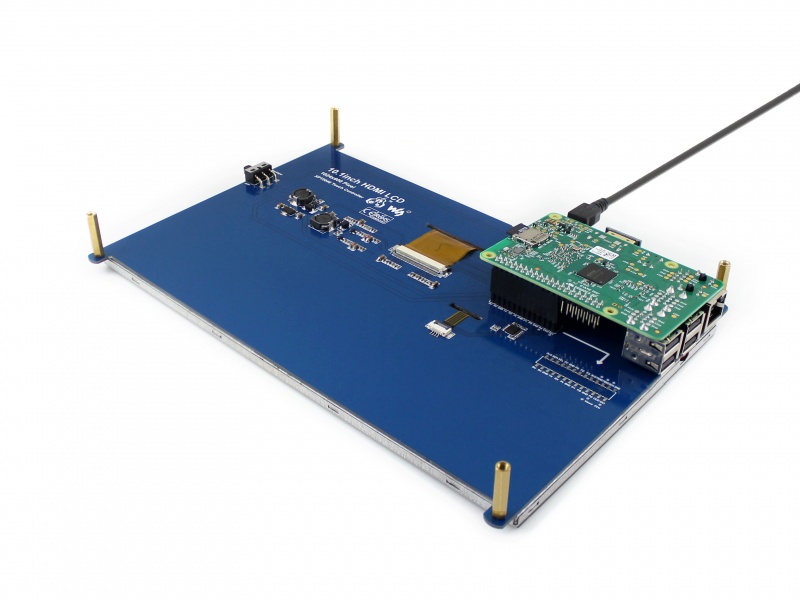
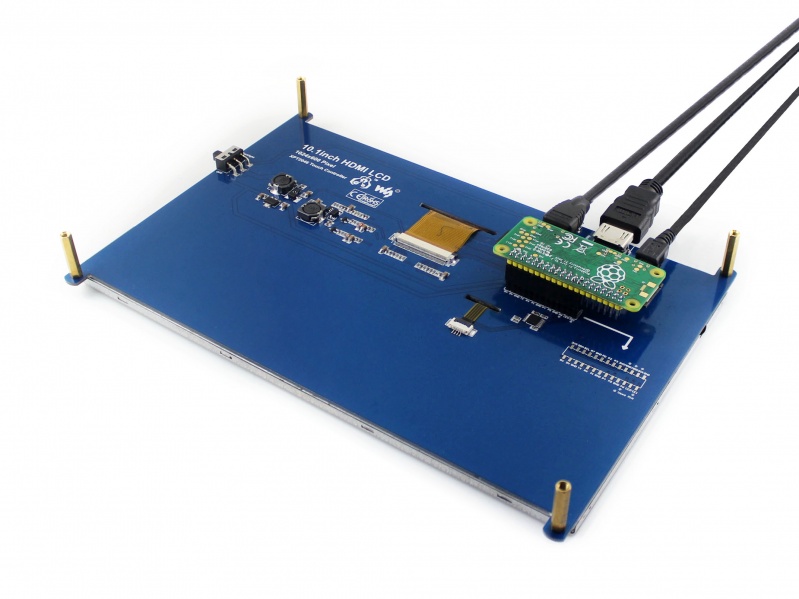
- Plug the LCD to your Raspberry Pi:
- There are 40 pins on Raspberry Pi Model A+/B+/2 B/3 B but only 26 pins on the LCD, so you should pay attention to connecting the pins to your Pi accordingly.
- Connect the HDMI Connector to both the HDMI interfaces on the LCD and the Pi.
- You should connect the LCD to Raspberry Pi Model B or Raspberry Pi Zero with an HDMI cable rather than an HDMI Connector.
- Turn on the "backlight" switch on the back of the LCD.
- There are 40 pins on Raspberry Pi Model A+/B+/2 B/3 B but only 26 pins on the LCD, so you should pay attention to connecting the pins to your Pi accordingly.
- You should connect the LCD to Raspberry Pi Model B or Raspberry Pi Zero with an HDMI cable rather than an HDMI Connector.
You can enable the touch in two ways: Method 1. install driver to your Raspbian/Ubuntu Mate OS. Method 2. use the Ready-to-use image file of which LCD driver was pre-installed.
Method 1. Driver installation
Description: The driver can be downloaded from github
git clone https://github.com/waveshare/LCD-show.git
1) Download the Raspbian / Ubuntu Mate image from Raspberry Pi website and extract it on a PC.
2) Connect your micro SD card to the PC and write the image to the card using Win32DiskImager. How to write an image to a micro SD card for your Pi? See RPi Image Installation Guides for more details)
3) Copy the LCD driver to the micro SD card (or copy the driver to the system of Pi using a USB drive).
4) Append the following lines to the config.txt file which is located in the root of the card:
max_usb_current=1
hdmi_group=2
hdmi_mode=87
hdmi_cvt 1024 600 60 6 0 0 0
display_rotate=2
If you use the LCD with Raspberry Pi 4B, you need to remove line dtoverlay=vc4-fkms-V3D from config.txt file
5) The LCD will display after booting up. Then open a terminal to install the touch driver which can be found in the /boot/ directory.
tar xzvf /boot/LCD-show-*.tar.gz
cd LCD-show/
chmod +x LCD101-1024x600-show
./LCD101-1024x600-show
Touch function will work after restart. For ease of use, you can set the screen orientation, see: #Screen orientation settings.
Method 2. Using Ready-to-use image
The image file with pre-installed driver is located in the IMAGE directory of the CD, or you can download it from #Image. Extract the .7z file and you will get an .img file. Write the image to your micro SD card (How to write an image to a micro SD card for your Pi? See RPi Image Installation Guides for more details). Then insert the card to your Pi, power up and enjoy it.
Screen orientation settings
After touch driver installed, the screen orientation can be set by these commands:
- 0 degree rotation
cd LCD-show/
./LCD101-1024x600-show 0
- 90 degree rotation
cd LCD-show/
./LCD101-1024x600-show 90
- 180 degree rotation
cd LCD-show/
./LCD101-1024x600-show 180
- 270 degree rotation
cd LCD-show/
./LCD101-1024x600-show 270
Touch screen calibration
- This LCD can be calibrated using a program called xinput_calibrator which can be downloaded from Xinput-calibrator_0.7.5-1_armhf
- Extract and copy the software Xinput-calibrator_0.7.5-1_armhf.deb to the Raspbian of your Pi.
- Install it with the commands:
sudo dpkg -i -B xinput-calibrator_0.7.5-1_armhf.deb
- Click the "Menu" button on the task bar, choose "Preference" -> "Calibrate Touchscreen".
- Finish the touch calibration following the prompts. Maybe rebooting is required to make calibration active.
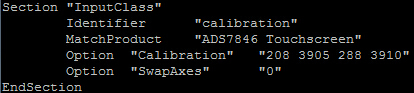
- You can create a 99-calibration.conf file to save the touch parameters (not necessary if file exists).
/ect/X11/xorg.conf.d/99-calibration.conf
- Save the touch parameters (may differ depending on LCD) to 99-calibration.conf, as shown in the picture:
Interface
| PIN NO. | SYMBOL | DESCRIPTION |
|---|---|---|
| 1, 17 | 3.3V | Power positive (3.3V power input) |
| 2, 4 | 5V | Power positive (5V power input) |
| 3, 5, 7, 8, 10, 11, 12, 13, 15, 16, 18, 24 | NC | NC |
| 6, 9, 14, 20, 25 | GND | Ground |
| 19 | TP_SI | SPI data input of Touch Panel |
| 21 | TP_SO | SPI data output of Touch Panel |
| 22 | TP_IRQ | Touch Panel interrupt, low level while the Touch Panel detects touching |
| 23 | TP_SCK | SPI clock of Touch Panel |
| 26 | TP_CS | Touch Panel chip selection, low active |